If you have defined the semantic layer, you can map it to the physical layer using the Assistant page. There, you can
Note If the New app experience setting is disabled, the menu item is called Semantic Assistant.
Automatically map the physical layer using Collibra AI
About the semantic mapping Collibra AI feature
Semantic mapping is a Collibra AI feature that helps data stewards map the semantic layer to other assets in Collibra. With semantic mapping, you don't need to manually map the assets.
Important This feature consumes Collibra Units.
In the Assistant page, the feature suggests Data Attribute assets for Column assets and creates relations when suggestions are accepted. The suggestions are based on defined criteria such as descriptions and selected data attributes. The mapping between the semantic and physical layers adds context, ensures consistency, and simplifies analysis by AI models.

- Once you have defined the Data Model with Data Entity and Data Attribute assets, you can start the semantic mapping process for a table or view (1).
- Semantic mapping guides you through a series of options to define the criteria that Collibra AI must take into account (2).
- The process collects the data (3) and sends a request to Collibra AI (4).
- When suggestions are available (5), they are shown (6).
You can then verify the suggestions and either accept or reject them. If you accept a suggestion, a "Data Attribute represents / is represented by Column" relation is created between the Column asset and the Data Attribute asset.
Important
Currently, semantic mapping works only when the table has less than 250 columns. If the table contains more than 250 columns, the mapping fails and no mapping results are available.
Start semantic mapping
Prerequisites
- The Semantic model generation feature is enabled.
- A semantic data model with Data Attribute assets has been defined.
- Preferably, Table and Columns assets have a description and have been classified.
- You have the required permissions.
- Ensure that your environment uses the latest user interface.
Steps
-
On the main toolbar, click
 , then
  Stewardship.
- Go to Semantic layer → Assistant.
If the New app experience setting is disabled, the menu item is called Semantic Assistant.
A page opens showing a data explorer on the left-hand side. The panel shows all available data sources in Collibra. - In the data explorer, complete the following steps to find the columns you want to link to Data Attribute assets.
- Expand the database and then the schema to show the available tables and views.
- Click the table or view to show the columns on the right-hand side.
- Click Map data attributes.
The Map data attributes dialog box appears.
By default, Collibra AI uses the descriptions of the columns and the related tables, views, schemas, and databases, and the accepted data classifications of the columns to create Data Attribute suggestions. - Define semantic model targets to limit the attributes from which Collibra AI can choose to make suggestions.
- Select at least one target: a data model, one or more data entities, or both.
- Use the Target data model drop-down list to filter the Target data entities list if needed.
- If you select only a data model, all attributes for all its data entities are considered.
- If you select a data model and specific data entities from that model, only attributes for those data entities are considered.
- If you select only the data entities, the attributes for those data entities are considered.
- Click Map.
The mapping process starts. Collibra AI analyzes the selected options and tries to make a suggestion for all columns in the table or view that aren't yet mapped to a Data Attribute.
If a Data Attribute is found, the suggestion is shown.
- You can follow up on the progress in the Activities page.
- Only one suggestion is provided per column.
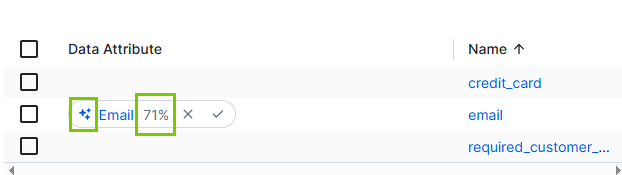
- The full name of the Data Attribute asset is shown as a link. You can click it to open the Data Attribute asset page. This full name can provide additional context when you verify the suggestions.
- The suggestion is marked with the Collibra AI icon.
- A similarity score, shown as a percentage, indicates how closely the Data Attribute information matches the column information analyzed by Collibra AI. This score can assist in verifying the suggestions.
If no Data Attribute is found, no suggestion is shown.
Important
Currently, semantic mapping works only when the table has less than 250 columns. If the table contains more than 250 columns, the mapping fails and no mapping results are available. - Verify the suggested Data Attributes.You can filter the visible Column assets by similarity score using the Data Attribute column. In the filter dialog box, use the Similarity score slider to show only suggestions with a score above a specific value.
You can then accept or reject the Data Attribute suggestions.
The Data Attribute asset and the Column asset aren't linked until you accept the Data Attribute suggestion.


Accept Data Attribute suggestions
You can accept suggested Data Attributes in the following ways.
- In the Data Attribute suggestion, click the Check icon.

- Select the checkbox for the columns for which you want to accept the suggestion and click Accept Data Attribute.
Use this method to accept suggestions for multiple columns in a single action.
When you accept a Data Attribute suggestion for a column:
- The similarity score and the Collibra AI icon are removed.
- The display name of the Data Attribute asset is shown.
- A Data Attribute represents / represented by Column relation is created between the Data Attribute asset and the Column asset. This relation has publicID DataAttributeRepresentsColumn.
Reject Data Attribute suggestions
You can reject suggested Data Attributes in the following ways.
- In the Data Attribute suggestion, click the x icon.
- Select the checkbox in front of the Data Attribute that you want to reject and click Reject Data Attribute.
Use this method to reject suggestions for multiple columns in a single action.
When you reject a Data Attribute suggestion for a column, the suggestion is removed.
- When you ran the semantic mapping, and you want to manually map a column afterward, the same target data model and entities as used during the automatic mapping are already selected in the dialog box. If both a data model and data entities were selected, only the data entities remain selected because the data model acts only as a filter in this case.
- Unaccepted suggestions generated by the Semantic layer AI agents are automatically removed from Collibra after 60 days.
Manually map the physical layer
Prerequisites
- A semantic data model with Data Attribute assets has been defined.
- You have the required permissions.
- Ensure that your environment uses the latest user interface.
Steps
-
On the main toolbar, click
 →
Stewardship.
→
Stewardship. - Go to Semantic layer → Assistant.
If the New app experience setting is disabled, the menu item is called Semantic Assistant.
A page opens showing a data explorer on the left-hand side. The panel shows all available data sources in Collibra. - In the data explorer, complete the following steps to find the columns you want to link to Data Attribute assets.
- Expand the database and then the schema to show the available tables and views.
- Click the table or view to show the columns on the right-hand side.
- For the column you want to map, double-click the Data Attribute cell.
A dialog box appears.When you ran the semantic mapping before, the same data model and entities used during the automatic mapping are already selected in the dialog box. If both a data model and data entities were selected, only the data entities are selected because the data model acts only as a filter in this case.
- Select one or more Data Attribute assets from the Data attribute drop-down list.
You can limit the available data attributes by filtering by data models or data entities. - Optionally, select the checkbox Apply to all visible rows to automatically map all columns to the selected Data Attributes.
- Click Save.
- The columns are linked to the data attributes with the Data Attribute represents / represented by Column relation.
- You can also see the connected Table and Column assets through the Semantic layer widget in the asset page and in the Semantic Models overview.

You can see the connected assets for Tables and Columns through the Semantic layer widget in the asset page and in the Data models overview.