Create a Pushdown job
| Step | Description | Required? |
|---|---|---|
| 1. Select the data to monitor | Select a table from Monitoring Overview, then create a job on it. |
|
| 2. Add monitors | Select the data quality monitors to apply to your job. |
|
| 3. Set a run schedule | Schedule a job to run automatically at a specified frequency. |
|
| 4. Add notifications | Configure notifications to send to job owners when a job:
|
|
| 5. Review and run | Review the SQL query or JSON payload, then save and run your job. |
|
Prerequisites
- The Data Quality Pushdown Processing Edge capability is enabled for your data source.
- You have a global role with the Product Rights > Data Quality global permission and the following permissions based on the actions you want to perform:
- If you want to use notifications, ensure that the users who need to receive notifications have a Collibra user account.
| Action | Role and permission requirement |
|---|---|
| Create a job | You have the Data Quality Editor or Data Quality Manager resource role with the Data Quality Job > Create resource permission. |
| Schedule a job | You have the Data Quality Editor or Data Quality Manager resource role with the Data Quality Job > Schedule resource permission. |
| Run a job | You have the Data Quality Editor or Data Quality Manager resource role with the Data Quality Job > Run resource permission. |
Steps
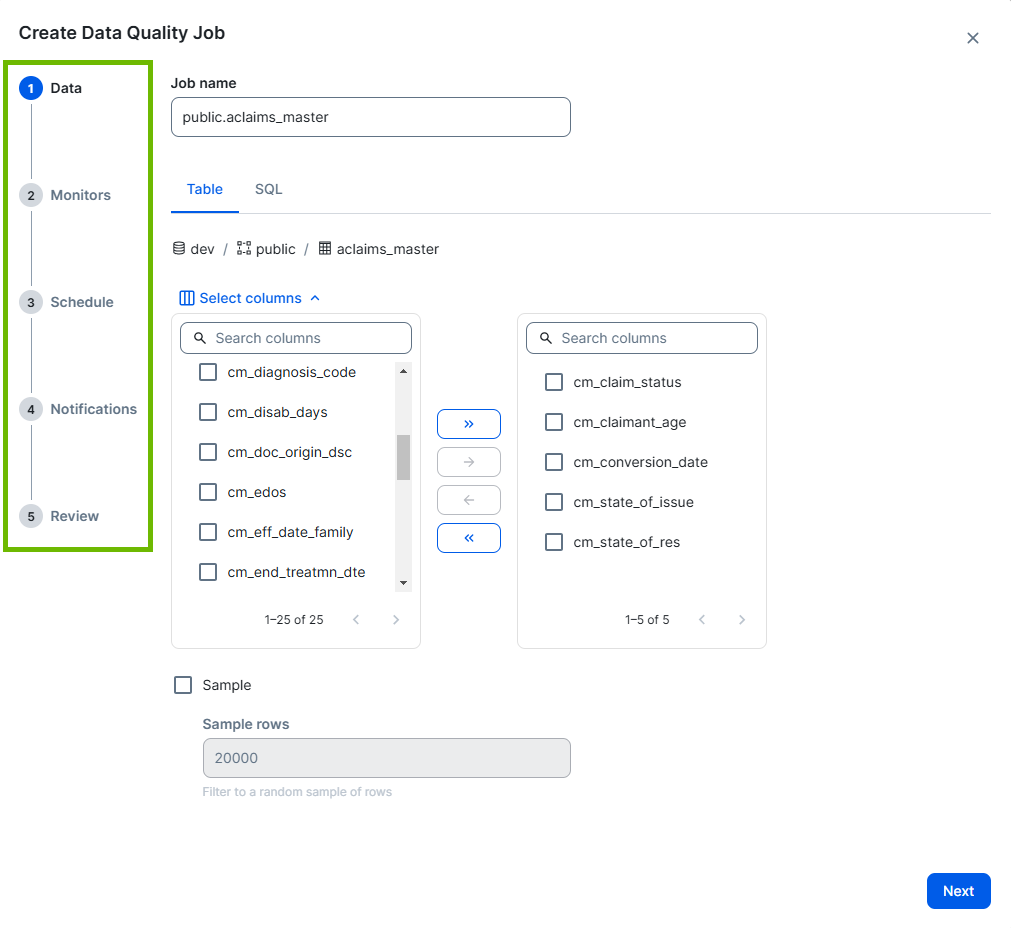
1 Select the data to include in the scan
- Optionally, give your job a unique name in the Job Name field. The Job Name cannot contain special characters, other than -._.
- Optionally, select the method you want to use to define your data:
- Table (default): This no-code option allows you to configure the following:
- Columns: Include only specific columns from the selected table in your job. By default, all columns in your table are included in the job. If you want to run a job on the entire table, you do not need to change the default column selections. To include only specific columns, click Select columns and follow the steps in the "Show steps" section below.
- Select the checkbox option next to the columns you want to remove from your job in the right pane.
- Click
 to move the selected columns from the right pane to the left pane and remove the columns from your job.
 - Optionally, click
 to move any selected columns in the left pane back to the right pane to include them in your job.
 Sample: Filter to a random sample of rows. Select Sample, then enter a specific value in the Sample rows field to include that number of rows in the sample.
Filters: Restrict the data to a specific subset of rows relevant to your use case. Click Select columns and follow the steps in the "Show steps" section below.
- =: Equal to
- !=: Not equal to
- >: Greater than
- >=: Greater than or equal to
- <: Less than
- <=: Less than or equal to
- View the row count distribution of the date column you selected for your time slice as a chart.
- View the row count distribution of the date column you selected for your time slice as a table. You can click
 to switch to the table display.
 - Select an option from the drop-down list to display the distribution in days, weeks, or months.
- Click any of the bars in the chart to apply your selection to the start date.
Show stepsNote When there are more than 50 columns in your table, the pane is paginated.
Tip When there are multiple available columns to select in one of the panes, you can select all columns you want to move to the other pane, then click
 or
or  to move them in bulk.Show steps
The Filter by option allows you to filter the data of a subset of rows in a given column. This option ensures that your job evaluates only rows relevant to your specific use case. For example, you can use this option to filter data based on a particular region, such as North America, or only trade dates on or after a certain date.
The following table shows the available options for the Filter by option.
Option Description Column to filter The column in your data where rows are filtered based on your specifications. Convert to date data typeTransforms a column from a non-date format to a synthetic date column. You can use this option when your date column is not in YYYY-MM-DD format.
Using your data source’s SQL syntax, enter SQL to cast the date column into a date format. For example,
TO_DATE([column], ‘YYYY-MM-DD’)Operator The symbol that specifies the action performed by the SQL query on one or more expressions.
The available operators are:
Show distributionWhen you click Show distribution, you can do the following after the distribution loads.
Note This display option is selected by default. When the table display is selected, you can click
 to switch back to the chart display.
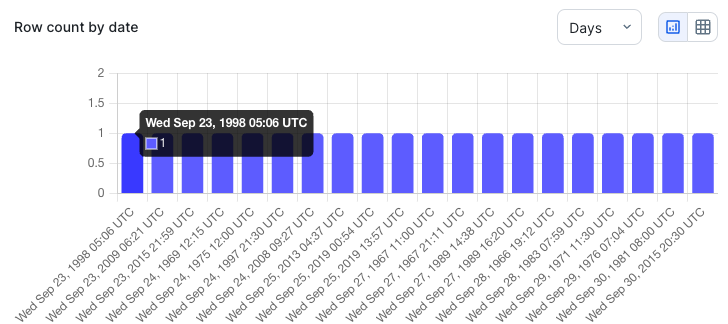
- SQL: This method allows you to customize your job SQL query. You can use joins with other tables in the data source when needed.
- Update the default query in the editor as needed.
- Click Validate SQL to check whether the query uses the correct syntax.
Note This option is intended for users familiar with SQL syntax. - Table (default): This no-code option allows you to configure the following:
- Click Next.
The Monitors step opens.
Note The Job Name field uses a default name, following a schemaName.tableName_number format. A number at the end of the name, such as schemaTest.tableExample_2, indicates that another job called schemaTest.tableExample already exists.
2 Add monitors
After selecting the data to include in the scan, you need to add monitors to your job. All jobs include data type and schema change checks.
- Data type
- Schema evolution
- Row count
- Uniqueness
- Null values
- Empty fields
- Optionally, select Allow descriptive statistics in profiling to show the results of checks for min, median, max, Q1 and Q3 values from numeric columns in the UI.
- Select the monitors to include or exclude in your job.
- Optionally, click
 Advanced, then click and drag the sliders or enter a value in the fields to configure the settings.
 - Click Next.
The Schedule step opens.
Warning Allowing descriptive statistics in profiling may include sensitive values if they are present in the columns you include in the scan.
| Monitor | Description | Default on? |
|---|---|---|
| Row count | Tracks changes to the total number of rows. |
|
| Uniqueness | Tracks changes in the number of distinct values across all columns. |
|
| Null values | Detects changes in the number of NULL values in all columns. |
|
| Empty fields | Detects changes in the number of empty values in numeric columns. |
|
| Min value | Detects changes in the lowest value in numeric columns. |
|
| Mean value | Detects changes in the average value in numeric columns. |
|
| Max value | Detects changes in the highest value in numeric columns. |
|
| Execution time | Tracks changes in the execution time of the data job. |
|
Note If you do not change the default options, row count, uniqueness, and null and empty values monitors will be included in your job.
| Setting name | Description | Default setting |
|---|---|---|
| Data Lookback | The number of runs to train the adaptive monitoring for expected values. | 10 (runs) |
| Learning Phase | The minimum number of runs to train the adaptive monitoring before it can begin to suggest if the adaptive rules are breaking or passing. | 4 (runs) |
3 Set a run schedule
Scheduled jobs run only on the current date (if included in the job’s schedule) and future scheduled dates. Jobs scheduled for dates before the current date do not run retroactively.
For example, if a job is scheduled to run on the 15th of every month at 14:00 UTC and the job schedule is activated on January 16, the next run will be February 15 at 14:00 UTC, not retroactively on January 15 at 14:00 UTC.
If a service disruption occurs on the day a job is scheduled to run, the job runs once the service is restored, even if the scheduled run time has already passed. For example, a job scheduled for January 15 at 14:00 UTC will run at 19:00 UTC if the service is restored at that time.
- Select the automated run frequency of the job from the Repeat drop-down list. The available options differ depending on the selected Repeat option.
- Optionally, configure a run date end, run date format, and run date offset.
- Optionally, click Advanced. The Run date and Run date format settings expand when you select Never as the Repeat option. Otherwise, the Run date offset and Run date format settings expand.
- Click
 in the Run date field and select a new date and time.
 - Select a Run date format option.
- Select an option from the Run date offset drop-down list.
- Optionally, include a time slice to run the job on a moving subset of time, or enable back runs to start job runs on historical data.
- View the row count distribution of the date column you selected for your time slice as a chart.
- View the row count distribution of the date column you selected for your time slice as a table. You can click to switch to the table display.
- Select an option from the drop-down list to display the distribution in days, weeks, or months.
- Click any of the bars in the chart to apply your selection to the start date.
- Click Next. The Notifications step opens.
| Repeat options | Description | Run start options |
|---|---|---|
| Never |
Your job doesn't run automatically along a schedule. No additional Repeat configuration is required. Note When you select Never, the job runs only once, when you initiate the job run. |
Run date end
The run date end defaults to the current date, but you can select a past date to run your job on historical data. |
| Hourly | Your job runs every hour, at the minute you set in the Run start minute option. |
Run start minute Enter a value between 00 and 59 in mm format, or click |
| Daily | Your job runs every day, at the time you set in the Run start time option. | Run start time
Enter a value between 01:00 and 12:59 in hh:mm format, or click Note Because run start time uses a 12-hour clock, you need to select AM or PM from the |
| Weekly on | Your job runs every week, on the day(s) of the week and time you set in the Run start time option. | Run days
Select one or more days on which you want your job to run automatically at the designated run start time. Run start time Enter a value between 01:00 and 12:59 in hh:mm format, or click Note Because run start time uses a 12-hour clock, you need to select AM or PM from the |
| Weekdays | Your job runs every day, except Saturday and Sunday, at the time you set in the Run start time option. | Run start time
Enter a value between 01:00 and 12:59 in hh:mm format, or click Note Because run start time uses a 12-hour clock, you need to select AM or PM from the |
| Monthly | Your job runs every month, on either the first or last day of the month, or the calendar day number and time you set in the Run start time option. |
Run day Select a day of the week on which you want your job to run automatically at the designated run start time. You can use the drop-down list to run your job monthly, on the first or last day of the month you select. Alternatively, you can select a specific date from the Day number drop-down list to run your job every month on a fixed date. Run start time Enter a value between 01:00 and 12:59 in hh:mm format, or click Note Because run start time uses a 12-hour clock, you need to select AM or PM from the |
| Setting name | Description | Default setting |
|---|---|---|
| Run date end |
By default, a run date end is the date when a job is created. However, you can set a past date to run a job on a historical date. Optionally, set a run date end if you configure your job to never repeat runs automatically. Important This option is only available when you set Repeat to Never. However, all jobs have a run date. For more information, go to About run dates.
|
Current date |
| Run date format |
Select whether the run date is a datetime or timestamp format, such as YYYY-MM-DD HH:MM or Wed Sep 23, 1998 05:06 UTC, or a traditional date format, such as YYYY-MM-DD. |
Datetime or timestamp |
| Run date offset |
Allows jobs to run on data from a time range other than the scheduled date. It dynamically defines the date inserted into your job query as the run date ( For example, to use the last day of the previous month as the run date, select Last of previous month from the drop-down list. This configuration inserts the last day of the previous month into your job query as the Example If the current month is January and you select Last of previous month as the run date offset, the new run date is set to December 31. The options correspond to your selection in the Repeat option. For example, if you select Monthly in the Repeat option, the Run date offset options reflect a monthly cadence. Note This option is not available when the Repeat option is set to Never. |
Scheduled date |
| Option | Description |
|---|---|
| Time slice |
A time slice filter is a dynamic filter that scans a range of dates or times to include in a job run. It allows you to perform incremental job runs on data over a moving subset of time. Time slice uses the current time stamp as your run date to isolate the latest time slice data from your table and runs a job on that portion for that day. For example, a run from the previous day checks for yesterday's date and groups it as a time slice. As long as a column that includes today's date exists in the table, a run from the current day will create a time slice for today's date and include it in the run. Note
Enter a number greater than 0, then use the time slice drop-down list to change the time slice to hours, weeks, or months. If you skip this step, the time slice format defaults to days. |
| Date column | A column in your data with a date or date time format. The date column is used as the run date (rd) in your job's SQL query. |
|
Convert to date data type
|
Transforms a column from a non-date format to a synthetic date column. You can use this option when your date column is not in YYYY-MM-DD or YYYY-MM-DD HH:MM:SS date time format. Using your data source’s SQL syntax, enter SQL to cast the date column into a date format. For example, |
| Back runs |
Back runs allow you to create one historical job run for each interval of the selected time bin. For instance, to create a monthly back run for a certain number of past months, set the back run value to the number of months for which you want historical data and select Months from the time bin drop-down list. Example To create one back run for each of the last 5 months, set the back run value to 5 and the time bin to Months. When you select this option, the back run value field, time bin drop-down list, and Show distribution button appear. Enter a number greater than 0 in the back run value field, then select an option from the time bin drop-down list to change the back run grouping to days, months, or years. |
|
Show distribution
|
When you click Show distribution, you can do the following after the distribution loads. Note This display option is selected by default. When the table display is selected, you can click
|
4 Add notifications
- Select the notification options.
- Optionally, in the Global custom message input field, enter a custom message to include with each notification.
- Optionally, switch on Individual custom messages in the upper-right corner, and enter a unique message for each applicable notification option.
- Click the Recipients drop-down list and select a user to add them to the list of recipients, or click
 to the right of a recipient's username to remove them.
 - Click Next. The Review step opens.
| Notification option | Sends a notification to the specified recipients when... | Default on |
|---|---|---|
| Job failed | Your job does not complete a run. |
|
| Job completed | Your job completes a run. |
|
| Rows <= |
The number of rows is less than or equal to the value you set. Enter a value greater than 0. |
|
| Runs without data >= |
The number of runs where your job contains no data are greater than or equal to the value you set. Enter a value greater than 0. |
|
| Days without data >= |
The number of days without data is greater than or equal to the value you set. Enter a value greater than 0. |
|
| Score <= |
The data quality score is lower than or equal to the value you set. Enter a value between 0 and 100. |
|
| Run time minutes > |
The run time of your data exceeds the value you set, in minutes. Enter a value greater than 0. |
|
Note When individual custom messages are enabled, they override the global custom message.
Note The drop-down list of users includes all active users in Collibra.
Note To configure your personal notification settings, see Manage a profile. To configure your global default notification settings, see Notifications admin settings.
5 Review and run
The review step provides a summary of the settings of your job.
- Review the SQL query or JSON payload.
- Optionally, configure the compute resourcing.
- Optionally, click Advanced. The Connections and Threads settings expand.
- In the Connections option, click and drag the slider or enter a value between 1 and 50 in the field. The default setting is 10.
- In the Threads option, click and drag the slider or enter a value between 1 and 10 in the field. The default setting is 2.
- Click Save and run now. The job is submitted to the jobs queue and appears in the Job column of its table of origin in the Monitoring Overview page.
- When a user creates a job, they are automatically granted the Data Quality Manager resource role for that job. This is to allow the job creator to grant other users access to the job and perform job management activities.
- If information is incorrect or missing, such as an incorrect data type in a date column, clicking Save and run now returns you to the step with the issue. You must resolve it before you can run the job.
Note The code under the Query and JSON tabs is a read-only preview of your job query.
| Setting name | Description | Default setting |
|---|---|---|
| Connections |
Refers to the number of simultaneous connections to the database. While increasing the number of connections can improve the processing speed of a job, it can also impact compute resourcing. |
10 (connections) |
| Threads | Refers to the number of concurrent threads for the job. While increasing the number of threads can improve the processing speed of a job, it can also impact compute resourcing. | 2 (threads) |
You can open the Job Details page via the Monitoring Overview page. While the job runs, you will see a "Running" status on the Job Details page and
You can now review the details of your Data Quality Job on the Job Details page.