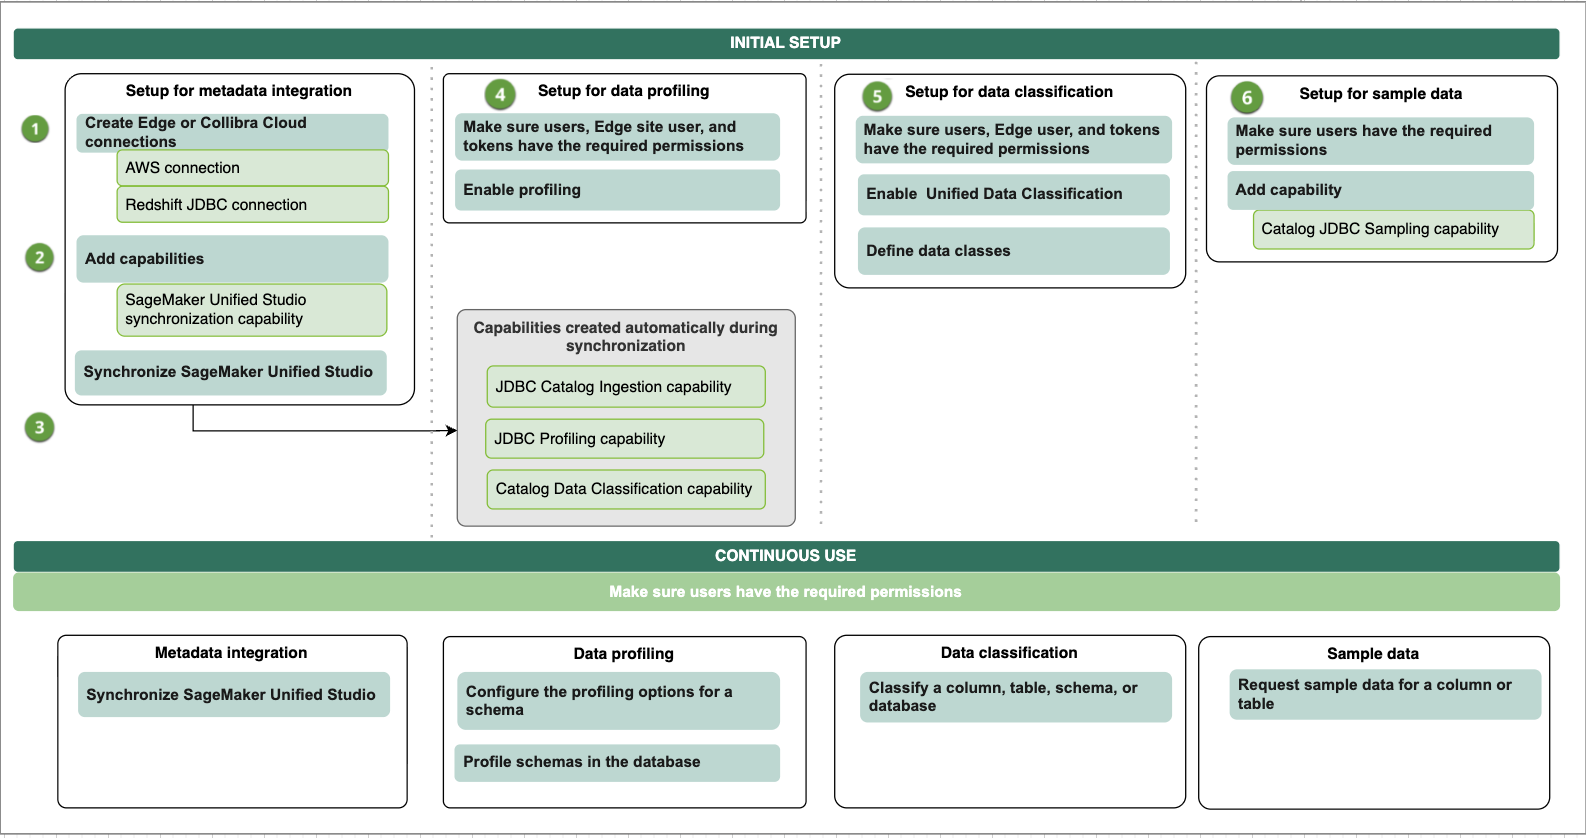
Complete the listed steps to integrate SageMaker Unified Studio via Edge. You can choose to integrate metadata only or integrate metadata, profile and classify data, and request sample data.
Tip
| No. | Step | Description |
|---|---|---|
| 1 | Create the required connections. | |
|
1a
|
Create an AWS connection to your Edge or Collibra Cloud site. | Creates a connection to Amazon SageMaker in an Edge or Collibra Cloud site. |
|
1b
|
Optionally, create a JDBC connection for Amazon Redshift. |
Creates a JDBC connection to Amazon Redshift in an Edge or Collibra Cloud site. Create a Redshift JDBC connection only if you want to profile and classify the integrated data. If you created a Redshift JDBC connection previously, you can use that JDBC connection. Note Create a JDBC connection for each database you want to integrate. |
|
2 |
Add the SageMaker Unified Studio synchronization capability to your Edge or Collibra Cloud site. | Adds the SageMaker Unified Studio data catalog capability to the AWS Edge connection. The capability allows you to retrieve data from SageMaker Unified Studio. |
| 3 | Synchronize metadata from SageMaker Unified Studio. |
You can manually synchronize SageMaker Unified Studio or add a synchronization schedule to automatically synchronize it. When the synchronization is completed, assets are available. If you want to profile and classify the integrated data, and request sample data, on the synchronization page, add all JDBC connections for the databases you want to integrate, and synchronize SageMaker Unified Studio again. This is not supported if you select AWS Glue as the data source. The synchronization process automatically creates the Catalog JDBC ingestion, JDBC profiling, and Catalog Data Classification capabilities if they do not already exist. After this synchronization, the Profiling tab is available on the Database asset page. |
| 4 | Optionally, set up and configure data profiling. | Goes through the required permission and steps to prepare Edge and Collibra to profile columns in SageMaker Unified Studio. |
| 5 | Optionally, enable and set up Unified Data Classification. | Goes through the required permission and steps to prepare Edge and Collibra to classify columns in SageMaker Unified Studio via the Unified Data Classification method. |
| 6 | Optionally, set up and configure the use of sample data. | Goes through the required permissions and steps to prepare Edge and Collibra to show sample data for columns in SageMaker Unified Studio. |
| Result |
Users with the correct permissions can now configure the profiling options and profile the data, automatically classify the data, or request sample data. |
|
Integration workflow
The following graphic shows the process of integrating SageMaker Unified Studio, profiling and classifying the data, and requesting sample data (in preview).