If Guided Stewardship is enabled in an environment, data stewards can benefit from the automatic Data Category association process. This process automatically creates a relation between a Column asset and a Data Category asset based on the classification of the column.
About the automatic Data Category association process
If Guided Stewardship is enabled in an environment, the automatic Data Category association process works as follows:
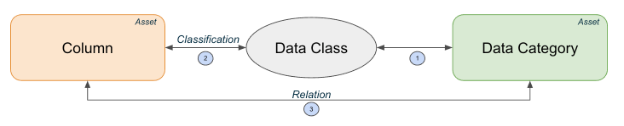
- Create Data Category assets and connect data classes with the Data Category assets.
You can do this via the Data Classification page or from the Data Category asset page.
You can link up to 100 Data Category assets to one data class. You can link multiple data classes to one Data Category asset. - Classify the columns and accept the classification manually or automatically.
The tool works for both the manual and automatic data classification, as long as data classes are defined in Collibra and the data classification is accepted. - For columns with a data classification that is linked to a data category, a relation is automatically created between the Column asset and the Data Category asset.
This way, through Data Classification, you can create a list of the columns that contain specific data categories, such as PII.
Important considerations
- If you have enabled the automatic acceptance and rejection feature, the automatic association process can slow down the data classification duration. This is because, when the process accepts a data class, Collibra also creates the required relations.
While you can always edit a classification, enabling the automatic acceptance of classifications removes a step in your ability to confirm their accuracy, including the accuracy of, for instance, a personal data (PII) classification. - If you remove the classification or link between a data class and a Data Category asset, Collibra also removes the relation between any columns and the related data category. Similarly, if you delete an asset or data class, Collibra cleans up any existing relations.
- The automatic creation of relations generates a background system job that is performed by the system. Only administrators can follow up on the progress via the Activities page in the Collibra General settings.
Required permissions for automatic Data Category association
|
Action |
Global Permission (*) |
Resource Permission (**) |
View permission |
|---|---|---|---|
| Connect a data class with a Data Category asset from the Data Classification page or the Data Category asset page. |
Product rights > Catalog. Product rights > Guided Stewardship. Classification > Data Classes > Update. |
Asset > Attribute > Add on the Data Category asset. |
|
| View the connections between data classes and Data Category assets in the Data Classification page or the Data Category asset page. |
Product rights > Catalog. Product rights > Guided Stewardship. Classification > Data Classes > Read. |
View permission on the Data Category asset. |
(*) As a user, you need a role that has these global permissions.
(**) As a user, you need a role that has these resource permissions.
Example | Automatic Data Category association
Prerequisites
- You have registered columns in Data Catalog.
- You have created Data Category assets.
- You have set up an automatic data classification method and have defined data classes in that method.
- Optionally, you have enabled the automatic classification acceptance and rejection feature.
Scenario
You have registered a column called “pem” that contains customer email addresses. You have also created a Data Category asset called “Personal Identifiable Information”. You have set up Data Classification and have imported the out-of-the-box data class “Email”. You have enabled the automatic classification acceptance feature in the classification settings.
Steps
- Link the data class with the Data Category asset.
-
On the main toolbar, click
 , then
  Stewardship.
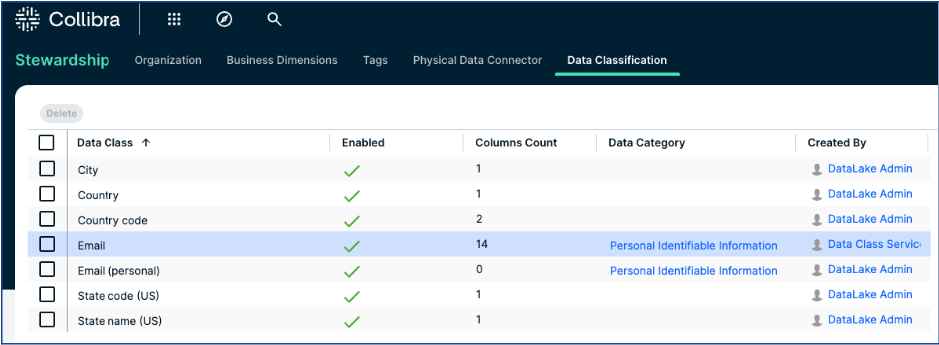
- Go to Data Classification → Data classes.
- For the “Email” data class, double-click the Data Category cell in the table.
- Select the “Personal Identifiable Information” Data Category asset and confirm your selection.
-
On the main toolbar, click
-
Start the data classification process.
-
Open the “pem” asset page.
-
Click Classify.
When the classification job is completed, the “pem” column is classified as “Email” and automatically accepted by the automatic classification acceptance feature.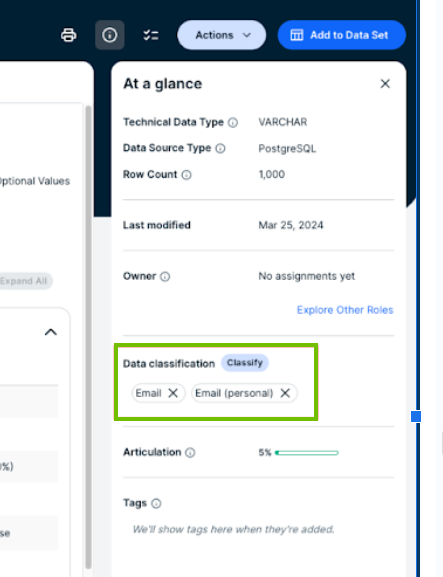
A relation is also automatically created between the column and the data category.
-
-
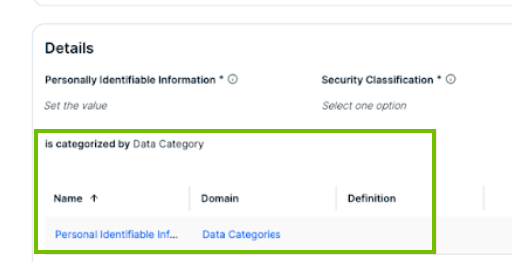
Refresh the “pem” asset page and check that an “is categorized by data category” relation is available between the asset and the “Personal Identifiable Information” data category.
Connect data classes to data categories