Managing Maestro agents (in preview)
Admins can create, edit, and delete custom Maestro agents from the Agents page in Maestro Studio. The Agents page shows all custom Maestro agents that you are responsible for in the environment.
Create a custom Maestro agent
You can create a custom Maestro agent from scratch or start from a Collibra-provided template.
Prerequisites
- Maestro Studio is enabled in your environment.
- You have a global role with the following global permissions:
- Maestro Studio
- Manage My Agents
Steps
-
On the main toolbar, click
 →
Maestro Studio.
→
Maestro Studio.
The Agents page opens. There are 2 tabs on this page. The Your agents tab shows all custom Maestro agents that you own or are shared with you in this environment. The System tab shows the agents that are provided and maintained by Collibra. - To create an agent, you can either:
- Click Create Agent or select the dropdown and click Create from a template.
A wizard-based agent builder opens.- Complete all the steps in the builder. The agent is saved as a draft whenever you click Save or go to another step.
For details on each step in the builder, go to the respective step information.
- Complete all the steps in the builder. The agent is saved as a draft whenever you click Save or go to another step.
- From the button dropdown click Create from a template.
The template selection wizard opens.- Select the agent template you want to use.
- Click Create.
An agent is created as a draft. You are automatically directed to the new agent's page. - Click into any field to edit the content.
- Click Create Agent or select the dropdown and click Create from a template.
- Click Submit for Review in the Summary tab when the agent is ready to be published.
When you submit an agent for review, the status is updated to Pending Review and notifies the users with the Publish Agents permission.
Manage a custom Maestro agent
Prerequisites
- Maestro Studio is enabled in your environment.
- You have a global role with the following global permissions:
- Maestro Studio
- Manage My Agents
- You own the Maestro agent.
Steps
-
On the main toolbar, click
→
Maestro Studio.
- Go to Agents.
The Agents page opens. This page shows all custom Maestro agents in the environment you are responsible for. - Click the name of the agent you want to update.
The Agent details page opens. - Edit the agent in one of the following ways:
- Click directly into the field you want to update and make the changes.
- Click Edit to open the wizard-based agent builder and review or update any or all steps. For details on each step in the builder, go to the respective step information.
- Once finished you can:
- Click Save to save your changes as a draft.
- Click Submit for Review in the Summary tab if the agent is ready to be published.
- Click Cancel to go back without saving any changes.
- To duplicate or delete the agent, click the More icon and select Duplicate or Delete.
Export a custom Maestro agent
You can export a custom Maestro agent as a YAML file. You can use the exported file to import the agent into another environment or to create a copy of the agent in the same environment.
Note The YAML file contains the agent configuration, including its handle, instructions, knowledge base references, and tools. It does not include the knowledge base content itself.
Prerequisites
- Maestro Studio is enabled in your environment.
- You have a global role with the Manage My Agents or Manage All Agents global permission.
Steps
-
On the main toolbar, click
→
Maestro.
- Go to Agents and click the name of the agent you want to export.
The agent details page opens. - Click
 More and select Export.
A YAML file is downloaded to your computer. The file is named agent-{handle}-{date}.yaml.
Import a custom Maestro agent
You can import a custom Maestro agent from a YAML file that was previously exported from Maestro Studio.
Prerequisites
- Maestro Studio is enabled in your environment.
- You have a global role with the Manage My Agents global permission.
- You have a YAML file exported from Maestro Studio.
Steps
-
On the main toolbar, click
→
Maestro Studio.
- Go to Agents.
- Click Import agent.
A file browser opens. - Select the YAML file and click Save.
If the import is successful, a confirmation message appears and the agent is added to the Agents page with a Draft status. If the agent handle already exists in this environment, the import fails with the error An agent with this handle already exists. To resolve this, open the YAML file in a text editor, update the handle value to a unique name, save the file, and try again.
Maestro agent builder
The wizard-based agent builder allows you to update every component of a custom Maestro agent.
Basic information
In the Basic information step, you define the identity of the custom Maestro agent.
This information is visible to data consumers in Maestro Assistant.

-
Agent name
The name of the agent. This name is visible to data consumers when they interact with the agent.- You can add up to 255 characters.
- This is a required field.
-
Handle
The handle is a quick-access identifier that data consumers can use to reference the agent and indicate that they want it to respond in a chat dialog box.- The handle is automatically generated from the Agent name you enter. You can edit it manually if you want a different value.
- The handle must be unique. No other agent can use the same handle in the environment.
- You can add up to 50 characters, limited to alphanumeric characters and the underscore (_) character.
- You don't need to type the @ in the input field. The @ is added by default.
For example, To define the handle @SalesAI, type SalesAI in the Handle field. - The handle can be called only from Maestro Assistant, not from other features, such as comments or workflows.
- This is a required field.
- Description
The description of the agent. This description is visible to data consumers when they interact with the agent.- You can add up to 1,000 characters.
- No formatting options are available.
- This is a required field.
- You can click the AI assist button to get help when you create the description. Collibra AI considers the agent name and handle to create a draft of the description. The button appears only if you have completed the Agent name and Handle fields. This feature consumes Collibra Units.

Agent instructions
In the Agent instructions step, you provide the agent with interaction details to ensure its autonomous decisions remain aligned with specific business logic and quality standards. In the instructions, you can specify the agent's role, persona, responsibilities, and tone, defining how the agent responds to prompts. You can also include guardrails such as core operating principles, governance or security protocols, and task-specific instructions. These instructions are part of the context provided to the agent with every chat interaction.
- You can add up to 16,000 characters.
- This is a required step.
- You can ask Collibra AI for assistance when you create the instructions. Collibra AI considers the basic information you provided to create a draft of the instructions. The AI assist button appears only if you have completed the Description field in the Basic information step.
Tip Instructions that are too restrictive can interfere with the knowledge base and tools you define in later steps. Make sure the instructions are broad enough to allow the agent to perform its intended tasks.
Tools and knowledge
In the Tools and knowledge step, you select which tools and knowledge base views are available to your agent to answer questions or complete tasks. This is an optional step. However, without at least a knowledge base or tool, the agent has no data to pull from.
Agent tools
Select which tools are available to your agent to answer questions or complete tasks.
You get a list of tools to which you have access, such as Get Asset Details and List Asset Types. For each tool, a name and description are available.
For all information about these tools, go to About Maestro agents (in preview).
Knowledge base
Switch on the Knowledge base toggle to select which Collibra views the agent can access. The content of these views is loaded into the agent’s context as the core knowledge base. The agent consults this context before using any selected tools to search or retrieve additional information. The toggle is off by default. When enabled, selected sources are added to every request, regardless of whether the question requires them.
Tip This option is best suited for specialized agents scoped to a single asset view that always need that asset’s context. If your agent may need to look up any asset on the platform, use the search tool instead.
Note Agent owners should have access to any knowledge bases associated with the agent. Without access, the knowledge base content won’t be visible to them.
- An agent context has a fixed capacity of 400,000 tokens. The Context window limit progress bar in the top corner shows how much of that capacity is used by the selected views.
- You can select views from the Organization tree or from the Applications tree.
- Organization means you can select views within communities and domains.
- Applications means you can select views specific to applications in your environment to which you have access, for example the Stewardship application.
To define the knowledge base:
- On the Tools and knowledge step, switch on the Knowledge base toggle.
- Open the Context drop-down list and select Organization or Applications.
Based on your selection, the Organization or Applications drop-down list appears. - Select the organizations or applications you want to select views from.
You can select multiple organizations or applications.
As soon as you select items from the drop-down list, the Sources table appears, showing the relevant views you can select. - Select the views you want the agent to reference.
You can sort and filter the views in the table.
The context progress bar indicates the percentage of the available capacity that is used. Hover over the information icon to see the actual number of tokens allocated.
Maestro test
In the Maestro test step, you validate the behavior of the custom Maestro agent before publishing it to the wider organization.
You can preview the agent and test it by starting a conversation. If you aren't getting the expected results, go back and edit the knowledge base, tools, and instructions.
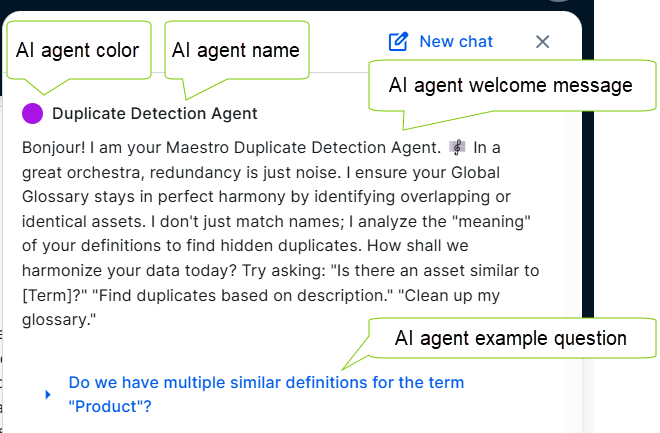
At this point, you also define the Agent calling info, such as a welcome message, at least one example question, and an identifying color for the agent to be used in the Maestro Assistant dialog box.
- Select a color
A color that represents the agent in overview pages and the Maestro Assistant dialog box.- Enter the desired color code or select a color by selecting the color icon and choosing a color.
- A suggested color is assigned automatically.
- You can't select #72bf00 green because this color is reserved for the Maestro Assistant agent.
- This is a required field.
- Welcome message
The default message that data consumers get from the agent when they start a chat with it.- Use the welcome message to set user expectations.
- You can add up to 500 characters.
- This is a required field.
- Example questions
Example questions help users understand the types of queries, questions, or tasks they can ask, and allow them to click a question to see how the agent responds. These questions appear as clickable links in the Maestro Assistant dialog box when the agent is loaded.- You can add up to 4 example questions.
- You can add up to 255 characters per question.
- This is a required field. You must add at least 1 example question.
Access
In the Access step, you define who can interact with the agent from the Maestro Assistant dialog box and who can manage it. By default, the agent is available to its creator only.
-
Sharing and visibility
Publish the agent to the wider organization or limit the agent availability to specific groups. The available options are:- Only me (default)
- Everyone
- Specific roles, groups, or users
Select the required values from the respective drop-down lists.
Note Standard view permissions on the community or application are always checked in addition to the Sharing and visibility access. For example, if a data consumer doesn't have access to Stewardship, they never have access to an agent's context that is connected to the Stewardship application, even when Sharing and visibility is set to Everyone.
-
Ownership
Define who can view the agent on the Agent page in Maestro Studio and manage its details. The creator is always an owner. You can add additional owners to ensure visibility and continuity.The available options are:
- Only me (default)
- Specific owners
Select the required users from the respective drop-down lists. If you select a user who doesn't have access to the defined context, an error message appears.
Summary
The Summary step gives you a high-level overview of the agent.
If one or more steps are not completed, an error is shown in the Summary step.
When the agent is ready to be published, click Submit for Review.
The agent status changes to Pending Review. Users with the Publish Agents permission receive a notification with a link to review the agent. The agent is not available in Maestro chat until it is approved and reaches Published status.
Agent statuses
Every custom Maestro agent has a status that reflects where it is in its lifecycle. Only agents with Published status are visible and callable by data consumers from Maestro Assistant.
| Status | Description | Callable from Maestro Assistant |
|---|---|---|
| Draft | The agent has been saved but not submitted for review. This is the initial status for all new agents. An agent also returns to Draft status if the owner saves changes after it has been in any other status. | No |
| Pending Review | The agent has been submitted for review and is awaiting approval from a user with the Publish Agents permission. | No |
| Published | The agent has been approved and is active. Data consumers with access to the agent can interact with it from Maestro chat. | Yes |
| Rejected | The reviewer rejected the agent. The rejection reason is shown on the agent details page. The agent owner can edit the agent and resubmit it for review. | No |
Note If you own the agent, you can chat with it in Maestro Assistant if it is in the Pending Review, Draft or Published status, as long as it is valid. You can't chat with an agent in the Rejected status. The conversation shows a Test label to indicate that you are using an unpublished version. You can also preview and test the agent's behavior before publishing it in the Maestro test step of the builder.
Approve or reject an agent
Prerequisites
- You have a global role with the Publish Agents global permission.
- The agent you want to review is in Pending Review status.
Steps
-
On the main toolbar, click
→
Maestro Studio.
- Go to Agents.
The Agents page opens. This page shows all custom Maestro agents in the environment you are responsible for. - Click the name of the agent you want to review.
The Agent details page opens. - Review the agent configuration.
- Click Approve or Reject.
If you reject the agent, enter a rejection reason. The reason is posted as a comment on the agent details page and the agent owner is notified.
On approval, the agent status changes to Published and the agent becomes available in Maestro Assistant. The agent owner is notified.
Move agents between environments
You can export a custom Maestro agent from one environment and import it into another, for example to move an agent from a test environment to a production environment.
Export an agent
-
On the main toolbar, click
→
Maestro Studio.
- Go to Agents.
- Click the name of the agent you want to export.
- Click the More icon and select Export.
A configuration file for the agent is downloaded.
Import an agent
Note The communities, domains, and views referenced in the agent's knowledge base must exist in the target environment. If they don't, you must update the knowledge base after importing.
-
On the main toolbar, click
→
Maestro Studio.
- Go to Agents.
- Click Import agent.
- Select the agent configuration file and click Import.
The agent is created as a draft in the target environment. Review the agent configuration before submitting it for review.
Configure the Maestro Assistant
You can configure how the Maestro Assistant system agent introduces itself to data consumers.
Prerequisites
- Maestro Studio is enabled in your environment.
- You have a global role with the Manage All Agents global permission.
Steps
-
On the main toolbar, click
→
Maestro Studio.
- Go to Agents, then click the System tab.
The System tab shows the Maestro Assistant agent, which is managed by Collibra. - Click Edit configuration.
The Maestro Assistant configuration page opens. - In Welcome message, enter the greeting shown when users open the agent. If you leave this empty, the default Collibra message is used.
- In Example instructions, add up to 4 suggested prompts shown to users when they open the assistant, to help them get started.
- Click the checkmark to save each field.
Note To manage other AI features, go to Maestro Assistant in Settings.
Using Maestro Assistant (in preview)