Standalone Install
1. Setup Tutorial Assumptions
OWL_BASE) under the subdirectory owl (install path: $OWL_BASE/owl). There is no requirement for Collibra DQ to be installed in the home directory, but the Collibra DQ Full Installation script may lead to permission-denied issues during local PostgreSQL server installation if paths other than the home directory are used. If these issues occur, please adjust your directory permission to allow the installation script a write access to the PostgreSQL data folder.
Note Collibra DQ is supported to run on RHEL 8 and 9. You can use your PostgreSQL database instance.
This tutorial assumes that you are installing Collibra DQ on a brand new compute instance on Google Cloud Platform. Google Cloud SDK setup with proper user permission is assumed. This is optional, as you are free to create Full Standalone Installation setup on any cloud service provider or on-premise.
Please refer to the GOAL section for the intended outcome of each step and modify accordingly.
Note The full install package supports RHEL 8 or 9. If another OS is required, please follow the basic install process. You must have a PostgreSQL database installed and accessible, prior to running an RHEL 8 installation package.
Note Collibra DQ Metastore supports AWS RDS or AWS Aurora.
# Create new GCP Compute Instance named "install"
gcloud compute instances create install \
    --image=centos-7-v20210701 \
    --image-project=centos-cloud \
    --machine-type=e2-standard-4

# SSH into the instance as user "centos"
gcloud compute ssh --zone "us-central1-a" --project "gcp-example-project" "centos@install"
GOAL
- Create a new compute instance on a cloud provider (if applicable).
- Access the server where Collibra DQ will be installed.
2. Download DQ Full Package
Download full package tarball using the signed link to the full package tarball provided by the Collibra DQ Team. Replace <signed-link-to-full-package> with the link provided.
### Go to the OWL_BASE (home directory of the user is most common)
### This example uses /home/owldq installing as the user owldq

cd /home/owldq

### Download & untar
curl -o dq-full-package.tar.gz "<signed-link-to-full-package>"
tar -xvf dq-full-package.tar.gz

### Clean-up unnecessary tarball (optional)
rm dq-full-package.tar.gz
GOAL
- Download the full package tarball and place it in the
$OWL_BASE(home directory). Download viacurlor upload directly via FTP. The tarball name is assumed to bedq-full-package.tar.gzfor the sake of simplicity. - Untar
dq-full-package.tar.gztoOWL_BASE.
3. Install Collibra DQ + PostgreSQL + Spark
First set some variables for OWL_BASE (where to install Collibra DQ. In this tutorial, you are already in the directory that you want to install), OWL_METASTORE_USER (the PostgreSQL username used by DQ Web Application to access PostgreSQL storage), and OWL_METASTORE_PASS (the PostgreSQL password used by DQ Web Application to access PostgreSQL storage).
### The base path that you want Collibra DQ installed under. Trailing spaces are not permitted.

export OWL_BASE=$(pwd)
export OWL_METASTORE_USER=postgres
# minimum complexity recommended (18 length, upper, lower, number, symbol)
# example below
export OWL_METASTORE_PASS=H55Mt5EbXh1a%\$aiX6
# The default Spark version is 3.4.1, but you can opt to install Spark 3.2.2 or 3.0.1 instead.
# Spark 3.4.1
export SPARK_PACKAGE=spark-3.4.1-bin-hadoop3.2.tgz
# Spark 3.2.2
export SPARK_PACKAGE=spark-3.2.2-bin-hadoop3.2.tgz
Warning The $ symbol is not a supported special character in your PostgreSQL Metastore password.
dq-package-full.tar.gz that you untarred contains installation packages for Java 8 or Java 11, PostgreSQL 11, and Spark. There is no need to download these components. These off-line installation components are located in $(pwd)/package/install-packages .

One of the files extracted from the tarball is setup.sh. This script installs Collibra DQ and the required components. If a component already exist (for example, Java 8 is already installed and $JAVA_HOME is set), then that component is not installed (i.e. Java 8 installation is skipped).
To control which components are installed, use the -options=... parameter. The argument provided should be a comma-delimited list of components to install (valid inputs: spark, postgres, owlweb, and owlagent. -options=postgres,spark,owlweb,owlagent means "install PostgreSQL, Spark pseudo cluster, DQ Web Application, and DQ Agent". Note that Java is not part of the options. Java 8 or Java 11 installation is automatically checked and installed/skipped depending on availability.
At a minimum, you must specify -options=spark,owlweb,owlagent if you independently installed PostgreSQL or use an external PostgreSQL connection (as shown in Step 4, if you choose that installation route).
### The following installs PostgresDB locally as part of Collibra DQ install

./setup.sh \
    -owlbase=$OWL_BASE \
    -user=$OWL_METASTORE_USER \
    -pgpassword=$OWL_METASTORE_PASS \
    -options=postgres,spark,owlweb,owlagent
Warning The $ symbol is not a supported special character in your PostgreSQL Metastore password.
Note If you are prompted to install Java 8 or Java 11 because you do not have one of them installed, accept to install from a local package.
You are prompted to select a location to install PostgreSQL, as shown below:
Postgres DB needs to be intialized. Default location = <OWL_BASE>/postgres/data
to change path please enter a FULL valid path for Postgres and hit <enter>
DB Path [ <OWL_BASE>/owl/postgres/data ] =
If the data files for the PostgreSQL database need to be hosted at a specific location, provide it during this prompt. Ensure the directory is writable. Otherwise, press <Enter> to install the data files into $OWL_BASE/owl/postgres/data. The default suggested path does not have permission issues if you use OWL_BASE
as the home directory.
If no exceptions occur and the installation is successful, then the process completes with the following output:
installing owlweb
starting owlweb
starting owl-web
installing agent
not starting agent
install complete
please use owl owlmanage utility to configure license key and start owl-agent after owl-web successfully starts up
GOAL
- Specify
OWL_BASEpath where Collibra DQ will be installed and specify PostgreSQL environment variables. - Install DQ Web with PostgreSQL and Spark linked to DQ Agent (all files are in the
$OWL_BASE/owlsub-directory) usingsetup.shscript provided. The location ofOWL_BASEand PostgreSQL are configurable, but we advise you take the defaults.
4. Install DQ + Spark and use existing PostgreSQL (advanced)
Note
Skip Step 4 if you opted to install PostgreSQL and performed Step 3 instead.
We recommend Step 4 over Step 2 for advanced DQ Installer.
If you already installed DQ in the previous step, then skip this step. This is only for those who want to use external PostgreSQL (e.g. use GCP Cloud SQL service as the PostgreSQL metadata storage). If you have an existing PostgreSQL installation, then everything in the previous step applies except the PostgreSQL data path prompt and the setup.sh command.
Refer to Step 3 for details on OWL_BASE, OWL_METASTORE_USER , and OWL_METASTORE_PASS.
# The base path that you want Collibra DQ installed. No trailing

export OWL_BASE=$(pwd)
export OWL_METASTORE_USER=postgres

# minimum complexity recommended (18 length, upper, lower, number, symbol)
# example below
export OWL_METASTORE_PASS=H55Mt5EbXh1a%$aiX6
Run the following installation script. Note the missing "Postgres" in -options and new parameter -pgserver. This -pgserver could point to any URL that the standalone instance has access to.
# The following does not install PostgresDB and
# uses existing PostgresDB server located in localhost:5432 with "postgres" database
./setup.sh \
    -owlbase=$OWL_BASE \
    -user=$OWL_METASTORE_USER \
    -pgpassword=$OWL_METASTORE_PASS \
    -options=spark,owlweb,owlagent \
    -pgserver="localhost:5432/postgres"
The database named postgres is used as the default DQ metadata storage. Changing this database name is out-of-scope for Full Standalone Installation. Contact the Collibra DQ team for assistance.
GOAL
- Specify
OWL_BASEpath where Collibra DQ will be installed and specify PostgreSQL environment variables - Install DQ Web and Spark linked to DQ Agent (all files will be in
$OWL_BASE/owlsub-directory) usingsetup.shscript provided and link DQ Web to an existing PostgreSQL server.
5. Verify DQ and Spark Installation
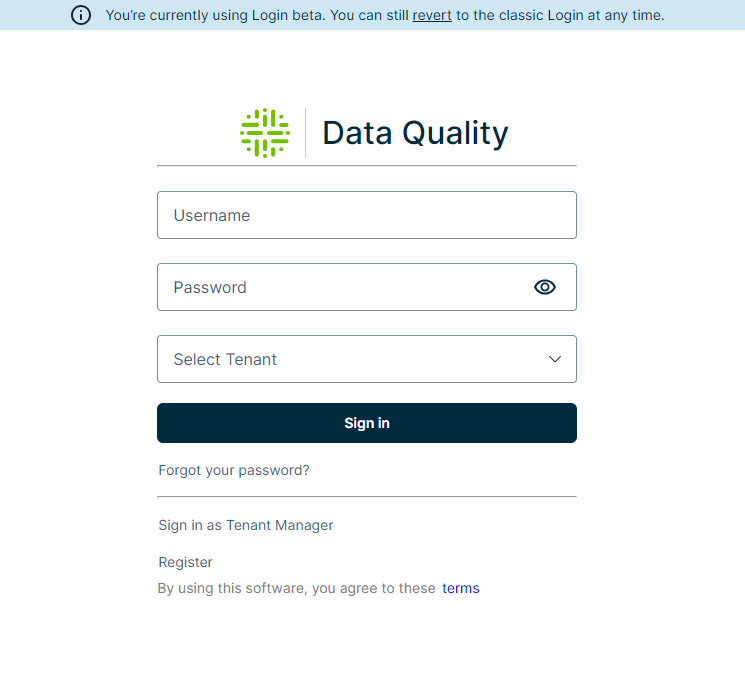
The installation process will start the DQ Web Application. This process initializes the PostgreSQL metadata storage schema in PostgreSQL under the database named postgres. This process must complete successfully before the DQ Agent can be started. Wait approximately 1 minute for the PostgreSQL metadata storage schema to be populated. If you can access DQ Web using <url-to-dq-web>:9000 using a Web browser, then this means you have successfully installed DQ.
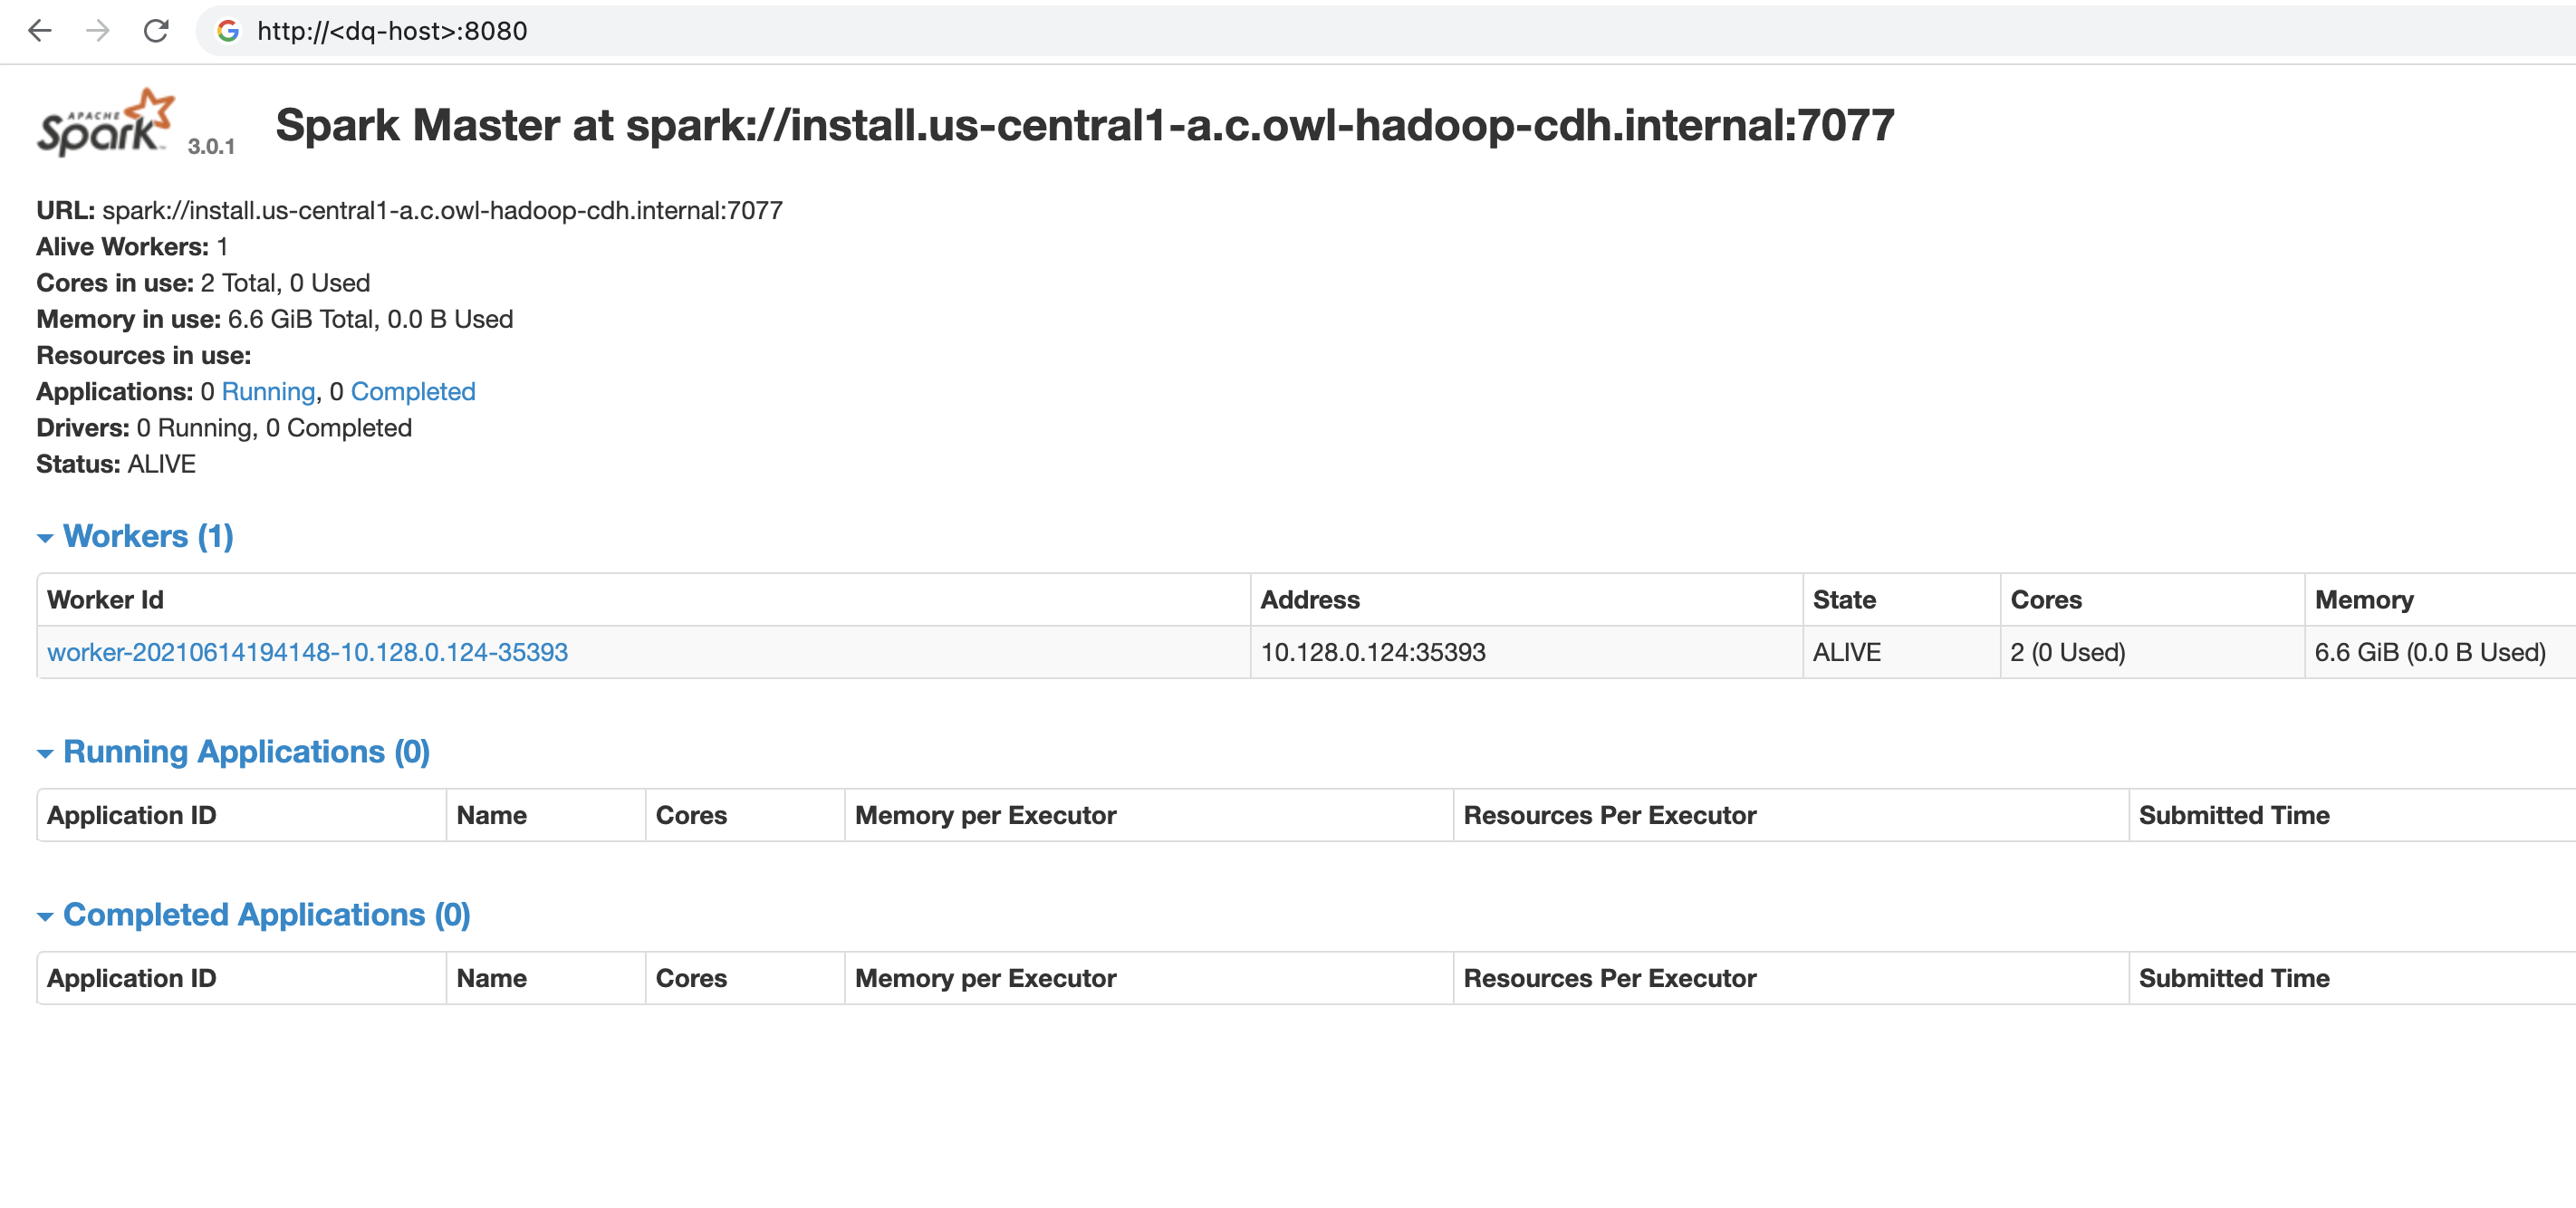
Next, verify that the Spark Cluster has started and is available to run DQ checks using <url-to-dq-web>:8080. Take note of the Spark Master URL starting with spark://.... This is required during DQ Agent configuration.
6. Set License Key
In order for Collibra DQ to run checks on data, the DQ Agent must be configured with a license key. Replace <license-key> with a valid license key provided by Collibra.
Note Your license key is the value following YOUR KEY IS = in the license provision email.
cd $OWL_BASE/owl/bin
./owlmanage.sh setlic=<license-key>

# expected output:
# > License Accepted new date: <expiration-date>
7. Set License Name
It is required that you set a license name upon your initial deployment of Collibra DQ.
Replace <your-license-name> with a valid license name provided by Collibra.
Note Your license name is the value following YOUR NAME IS = in the license provision email.
vi /<install-dir>/owl/config/owl-env.sh
export LICENSE_NAME=<your-license-name>
8. Set DQ Agent Configuration
Start the DQ Agent process to enable processing of DQ checks.
# 1 Start the agent to create the agent.properties file.
cd $OWL_BASE/owl/bin
./owlmanage.sh start=owlagent

# 2 Stop the agent and add this line to agent.properties:
./owlmanage.sh stop=owlagent

# 3 Add this line to agent.properties:
sparksubmitmode=native
sparkhome=</your/spark/home/folder>

# 4 Start the agent again.
./owlmanage.sh start=owlagent

# 5 Verify that agent.properties contains the correct details.
cd $OWL_BASE/owl/config
cat $OWL_BASE/owl/config/agent.properties
When the script successfully runs, the $OWL_BASE/owl/config folder contains a file called agent.properties. This file contains agent ID and the number of agents installed in your machine. Since this is the first non-default agent installed, the expected agent ID is 2. Verify that the agent.properties file is created. Youragent.properties is expected to have a different timestamp, but you should see agentid=2.
cd $OWL_BASE/owl/config
cat agent.properties

# expected output:
> #Tue Jul 13 22:26:19 UTC 2021
> agentid=2
Once the DQ Agent starts, it needs to be configured in DQ Web in order to successfully submit jobs to the local Spark (pseudo) cluster.
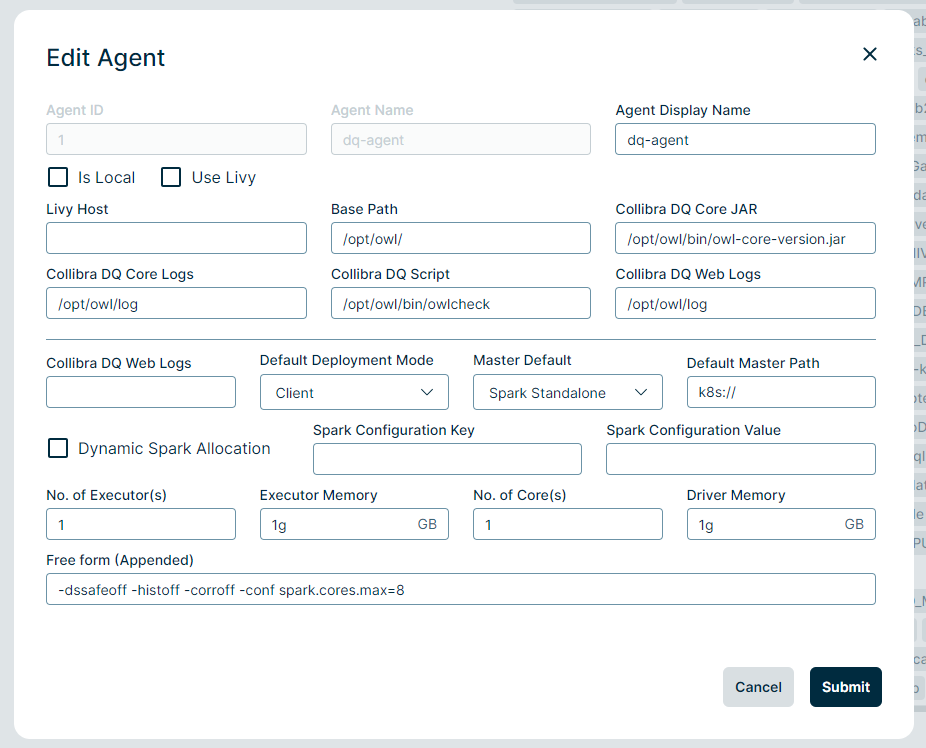
The new agent is set up with the template base path /opt and install path /opt/owl. The owlmanage.sh start=owlagent script does not respect OWL_BASE environment. You must edit the Agent Configuration to follow the OWL_BASE.
Follow the steps in the Set up a DQ agent topic to configure the newly created DQ Agent and edit the following parameters in DQ Agent #2.
- Replace all occurrence of
/opt/owlwith your$OWL_BASE/owl/in Base Path, Collibra DQ Core JAR, Collibra DQ Core Logs, Collibra DQ Script, and Collibra DQ Web Logs.- Note that Base Path here does not refer to
OWL_BASE
- Note that Base Path here does not refer to
- Replace Default Master value with the Spark URL from Fig 3
- Replace Number of Executors(s), Executor Memory (GB), Driver Memory (GB) to a reasonable default based on the size of your instance.
Refer to the Agent section for descriptions of the parameters.
Specify the Number of Core(s).
To limit Spark cores from being used for each job, a common configuration for the Free Form (Appended) field is -conf spark.cores.max=8.
Set the Default Deployment Mode option to Client for a Spark Standalone master.
9. Create DB Connection for DQ Job
Note In the following examples, a DQ Job is run against local DQ Metadata Storage.
Follow the steps on Map data source connections to a DQ agent section to configure newly created DQ Agent.
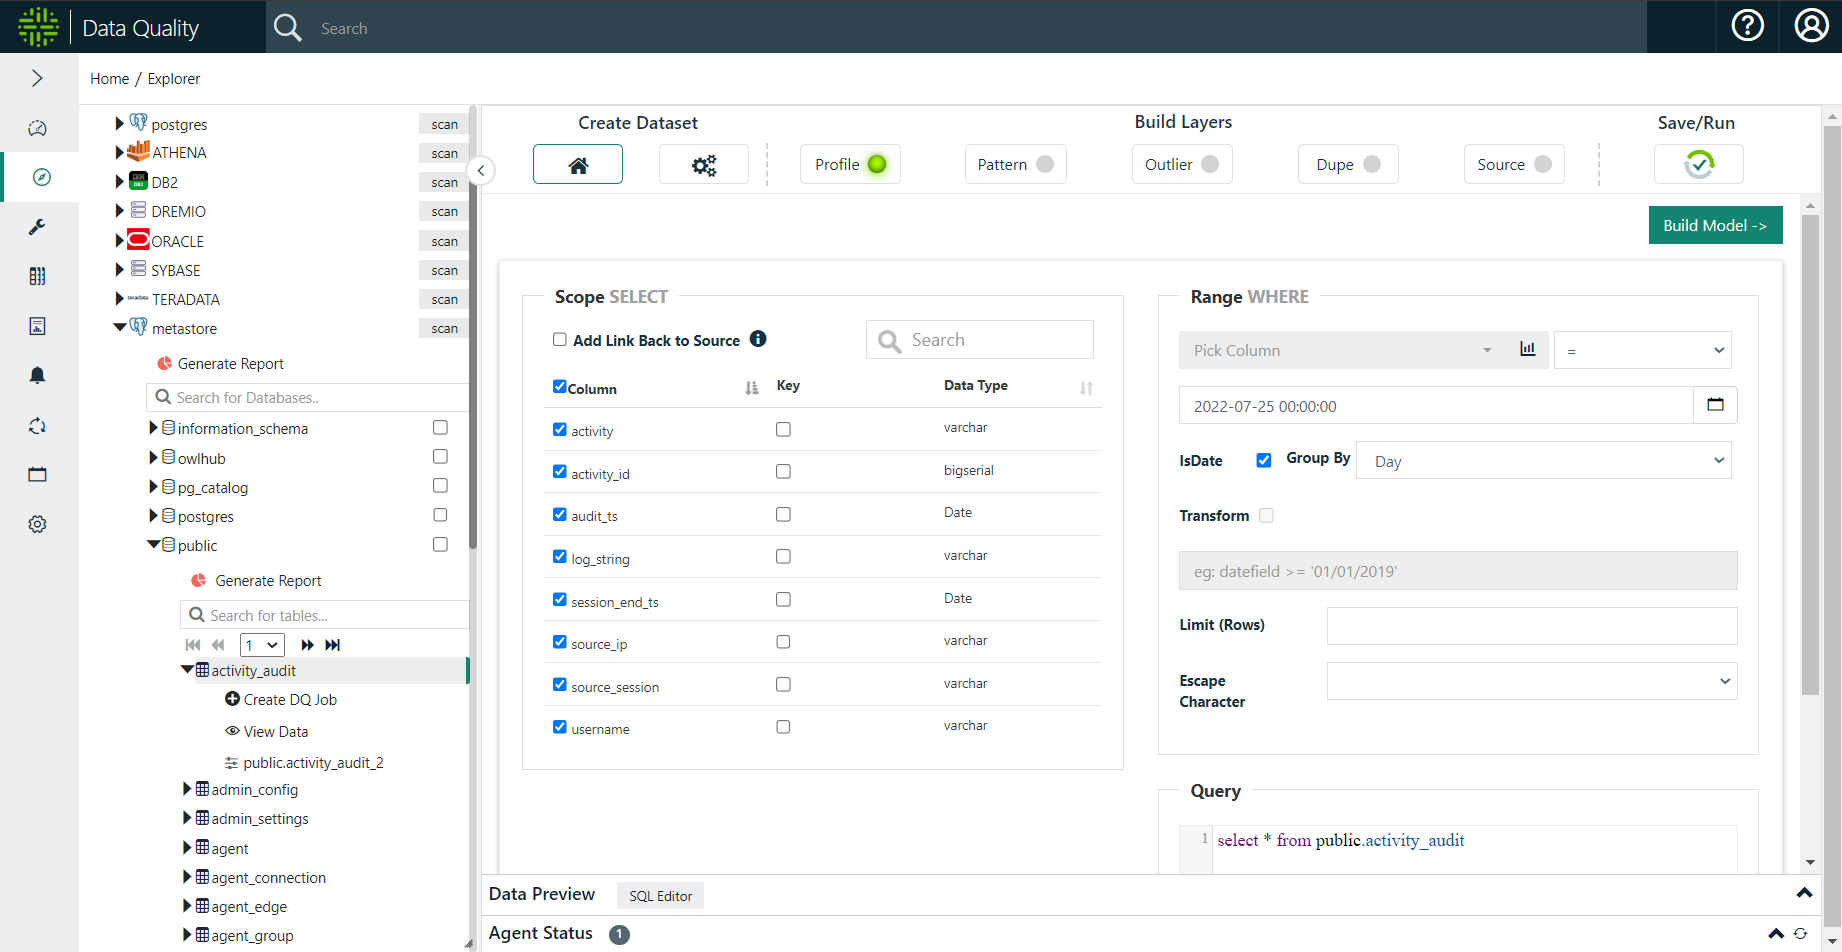
Click the compass icon in the navigation pane to open the Explorer page. Click the metastore connection, select the public schema, and select the first table in the resulting list of tables. From the Preview and Scope page, click Build Model. When the Profile page populates, click Save/Run.
On the Run page, click Estimate Job, acknowledge the resource recommendations, and click Run.
.png)
Click the revolving arrows icon in the left navigation panel to open the Jobs page.
Wait 10 seconds and then click the refresh button above the Status column until the status shows that the DQ job is Finished. We recommend refreshing several times, pausing for a few seconds in between clicks. While a job runs, the Activity column tracks the sequence of activities DQ performs before it completes a job. A successful job shows its status as Finished last.
.png)
Troubleshooting + Helpful Commands
### Setting permissions on your pem file for ssh access

chmod 400 ~/Downloads/ssh_pem_key
Make sure working directory has permissions
For example, if I SSH into the machine with user owldq and use my default home directory location /home/owldq/
### Ensure appropriate permissions
### drwxr-xr-x

chmod -R 755 /home/owldq
Reinstall PostgreSQL
### Postgres data directly initialization failed
### Postgres permission denied errors
### sed: can't read /home/owldq/owl/postgres/data/postgresql.conf: Permission denied

sudo rm -rf /home/owldq/owl/postgres
chmod -R 755 /home/owldq

### Reinstall just postgres
./setup.sh -owlbase=$OWL_BASE -user=$OWL_METASTORE_USER -pgpassword=$OWL_METASTORE_PASS -options=postgres
Changing PostgreSQL password from SSH
### If you need to update your postgres password, you can leverage SSH into the VM
### Connect to your hosted instance of Postgres

sudo -i -u postgres
psql -U postgres
\password
#Enter new password: ### Enter Strong Password
#Enter it again: ### Re-enter Strong Password
\q
exit
Warning The $ symbol is not a supported special character in your PostgreSQL Metastore password.
Permissions for ssh keys when starting Spark
### Spark standalone permission denied after using ./start-all.sh

ssh-keygen -t rsa -N "" -f ~/.ssh/id_rsa
cat ~/.ssh/id_rsa.pub >> ~/.ssh/authorized_keys
Tip If the recommendation above is unsuccessful, use the following commands instead of ./start-all.sh:./start-master.sh./start-worker.sh spark://$(hostname -f):7077
Permissions if log files are not writable
### Changing permissiongs on individual log files

sudo chmod 777 /home/owldq/owl/pids/owl-agent.pid
sudo chmod 777 /home/owldq/owl/pids/owl-web.pid
Getting the hostname of the instance
### Getting the hostname of the instance

hostname -f
Increase Thread pool / Thread Pool Exhausted
Adding to the owl-env.sh script
# vi owl-env.sh
# modify these lines

export SPRING_DATASOURCE_POOL_MAX_WAIT=500
export SPRING_DATASOURCE_POOL_MAX_SIZE=30
export SPRING_DATASOURCE_POOL_INITIAL_SIZE=5

# restart web and agent
Adding to the Spark agent configurations
If you see the following message, update the agent configurations within load-spark-env.sh:
Failed to obtain JDBC Connection; nested exception is org.apache.tomcat.jdbc.pool.PoolExhaustedException: [pool-29-thread-2] Timeout: Pool empty. Unable to fetch a connection in 0 seconds, none available[size:2; busy:1; idle:0; lastwait:200].Adjust the following configurations to modify the connection pool available:
export SPRING_DATASOURCE_POOL_MAX_WAIT=1000
export SPRING_DATASOURCE_POOL_MAX_SIZE=30
export SPRING_DATASOURCE_POOL_INITIAL_SIZE=5
Note The load-spark-env.sh file is located in the $SPARK_HOME/bin folder.
Adding to the owl.properties file
Depending on client vs. cluster mode and cluster type, you may also need to add the following configurations in the owl.properties file:
export SPRING_DATASOURCE_TOMCAT_MAXIDLE=10
export SPRING_DATASOURCE_TOMCAT_MAXACTIVE=20
export SPRING_DATASOURCE_TOMCAT_MAXWAIT=10000
export SPRING_DATASOURCE_TOMCAT_INITIALSIZE=4
Jobs stuck in the Staged activity
If DQ Jobs are stuck in the Staged activity on the Jobs page, update the following properties in the owl-env.sh file to adjust the DQ Web component:
export SPRING_DATASOURCE_POOL_MAX_WAIT=2500
export SPRING_DATASOURCE_POOL_MAX_SIZE=1000
export SPRING_DATASOURCE_POOL_INITIAL_SIZE=150
export SPRING_DATASOURCE_TOMCAT_MAXIDLE=100
export SPRING_DATASOURCE_TOMCAT_MAXACTIVE=2000
export SPRING_DATASOURCE_TOMCAT_MAXWAIT=10000
Depending on whether your agent is set to Client or Cluster default deployment mode, you may also need to update the following configurations to the owl.properties file:
spring.datasource.tomcat.initial-size=5
spring.datasource.tomcat.max-active=30
spring.datasource.tomcat.max-wait=1000
Restart the DQ Web and Agent components.
Active Database Queries
select * from pg_stat_activity where state='active'Too many open files configuration
### "Too many open files error message"
### check and modify that limits.conf file
### Do this on the machine where the agent is running for Spark standalone version

ulimit -Ha
cat /etc/security/limits.conf

### Edit the limits.conf file
sudo vi /etc/security/limits.conf

### Increase the limit for example
### Add these 3 lines
fs.file-max=500000
*               soft    nofile           58192
*               hard    nofile           100000
### do not comment out the 3 lines (no '#'s in the 3 lines above)
Redirect Spark scratch
### Redirect Spark scratch to another location
SPARK_LOCAL_DIRS=/mnt/disks/sdb/tmp
Alternatively, you can add the following to the Free form (Appended) field on the Agent Configuration page to change Spark storage: -conf spark.local.dir=/home/owldq/owl/owltmp

Automate cleanup of Spark work folders
You can add the following line of code to owl/spark/conf/spark-env.sh, which must be copied from the spark-env.sh.template file, or to the bottom of owl/spark/bin/load-spark-env.sh.
### Set Spark to delete older files
export SPARK_WORKER_OPTS="${SPARK_WORKER_OPTS} -Dspark.worker.cleanup.enabled=true -Dspark.worker.cleanup.interval=1800 -Dspark.worker.cleanup.appDataTtl=3600"
Check disk space in the Spark work folder
### Check worker nodes disk space
sudo du -ah | sort -hr | head -5
Delete files in the Spark work folder
### Delete any files in the Spark work directory
sudo find /home/owldq/owl/spark/work/* -mtime +1 -type f -delete
Troubleshooting Kerberos
You can add the following to the owl-env.sh file:
# For Kerberos debug logging
export EXTRA_JVM_OPTIONS="-Dsun.security.krb5.debug=true"
Reboot the Collibra DQ web service with the following:
./owlmanage.sh stop=owlweb
./owlmanage.sh start=owlweb
Note You can use the option for several purposes such as SSL debugging, setting HTTP/HTTPS proxy settings, setting additional keystore properties, and so on.
Tip: Add Spark Home Environment Variables to Profile
### Adding ENV variables to bash profile

### Variable 'owldq' below should be updated wherever installed e.g. centos

vi ~/.bash_profile
export SPARK_HOME=/home/owldq/owl/spark
export PATH=$SPARK_HOME/bin:$PATH

### Add to owl-env.sh for standalone install

vi /home/owldq/owl/config/owl-env.sh
export SPARK_HOME=/home/owldq/owl/spark
export PATH=$SPARK_HOME/bin:$PATH
Check Processes are Running
### Checking PIDS for different components

ps -aef|grep postgres
ps -aef|grep owl-web
ps -aef|grep owl-agent
ps -aef|grep spark
Starting Components
### Restart different components

cd /home/owldq/owl/bin/
./owlmanage.sh start=postgres
./owlmanage.sh start=owlagent
./owlmanage.sh start=owlweb

cd /home/owldq/owl/spark/sbin/
./stop-all.sh
./start-all.sh
Configuration Options
Setup.sh arguments
| Argument | Description |
|---|---|
| -non-interactive | Skips asking to accept Java license agreement. |
| -skipSpark | Skips the extraction of Spark components. |
| -stop | Do not automatically start all components (Owl-Web, Zeppelin, Postgres). |
| -port= | Set DQ Web application to use the defined port. |
| -user= | Optional parameter to set the user to run Collibra DQ. The default is the current user. |
| -owlbase= | Sets the base path to where you want Collibra DQ installed. |
| -owlpackage= | Optional parameter to set the Collibra DQ package directory. The default is the current working directory. |
| -help | Display this help and exit. |
| -options= | The different Collibra DQ components to install in a comma-separated list format. For example, -options=owlagent,owlweb,postgres,spark |
| -pgpassword= | The password used to set for the PostgreSQL metastore. For unattended installs. |
| -pgserver= | The name of the PostgreSQL server. For example, -pgserver=owl-postgres-host.example.com:5432/owldb. For unattended installs. |
Example:
./setup.sh -port=9000 -user=ec2-user -owlbase=/home/ec2-user -owlpackage=/home/ec2-user/packages
- The tar ball extracted to this folder on my EC2 Instance: ****
/home/ec2-user/packages/ - Collibra DQ is running as the ****
ec2-user - The DQ Web application runs on port
9000 - The base location for the setup.sh script to create the will be:
/home/ec2-user/
Example installing just the agent (perhaps on an Edge node of a hadoop cluster):
./setup.sh -user=ec2-user -owlbase=/home/ec2-user -owlpackage=/home/ec2-user/package -options=owlagent
- The package extracted to this folder on my EC2 Instance: ****
/home/ec2-user/packages/ - Owl-agent is running as the ****
ec2-user - The base location for the setup.sh script to create the Collibra DQ folder and place all packages under Collibra DQ is:
/home/ec2-user/
When installing different features, the following questions are asked:
- postgres = Postgres DBPassword needs to be supplied.
- If postgres is not being installed (such as agent install only) postgres metastore server name needs to be supplied.
Launching and Administering Collibra DQ
When the setup.sh script finishes by default software is automatically started. The setup.sh also creates the owlmanage.sh script which allows for stopping and starting of all owl services or some components of services. The setup script will also generate an owl-env.sh script that will hold the main variables that are reused across components (see owl-env.sh under the config directory).
Collibra DQ Directory Structure after running setup.sh
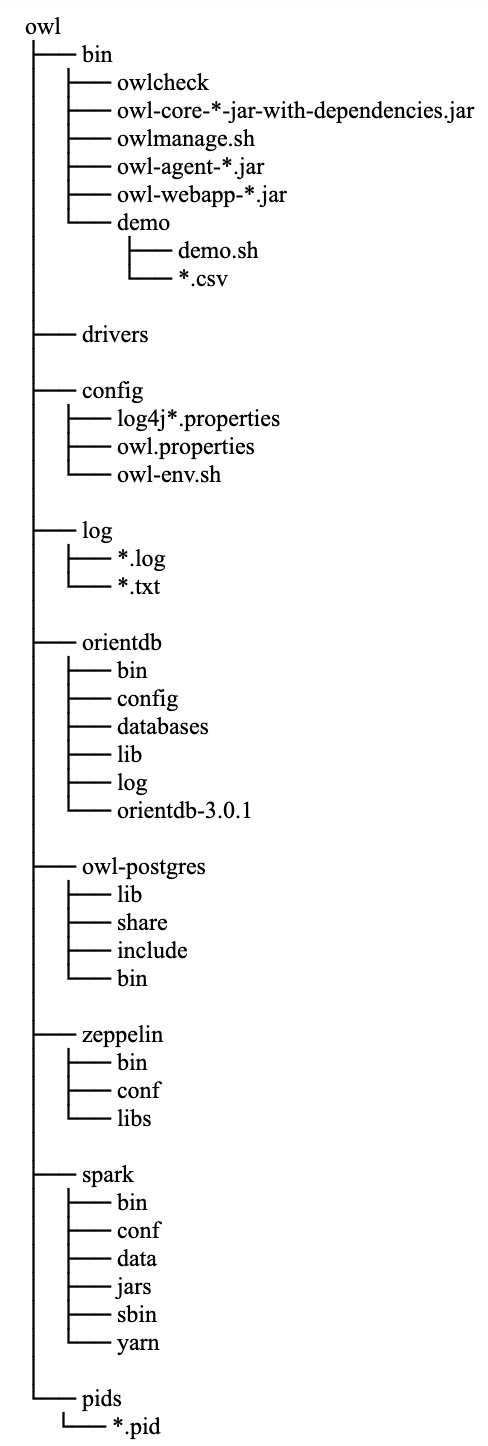
Configuration of ENV settings within owl-env.sh
Contents of the owl-env.sh script and what the script is used for.
| owl-env.sh scripts | Description |
|---|---|
export SPARK_CONF_DIR="/home/collibra/owl/cdh-spark-conf"
|
The directory on your machine where the Spark conf directory resides. |
export INSTALL_PATH="/home/collibra/owl"
|
The installation directory of Collibra DQ. |
export JAVA_HOME="/home/collibra/jdk1.8.0_131"
|
Java Home for Collibra DQ to leverage. |
export LOG_PATH="/home/collibra/owl/log"
|
The log path. |
export BASE_PATH="/home/collibra"
|
The base location under which the Collibra DQ directory resides. |
export SPARK_MAJOR_VERSION=2
|
Spark Major version. Collibra DQ only supports 2+ version of Spark. |
export OWL_LIBS="/home/collibra/owl/libs"
|
Lib Directory to inject in spark-submit jobs. |
export USE_LIBS=0
|
Use the lib directory or not. 0 is the default. A value of 1 means the lib directory is used. |
export SPARKSUBMITEXE="spark-submit"
|
Spark submit executable command. Collibra DQ using spark-submit as an example. |
export ext_pass_manage=0
|
If using a password management system. You can enable for password to be pulled from it. A value of 0 disables an external password management system. A value of 1 enables an external password management system. |
export ext_pass_script="/opt/owl/bin/getpassword.sh"
|
Leverage password script to execute a get password script from the vault. |
TIMEOUT=900 #15 minutes in seconds
|
Owl-Web user time out limits. |
PORT=9003 #owl-web port NUMBER
|
The default port to use for owl-web. |
export SPRING_LOG_LEVEL=ERROR
|
The logging level to be displayed in the owl-web.log |
export SPRING_DATASOURCE_DRIVER_CLASS_NAME=org.postgresql.Driver
|
The driver class name for postgres metastore (used by web). |
export SPRING_DATASOURCE_URL=jdbc:postgresql://localhost:5432/postgres
|
JDBC connection string to Collibra DQ PostgreSQL metastore. |
export SPRING_DATASOURCE_USERNAME=collibra
|
Collibra DQ PostgreSQL username. |
export SPRING_DATASOURCE_PASSWORD=3+017wfY1l1vmsvGYAyUcw5zGL
|
Collibra DQ PostgreSQL password. |
export AUTOCLEAN=TRUE/FALSE
|
TRUE/FALSE Enable/Disable automatically delete old datasets. |
export DATASETS_PER_ROW=200000
|
Delete datasets after this threshold is hit (must be greater than the default to change). |
export ROW_COUNT_THRESHOLD=300000
|
Delete rows after this threshold is hit (must be greater than the default to change). |
export SERVER_HTTP_ENABLED=true
|
Enabling HTTP to owl web |
export OWL_ENC=OFF #JAVA for java encryption
|
Enable Encryption (NOTE need to add to owl.properties also). Has to be in form owl.enc=OFF within owl.properties file to disable, and in this form owl.enc=JAVA to enable. the owl.properties file is located in the owl install path /config folder (/opt/owl/config). |
PGDBPATH=/home/collibra/owl/owl-postgres/bin/data
|
Path for PostgreSQL DB |
export RUNS_THRESHOLD=5000
|
Delete runs after this threshold is hit (must be greater than the default to change). |
export HTTP_SECONDARY_PORT=9001
|
Secondary HTTP port to use which is useful when SSL is enabled. |
export SERVER_PORT=9000
|
Same as PORT. |
export SERVER_HTTPS_ENABLED=true
|
Enabling of SSL. |
export SERVER_SSL_KEY_TYPE=PKCS12
|
Certificate trust store. |
export SERVER_SSL_KEY_PASS=t2lMFWEHsQha3QaWnNaR8ALaFPH15Mh9
|
Certificate key password. |
export SERVER_SSL_KEY_ALIAS=owl
|
Certificate key alias. |
export SERVER_REQUIRE_SSL=true
|
Override HTTP on and force HTTPS regardless of HTTP settings. |
export MULTITENANTMODE=FALSE
|
Flipping to TRUE will enable multi tenant support. |
export multiTenantSchemaHub=owlhub
|
Schema name used for multi tenancy. |
export OWL_SPARKLOG_ENABLE=false
|
Enabling deeper spark logs when toggled to true. |
export LDAP_GROUP_RESULT_DN_ATTRIBUTE
|
The attribute to the full path of the group object, for example, CN=OwlAppAdmin,OU=OwlGroups,OU=Groups,DC=owl, DC=com. Default is distinguishedname. |
export LDAP_GROUP_RESULT_NAME_ATTRIBUTE
|
The attribute to the simple name of the group, for example, OwlAppAdmin. Default is CN. |
export LDAP_GROUP_RESULT_CONTAINER_BASE
|
Property used in the scenario where the LDAP_GROUP_RESULT_DN_ATTRIBUTE does not return a value. In this case, the LDAP_GROUP_RESULT_NAME_ATTRIBUTE prepends to this value, which creates a fully qualified LDAP path. For example, OU=OwlGroups,OU=Groups,DC=owl,DC=com. Default is <null>. |
Configuration of owl.properties file
| Example | Description |
|---|---|
| key=XXXXXX | The license key. |
| spring.datasource.url=jdbc:postgresql://localhost:5432/postgres | The connection string to the Collibra DQ metastore (used by owl-core). |
| spring.datasource.password=xxxxxx | The password to the Collibra DQ metastore (used by owl-core). |
| spring.datasource.username=xxxxxx | The username to the Collibra DQ metastore (used by owl-core). |
| spring.datasource.driver-class-name=com.owl.org.postgresql.Driver | Shaded PostgreSQL driver class name. |
| spring.agent.datasource.url | jdbc:postgresql://$host:$port/owltrunk |
| spring.agent.datasource.username | {user} |
| spring.agent.datasource.passwords | {password} |
| spring.agent.datasource.driver-class-name | org.postgresql.Driver |
Starting Spark
 Spark Standalone Mode - Spark 3.2.0 Documentation
Launch Scripts
To launch a Spark standalone cluster with the launch scripts, you should create a file called conf/workers in your Spark directory, which must contain the hostnames of all the machines where you intend to start Spark workers, one per line. If conf/workers does not exist, the launch scripts defaults to a single machine (localhost), which is useful for testing. Note, the master machine accesses each of the worker machines via ssh. By default, ssh is run in parallel and requires password-less (using a private key) access to be setup. If you do not have a password-less setup, you can set the environment variable SPARK_SSH_FOREGROUND and serially provide a password for each worker.
Once you’ve set up this file, you can launch or stop your cluster with the following shell scripts, based on Hadoop’s deploy scripts, and available in SPARK_HOME/sbin:
| Shell Script | Description |
|---|---|
sbin/start-master.sh
|
Starts a master instance on the machine the script is executed on. |
sbin/start-workers.sh
|
Starts a worker instance on each machine specified in the conf/workers file. |
sbin/start-worker.sh
|
Starts a worker instance on the machine the script is executed on. |
sbin/start-all.sh
|
Starts both a master and a number of workers as described above. |
sbin/stop-master.sh
|
Stops the master that was started via the sbin/start-master.sh script. |
sbin/stop-worker.sh
|
Stops all worker instances on the machine the script is executed on. |
sbin/stop-workers.sh
|
Stops all worker instances on the machines specified in the conf/workers file. |
sbin/stop-all.sh
|
Stops both the master and the workers as described above. |
Note These scripts must be executed on the machine you want to run the Spark master on, not your local machine.
### Starting Spark Standalone

cd /home/owldq/owl/spark/sbin
./start-all.sh

### Stopping Spark
cd /home/owldq/owl/spark/sbin
./stop-all.sh### Starting Spark with Separate Workers
SPARK_WORKER_OPTS=" -Dspark.worker.cleanup.enabled=true -Dspark.worker.cleanup.interval=1799 -Dspark.worker.cleanup.appDataTtl=3600"
### 1 start master
/home/owldq/owl/spark/sbin/start-master.sh
### 2 start workers
SPARK_WORKER_INSTANCES=3;/home/owldq/owl/spark/sbin/start-slave.sh spark://$(hostname):7077 -c 5 -m 20g