You can configure the classification acceptance and rejection thresholds in 2 places: Collibra Settings and the Data Classification Configuration. If you configure the classification thresholds in one place, they are also updated in the other place.
From Collibra Console settings
Prerequisites
- You have the ADMIN or SUPER role in Collibra Console.
Steps
-
Open the DGC service settings for editing:
- Open Collibra Console.
Collibra Console opens with the Infrastructure page. - In the tab pane, expand an environment to show its services.
- In the tab pane, click the Data Governance Center service of that environment.
- Click Configuration.
- Click Edit configuration.
- Open Collibra Console.
- Go to the Data Classification- Classification Thresholds section.
- Enter the required information:
Setting
Description
 True: The automatic acceptance and rejection of data classification suggestions is active.
 False (default): Data classification suggestions are not automatically accepted or rejected.
Tip Start by manually accepting and rejecting a suggested data class. Only switch to automatic acceptance and rejection if you are comfortable with the data classification results.
Automatic acceptance threshold The percentage that determines when data classification suggestions are automatically accepted.
For example, if you set this value to 75%, classification suggestions with a confidence level of 75% or higher are automatically accepted.
If multiple classification suggestions meet the threshold for a column, the suggestion with the highest confidence level percentage is accepted automatically, as long as this suggestion is the only one to have that confidence level percentage. If two or more suggestions have the same confidence level, none are accepted automatically, and all remain visible.ExampleYou set the automatic acceptance threshold to 85% and classify a table with 2 columns.
- For column A, there are 3 classification suggestions with confidence level 93%,92%, and 90%.
- For column B, there are 2 classification suggestions with the same confidence level of 86%.
The results of the automatic acceptance will be:
- For column A, the classification suggestion with 93% is accepted automatically.
- For column B, both suggestions remain visible, none are accepted automatically.
The default acceptance threshold is 90.
Automatic rejection threshold The percentage that determines when data classification suggestions are automatically rejected. For example, if you set this value to 49%, data classification suggestions with a confidence level of 49% or lower are automatically rejected.
The default rejection threshold is 10.
Note If the acceptance threshold and rejection threshold are set to the same value, and a data classification suggestion has this confidence level percentage, the classification suggestion will be rejected.
- Click Save all.
From the Data Classification Configuration
Prerequisites
You have the required permissions.
Steps
-
On the main toolbar, click
 →
Stewardship.
→
Stewardship. - Go to Data Classification → Data classes.
- Click the Data Classification Configuration icon
 .
.
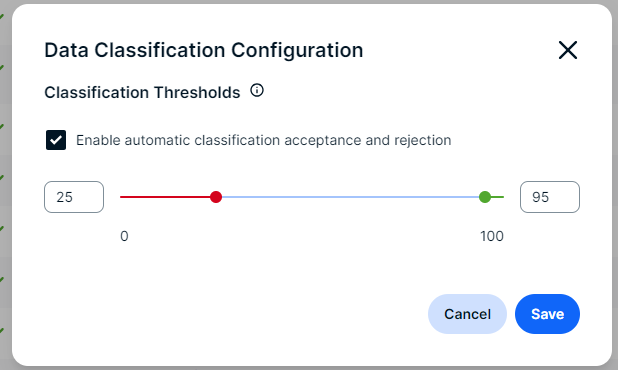
The Data Classification Configuration dialog box opens. - Select Enable automatic classification acceptance and rejection.
Tip Start by manually accepting and rejecting a suggested data class. Only switch to automatic acceptance and rejection if you are comfortable with the data classification results.
- Enter the rejection threshold value.
This is the percentage that determines when data classification suggestions are automatically rejected. The default rejection threshold is 10%.
The bar automatically updates. - Enter the acceptance threshold value.
This is the percentage that determines when data classification suggestions are automatically accepted. The default acceptance threshold is 90%.
The bar automatically updates.ExampleIn this example, we set the rejection value to 25 and the acceptance value to 95. This means that all data classification suggestions with a confidence level of 25% or lower will be rejected automatically. Data classification suggestions with a confidence level of 95% or higher will be accepted automatically.
- Click Save.