Actions
The following table provides an overview of the various actions you can perform to manage your collections on the Collections page, including editing, deleting, and sorting them. To open the Collections page, click your avatar → Collections.

| Action | Description |
|---|---|
| Create a collection. |
Click New Collection in the left pane. For more information, go to . |
| View assets in a collection. |
Click the collection in the left pane. Tip The Composition section shows the asset types of the assets included in the collection.
|
| Sort the assets in a collection. |
Use the Added On menu. Tip By default, assets are sorted by the date they were added to the collection, from newest to oldest. You can sort them alphabetically in ascending order by clicking Added On → Name.
|
| Open an asset in a collection. |
Click the asset name. |
| Remove an asset from a collection. | Click |
| Edit a collection name or description. |
Click Tip The Favorites collection can't be renamed.
|
| Delete a collection. | Click Tip
|
| Share a collection. |
Click Share. Tip
|
|
Search for a collection. |
Use the My Collections box in the left pane. Tip The list shows only 100 collections at a time. It is possible, however, that the total number of collections to which you have access is more than 100. In that case, you can use the My Collections box to find the collection. |
| Sort collections. |
Use the Name menu in the left pane. Tip By default, collections are sorted alphabetically in ascending order. You can sort them by created or last updated date by clicking Name → Last Modified or Creation Date.
|
Create a collection
You can create up to 100 collections and add up to 200 assets to a single collection. A collection can be created from the Collections page, an asset page, or an asset preview in Data Marketplace.
Steps
From the Collections page
The following steps show how to create a collection from the Collections page.
- Click your avatar → Collections.
The Collections page opens. - Click New Collection.
The Create Collection dialog box appears. - Enter the required information.
- Click Save.
The collection is created. You can add an asset to the collection from the asset page or Data Marketplace.
| Field | Description |
|---|---|
| Name | A name to identify the collection. |
| Optional: Description | A description for the collection. |
From an asset page
The following steps show how to add an asset to an existing collection from an asset page, and also how to create a new collection and add an asset to it at the same time.
- Open the asset page.
- Click
 .
.
The Add to Collection option appears.Tip If the bookmark icon next to the Add to Collection option is filled, it indicates that the asset has already been added to a collection. To remove the asset from a collection, select the option, and then select the collection in the Add to Collection dialog box. - Select the Add to Collection option.
The Add to Collection dialog box appears. - To add the asset to existing collections, select the collections.
The asset is added to the collections. - To create a new collection and add the asset to it, in the search box, enter a name to identify the new collection, and then press Enter.
The collection is created and the asset is added to it.
- To remove the asset from a collection, in the Add to Collection dialog box, select the collection.
- To view all your collections, click your avatar → Collections.
From Data Marketplace
The following steps show how to add an asset to an existing collection from Data Marketplace, and also how to create a new collection and add an asset to it at the same time.
- Go to the asset preview in Data Marketplace.
- Click
 .
.
The Add to Collection dialog box appears. - To add the asset to existing collections, select the collections.
The asset is added to the collections. - To create a new collection and add the asset to it, in the search box, enter a name to identify the new collection, and then press Enter.
The collection is created and the asset is added to it. - To remove the asset from a collection, in the Add to Collection dialog box, select the collection.
- To view all your collections, click your avatar → Collections.
Share a collection
By sharing a collection with someone, you allow them to either view or edit the collection. The following table describes the privileges associated with each type of access.
| Type of access | What can a user do? |
|---|---|
| Viewer | View the assets in the collection. |
| Editor |
|
- The owner of a collection is the person who created it. In addition to the actions that an editor can perform, the owner can edit the name of the collection and delete the collection.
- The ownership of a collection can't be transferred.
- The Favorites collection can't be shared.
Request access to a collection
You can request access to a collection from the owner of the collection.
- If you click a link to a collection to which you don't have access, the Collections page opens with the Request Access button. Clicking this button sends an email to the owner to request access. The owner can give you either the viewer access or the editor access to the collection.
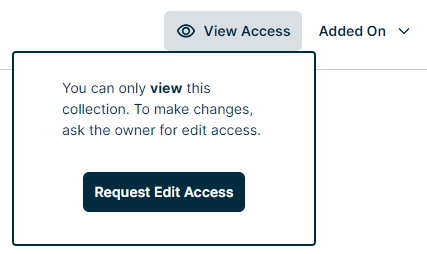
- If you have the viewer access to a collection, the collection shows the View Access tag on the Collections page. To request the editor access, click View Access → Request Edit Access. This sends an email to the owner to request editor access.
Give and remove access from a collection
If you are the owner of a collection or have the editor access to the collection, you can share the collection from the Collections page.
Steps
- Click your avatar → Collections.
The Collections page opens. - Select the collection you want to share.Tip As an owner, you may also have received an email indicating that someone requested access to a collection. In the email, click Manage access for this collection to open the collection.
- Click Share.
The Share <collection name> With dialog box appears. - If the user with whom you want to share the collection doesn't have access to the collection yet, start entering their name in the Add users box, and then select their name in the drop-down list.
The user is added to the People with access list with the viewer access. - To change a user's access type, in the drop-down list next to their name, select the required access type.Tip If you don't want the user to be able to access the collection, select Remove Access.
- Click Save.
An email is sent to the user notifying them of the access change.