Add a Technical Lineage for Databricks Unity Catalog capability to an Edge or Collibra Cloud site
After you enable technical lineage on Edge and have the Databricks connection available, add a Technical Lineage for Databricks Unity Catalog capability to the Edge or Collibra Cloud site.
Requirements and permissions
A global role that has the Manage connections and capabilities global permissions, for example Edge integration engineer.
Steps
- Open a site.
-
On the main toolbar, click
 →
→
 Settings.
The Settings page opens. -
In the tab pane, click Edge.
The Sites tab opens and shows a table with an overview of your sites. - In the table, click the name of the site whose status is Healthy.
The site page opens.
-
On the main toolbar, click
- In the Capabilities section, click Add capability. For Collibra Data Lineage to stitch the data objects in your technical lineage to the assets in Data Catalog, add a Catalog JDBC ingestion capability before you add the technical lineage capability.
The Add capability page appears. - Enter the required information.
Field Description Required? Name
The name of the capability.
 Yes
Yes
Description
The description of the capability.
 No
No
Databricks Connection The Databricks Workspace connection that you created.
Yes
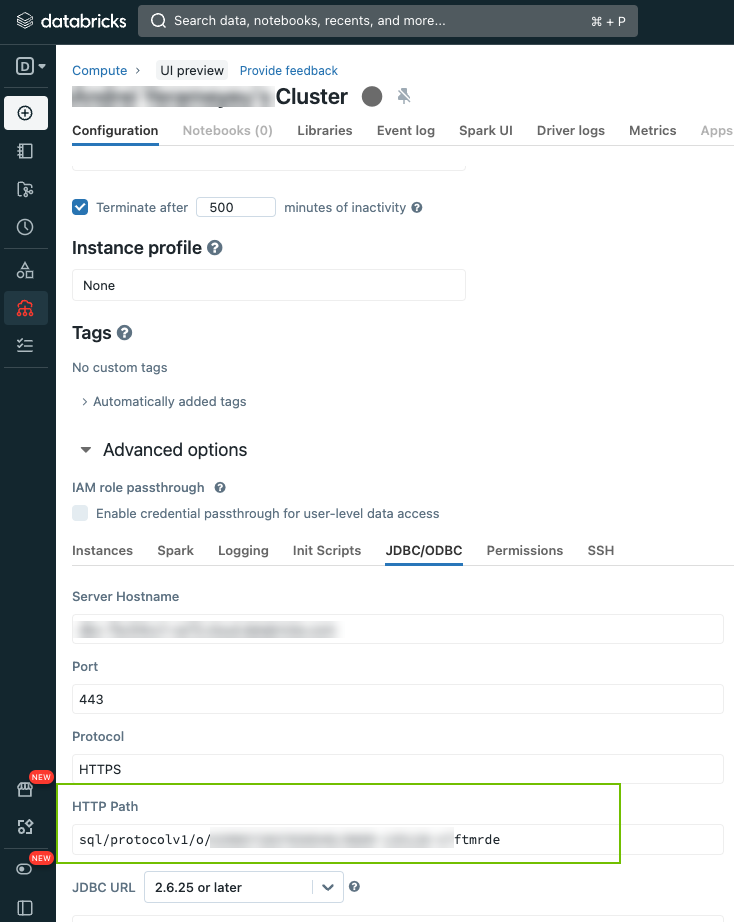
Compute Resource HTTP Path The HTTP path of the compute resource in Databricks Unity Catalog that Collibra Data Lineage collects and processes to create technical lineage.
How to find the HTTP path?You can find the HTTP path in the connection details of your cluster as shown in the following graphic. For details, go to Get connection details for a cluster in Databricks documentation.
 Yes
Yes
Source ID
The name of the data source. The name must be unique and cannot contain special characters, for example,
/. Yes
TechLin Admin Connection (beta) If you want to use the OAuth authentication type to connect to the Collibra Data Lineage service instances, you have to create a Technical Lineage Admin Edge or Collibra Cloud site connection and select the OAuth authentication type. Then, in this field, specify the name of the Technical Lineage Admin connection.
For more information about the authentication types, go to Create a Technical Lineage Admin connection.
No
Time Frame
Specify the duration for data collection. You can enter any of the following values:
- A number of days.
The default value is 365, which means that Collibra Data Lineage collects data of the past 365 days.
If a negative number or0is entered, the default time frame of the past 365 day is used. - A date range:
YYYY-MM-DD YYYY-MM-DD. Collibra Data Lineage collects data from the specified start date to the specified end date.YYYY-MM-DD now. Collibra Data Lineage collects data from the specified start date to the current date.now YYYY-MM-DD. Collibra Data Lineage collects data the current date to the specified end date.
The start date must be earlier than the end date and at least one day apart.
No
Property Use this section to define custom parameters for technical lineage. Click Add property to add a parameter.
Available properties:Type Value Type Name Descriptions Example value Text
Plaintext
httpTimeoutSets the HTTP timeout duration, in seconds. You can enter a value in the range of 1 to 3599. The default value is 15.
15Properties for Collibra Platform for Government customersType Value type Name Description Example value Text
Plaintext
techlinHostThis is the URL of the Collibra Data Lineage service instance to which you want to upload metadata.
techlin-europe-west1.collibra.comText
Secret
techlinKeyThis is the unique API key to connect to a Collibra Data Lineage service instance.
Specify a unique user key for each Collibra environment. If you're not sure what your user key is, contact your Collibra Collibra Account Team.
<your-techlin-key> Yes for US government customers.
For each of your data sources, you have to specify one of the following values: Analyze or Sync.When you synchronize your technical lineage, the following process begins:
- Metadata from data sources for which the value of this setting is either Analyze or Sync, is analyzed.
- Metadata from data sources for which the value of this setting is Sync, is synchronized.
Value Description Analyze Load and analyze the metadata on the Collibra Data Lineage service instance.
Synchronization does not start after analysis; it starts only after either:
- You trigger synchronization of another data source for which you specify Sync in the Processing Level drop-down list.
- You configure the Technical Lineage Admin Edge or Collibra Cloud site capability, and trigger synchronization via the Sync option in the Integration Configuration tab in Data Catalog.
Important If you want to synchronize multiple data sources, we strongly recommend that you select this option in the respective Edge or Collibra Cloud site capabilities for each of your data sources. This allows you to synchronize all data sources in a single job, thereby maximizing efficiency and mitigating the risk of failed synchronization jobs.- For complete information and important considerations, go to Tips for successful lineage synchronization
- For more information about the Sync option in the Technical Lineage Admin Edge or Collibra Cloud site capability, go to Technical lineage admin options.
Sync Load, analyze, and synchronize metadata from all data sources. Synchronization starts – or is queued, if another synchronization job is running – immediately after analysis.
Important If you want to synchronize multiple data sources and you select this option, each data source is processed as a separate job. This is highly inefficient and will likely lead to failed sync jobs. For complete information and important considerations, go to Tips for successful lineage synchronization.
Yes
Active
The option determines whether to include or remove the technical lineage of the data source.
Select this option to include the technical lineage of this data source.
Clear the checkbox to exclude the technical lineage of this data source.
Yes
Save Input Metadata Select the checkbox if you want to save the input metadata extracted from the data source in ZIP files. The files can be useful for troubleshooting. Select this option only on request of Collibra Support. If this option is selected, you can download the files from the Synchronization Result dialog box once the synchronization activity is completed.
No
Ingest lineage from external tables
Select this option to ingest lineage from external delta tables. Selecting this option can cause longer synchronization times.
Clear the checkbox to exclude lineage from external delta tables.
No
Also ingest lineage from table_lineage Select this option to create both table-level and column-level lineage. In addition to the lineage from the
system.access.column_lineagetable, Collibra Data Lineage also ingests lineage that exists only in thesystem.access.table_lineagetable when this option is selected. Selecting this option can cause longer synchronization times.Select this option if you want to create technical lineage for metric views.
To create only column-level lineage, clear the checkbox.
No
(Deprecated) Filters Note This field is deprecated. Use the Include Filter and Exclude Filter fields on the Synchronization page to specify which lineage events to include or exclude in technical lineage. If you specify this field and also the Include Filter and Exclude Filter fields, the Include Filter and Exclude Filter fields take precedence.Use this section to include or exclude databases and schemas to be ingested. Enter the filters in JSON format. If you used filters when you integrated Databricks Unity Catalog, you can enter in this field the content from the Filters and Domain Mapping field in the Databricks Unity Catalog capability. Noted that Collibra Data Lineage ignores the UUIDs that are specified in the content.
Text in JSON format to include or exclude databases and schemas, and to configure domain mappings.
- The text must be in JSON format and can contain an include and an exclude block. You can use any JSON validator to verify the format. Collibra is not responsible for the privacy, confidentiality, or protection of the data you submit to such JSON validators, and has no liability for such use.
- In the include block, you can specify the domain in which specific catalogs or schemas must be ingested. The format is:
“Catalog/Database > schema ”: “domain ID”. For example,"HR > address-schema": "30000000-0000-0000-0000-000000000000". - In the exclude block, you can specify the catalogs or schemas that you don't want to ingest. For example,
"* > test". - The exclude block has priority over the include block.
- If the include block is not present, we ingest all assets into the same domain as the System asset.
- If there is no explicit domain mapping for a schema, we use the domain specified for the database.
- You can use the keyword
defaultas a domain ID. In that case, the catalog or schema will be ingested in the same domain as the System asset. - A match with a database has priority over a match with a schema.
- The integration fails before the synchronization starts, if one or more domain IDs specified in the include block don't exist.
- The integration fails before the synchronization starts if a domain ID is left empty in the include block.
- You can use the ? and * wildcards in the catalog and schema names. If a catalog or schema matches multiple lines, the most detailed match is taken into account.
Show exampleExample{"include": {"HR": "20000000-0000-0000-0000-000000000000",
"HR > address-schema": "30000000-0000-0000-0000-000000000000","Orders > fk*": "40000000-0000-0000-0000-000000000000",
"Orders > *": "50000000-0000-0000-0000-000000000000",
"* > profiling": "60000000-0000-0000-0000-000000000000",
"sales": "default"},"exclude": ["testDB",
" * > information_schema"]}In this example:
- Assets from the "HR" database will be ingested into the domain with ID "20000000-0000-0000-0000-000000000000". However, all assets from the "HR > address-schema" schema will be ingested into the domain with id "30000000-0000-0000-0000-000000000000".
- All assets from the "Orders” database with schemas starting with fk (fk*) will be ingested into the domain with ID "40000000-0000-0000-0000-000000000000", and all other assets from the "Orders” database will be ingested into the domain with ID "50000000-0000-0000-0000-000000000000".
- All assets from the "sales" database will be ingested in the same domain as the System asset.
- Assets from the "profiling" schema will be ingested into the domain with ID "60000000-0000-0000-0000-000000000000". However, the "profiling" schema in the database "Orders" will be ingested in the domain with ID "50000000-0000-0000-0000-000000000000" because a database match has priority over a schema match.
- All assets from the "testDB” database will be excluded.
- All assets from the “information_schema” schema in all databases will be excluded.
No
Logging configuration
Memory (MiB)
JVM arguments
These fields are configuration options that can help when investigating issues with the capability.
Important Use these fields only at the request of Collibra Support. No
Debug
This setting is not valid for this integration. It should be set to false.
No
Log level
Only complete this field on the request of or together with Collibra Support.
No
- A number of days.
- Click Save.
The capability is added to the Edge or Collibra Cloud site.
The fields become read-only.
