If the automatic data classification process can't detect a data class for a column, you can classify the column yourself. While manually classifying data, you can also create new data classes.
Prerequisites
- You have registered a data source via Edge and synchronized one or more schemas.
- You have the required permissions.
- You have configured data classes.
Manually classify data from the Column asset page
- Go to the column you want to classify.
- In the At a glance sidebar, click the Data Classification field.
To open the At a glance sidebar, click the information icon.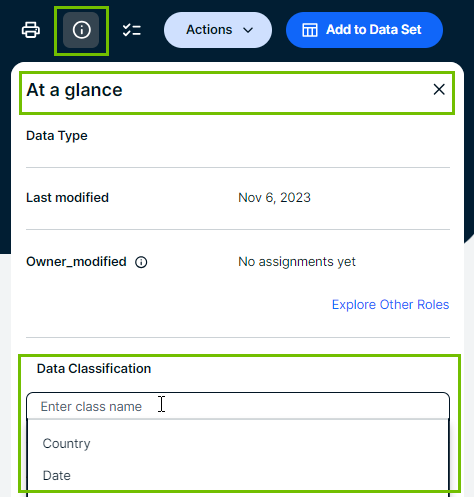
- Select the data class you want to assign.
The data classes in the drop-down list are the ones defined.
If needed, enter the new data class name and press Enter.- Data classes are case-sensitive and can contain spaces.
- You can add more data classes if applicable but avoid it as much as possible.
- Click outside the field.
The data classification is automatically accepted. If you entered a new data class, the data class is also available now for other classifications.
Manually classify data from a Table asset page
- Go to the table that contains the columns to classify.
- Navigate to the Columns section.
- If not yet available, add the Data Classification column to the table.
- Double-click in the Data Classification column.
- Place your cursor in the field.
The list with existing data classes appears. The data classes in the drop-down list are the ones defined. - Select the data class you want to assign from the drop-down list.
If needed, enter a new data class name and press Enter.- Data classes are case-sensitive and can contain spaces.
- You can add more data classes if applicable but avoid it as much as possible.
- Press Esc and click
 .
.
The data classification is automatically accepted. If you entered a new data class, it is now available for other classifications.
Manually classify data from an asset view
- Go to the view where you see the columns that you want to manually classify.
- If not yet available, add the Data Classification column to the view.
- Double-click the Classification cell for the column you want to update.
- Select the data class you want to assign from the drop-down list.
If needed, enter a new data class name and press Enter.- Data classes are case-sensitive and can contain spaces.
- You can add more data classes if applicable but avoid it as much as possible.
- Press Esc and click .
The data classification is automatically accepted. If you entered a new data class, it is now available for other classifications.
Related topics
For an example, go to Example: Manual classification.
For information on configuring your data classes for automatic data classification, go to Configuring data classes.