This section shows you how to use the Integration configuration wizard to set up a new integration of Data Quality & Observability Classic metadata from profile findings, rules, and alerts into Collibra Platform.
Important If you have multiple integrations set up, only one can be active at a given time.
Note This is a one-time configuration per environment.
Note You can associate a single data asset with multiple tables. The cardinality of the "Data Asset Represent Table" relation type is one-to-many.
Prerequisites
For the Integration API to run successfully, ensure that you review and meet the following criteria.
- The most recent versions (recommended) of Data Quality & Observability Classic and Collibra Platform. For more information on versions, go to Supported versions.
- You have an Admin role in Data Quality & Observability Classic to use the configuration wizard.
- You have an Admin or Dataset Manager role in Data Quality & Observability Classic to enable or disable individual datasets for integration.
- Your Collibra Platform profile must have Sysadmin and DataSteward global roles to manage all assets and objects of the integration.
- You have followed the steps on how to add Data Quality Rules to Assets in Collibra Platform.
- You have an aggregation path set for your Data Quality Rule in Collibra Platform
 Settings Operating model Data quality rules.
Important Do not modify the cardinality of out-of-the-box operating model relations that impact the integration.
Steps
- Hover your cursor over the
 icon and click Integrations.
The Integrations page opens. - In the upper right corner, click Add Integration.
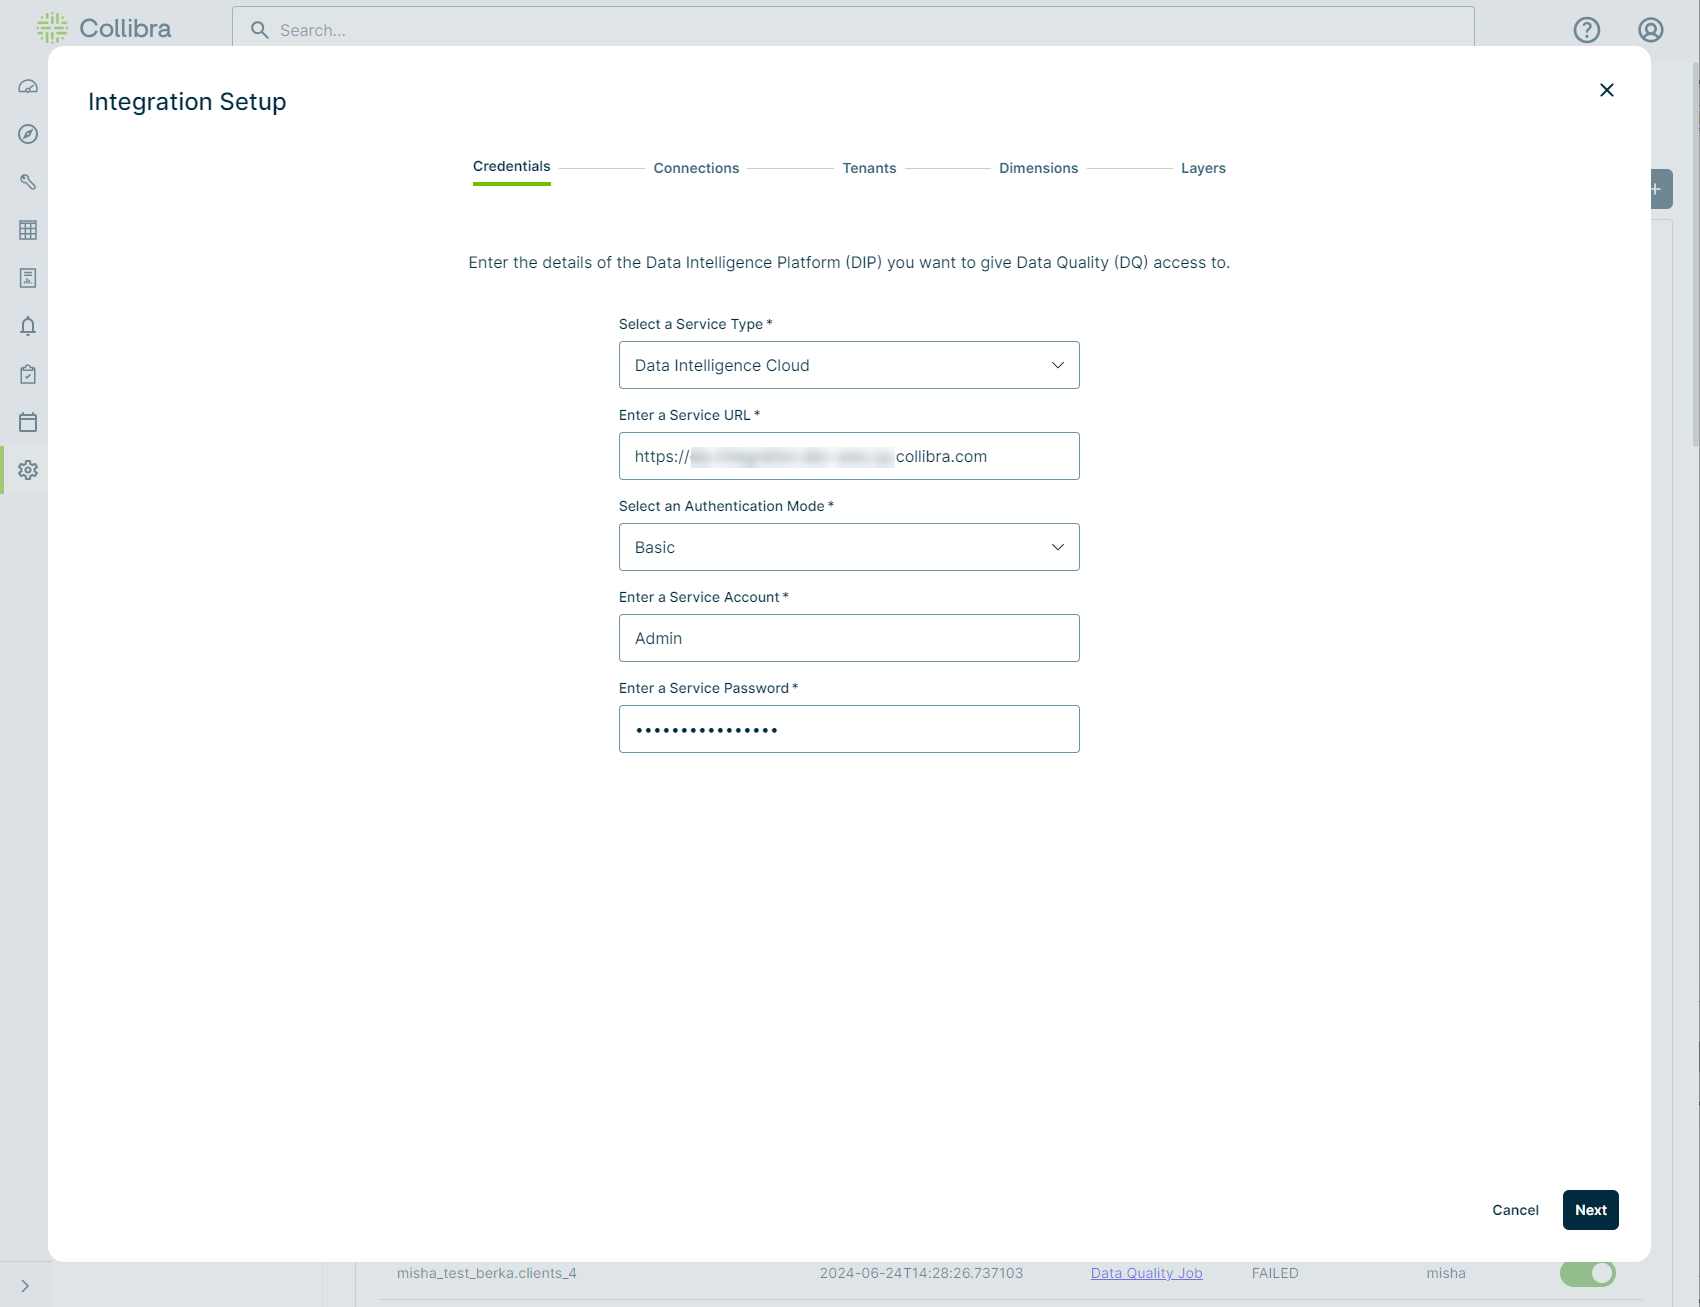
The Integration Setup wizard appears. - On the Credentials step, enter the required information.
- Click Next. The Connections step opens.
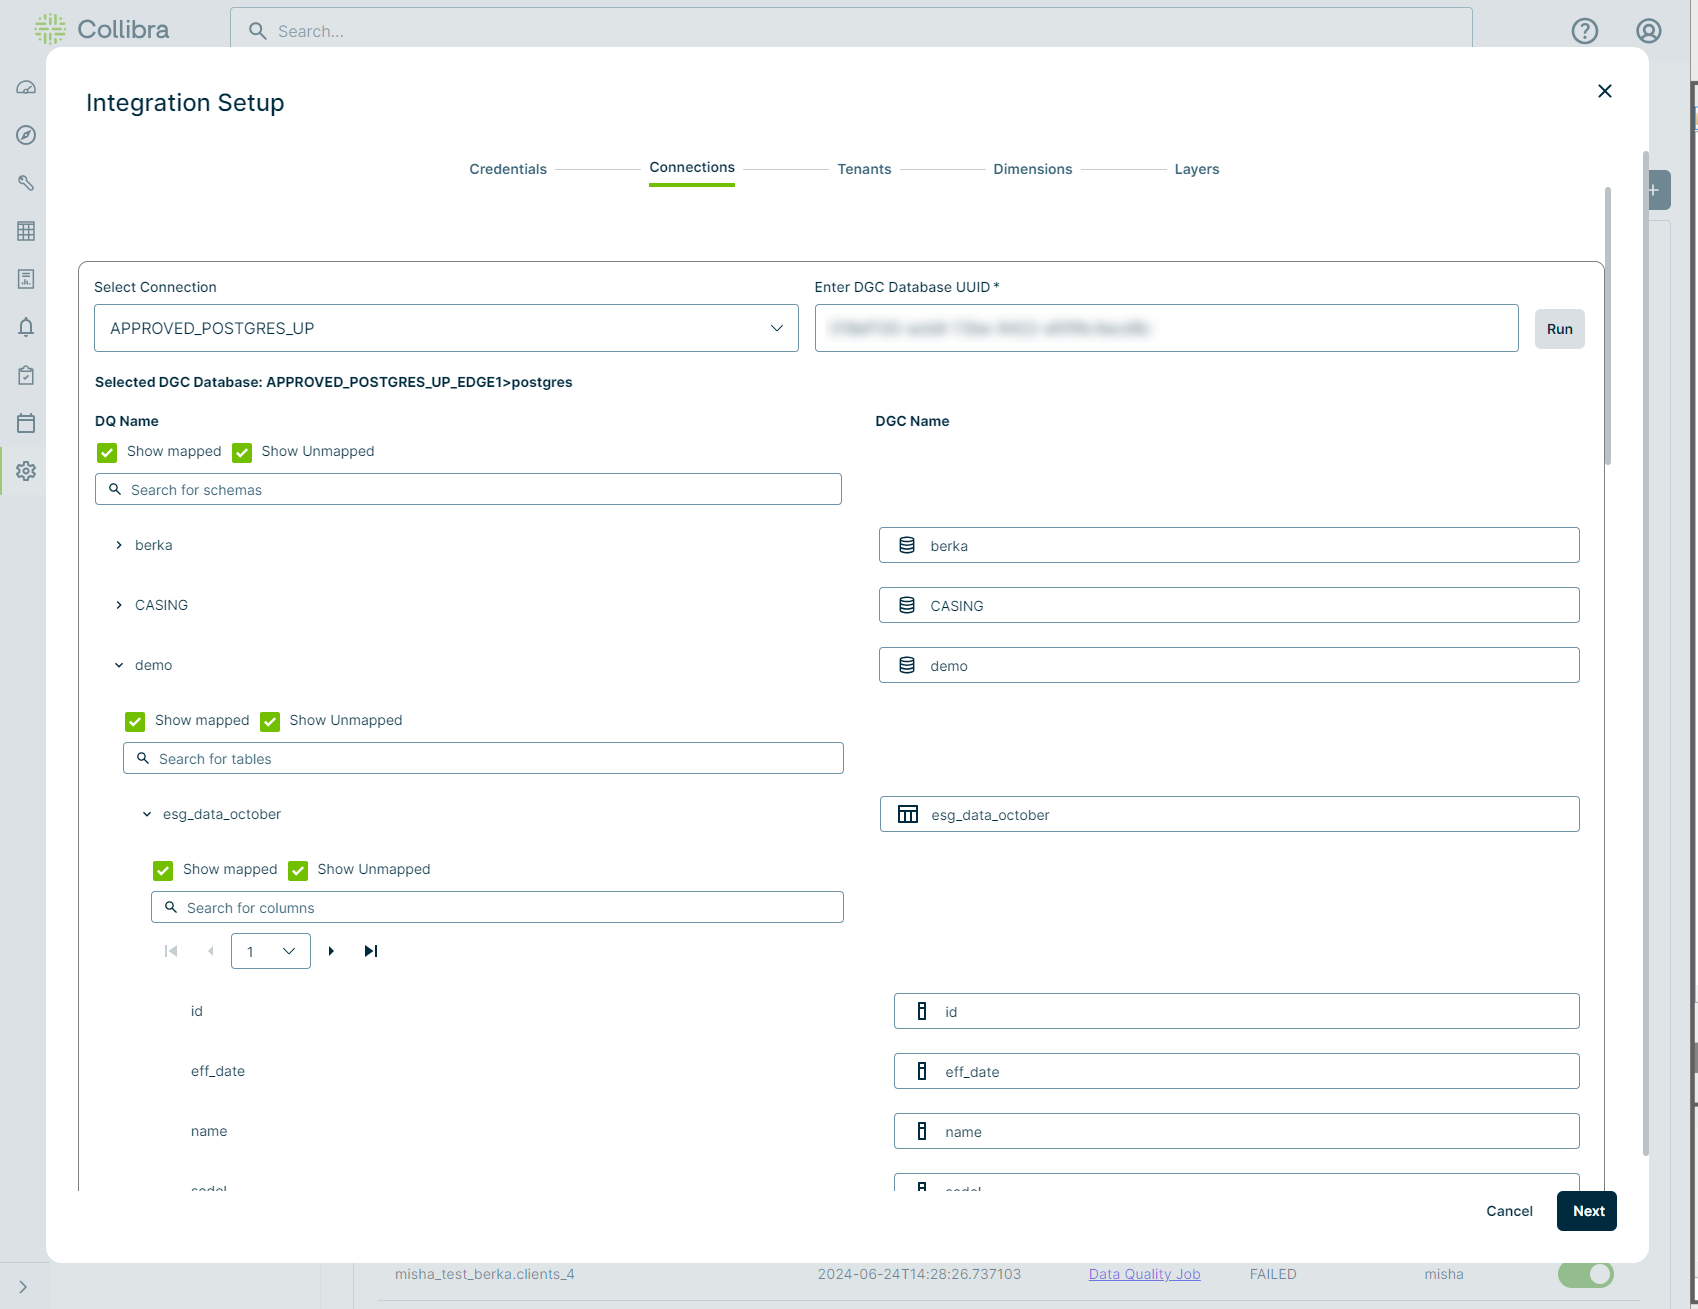
- On the Connections step, map your Collibra DQ connections to the appropriate database, schema, table, and column assets in Collibra Platform.
- Optionally, select the Map to primary column only switch to see only the column identified as the primary column related to the rule in Collibra Platform.
- From the Select Connection drop-down list, select a Collibra DQ database to integrate into Collibra Platform.
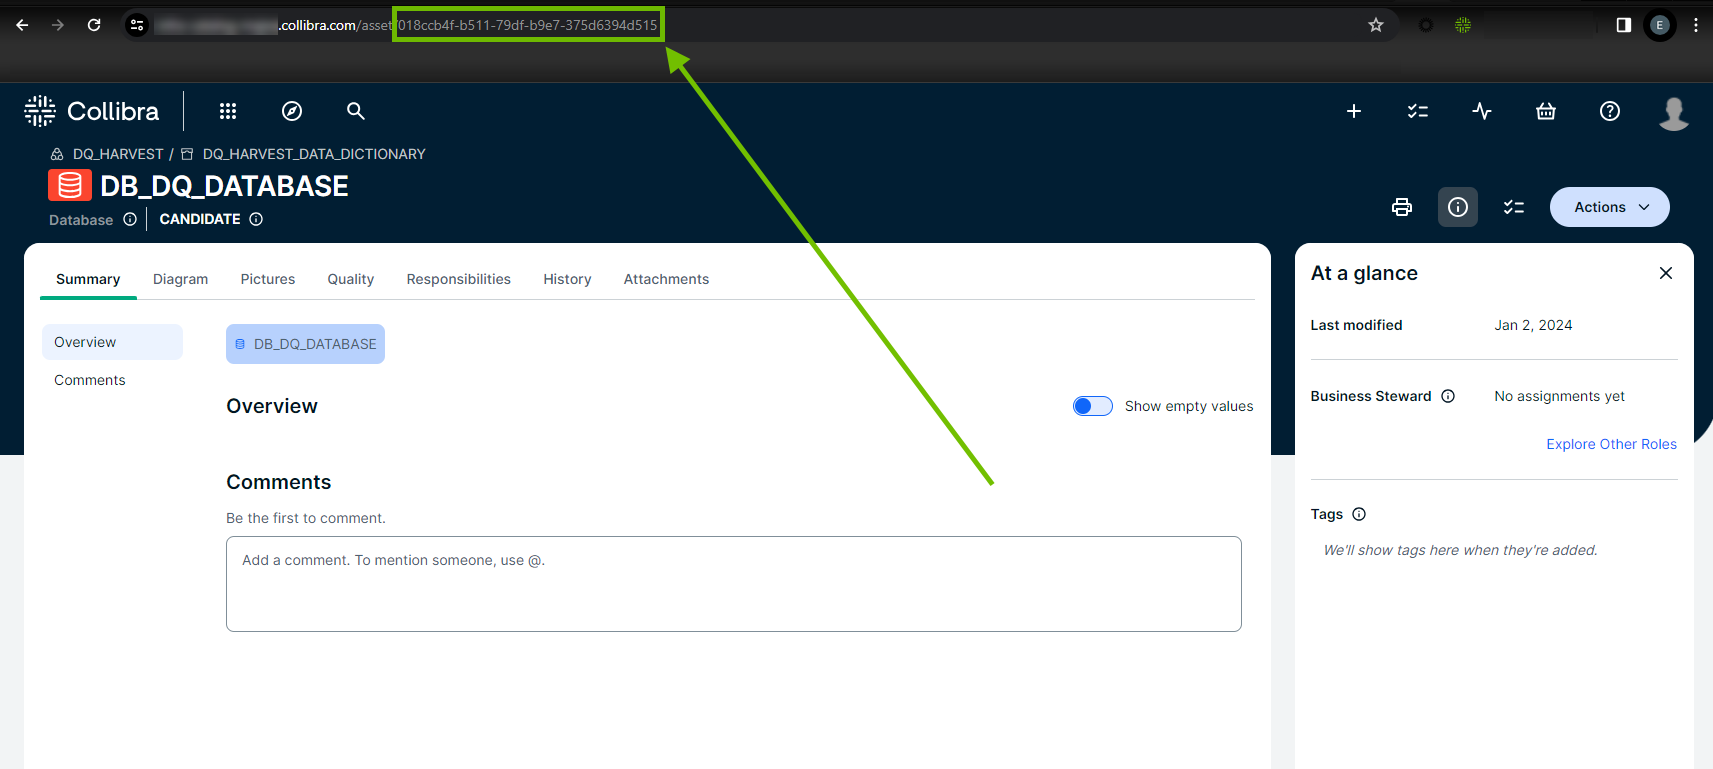
- In your Collibra Platform environment, open the asset page of the database you intend to map, then copy the URL from the UUID of the database asset from the URL.
- From the Connections tab in Collibra DQ, paste the copied UUID from Collibra Platform, or enter the UUID manually.
- If this is the first integration, then click
 , then Run to create an automatic mapping between the schemas within your selected Collibra DQ database and the schemas within Collibra Platform. If this is not the first integration, then proceed to the next step.
 - When the connection loads, click , then Show Full Mapping to expand the entire database mapping, including schemas, tables, and columns. You can use the Auto Map feature or manually map (or a combination of both) for each schema.
- Auto Map
Click
, then Auto Map to map tables in your DQ schema to those in DGC automatically. You can track the mapping status or cancel an in-progress mapping on the Mapping Status step.If auto map fails for a schema, then the Data Quality & Observability Classic mapping table is not updated. This is considered an atomic update, which is a series of operations that function as a single, indivisible unit. The operations either complete entirely or fail completely, ensuring that no partial states occur.
- Manually map
- In the DGC Name column, optionally click the drop-down list and select a different schema (
 ) to update the schema mapping.
 - In the DQ Name column, click the schema name to expand the available tables. The selected schema expands to show the available tables, and their corresponding tables (
- In the DGC Name column, click the drop-down list and select a different table to update the table mapping, if necessary.
- In the DQ Name column, click the table name to expand the available columns. The selected schema expands to show the available columns, and their corresponding columns (
- In the DGC Name column, click the drop-down list and select a different column to update the column mapping, if necessary.
Note When a name match cannot be made, a "Not Configured" message displays.
 ) appear across from them in the DGC Name column.
 ) appear across from them in the DGC Name column.
 - In the DGC Name column, optionally click the drop-down list and select a different schema (
-
Optionally, click Add New to map another connection and then repeat this process.
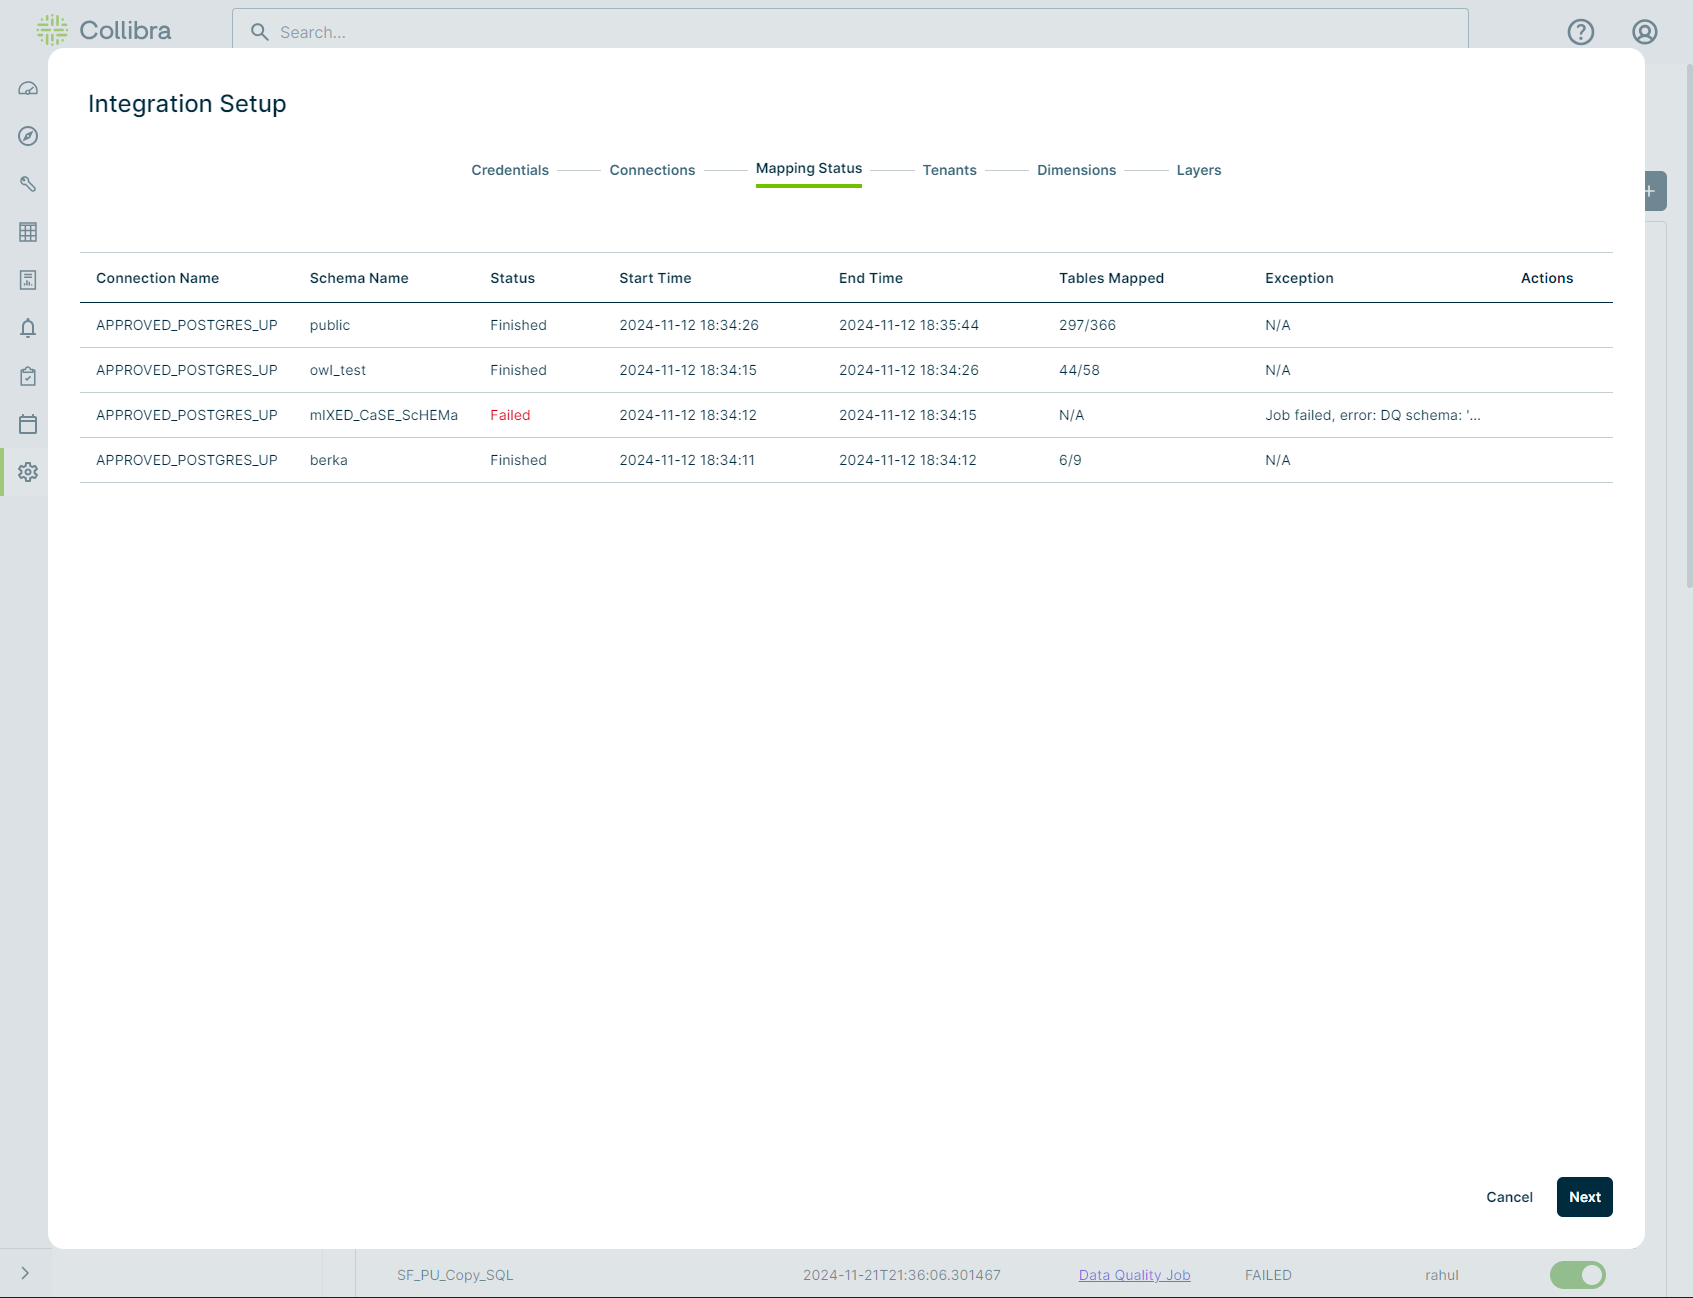
- Click Next. The Mapping Status step opens.
- On the Mapping Status step, optionally review mapping details.
-
x = partial column table count. The number of tables found in Data Quality & Observability Classic and Collibra Platform where some (>0 and < all column count) of the columns were mapped.
-
y = all column table count. The number of tables found in and Collibra Platform where all columns were mapped.
-
z = all tables discovered count. The total table count found in Data Quality & Observability Classic using the datasource connection for the "automap" schema.
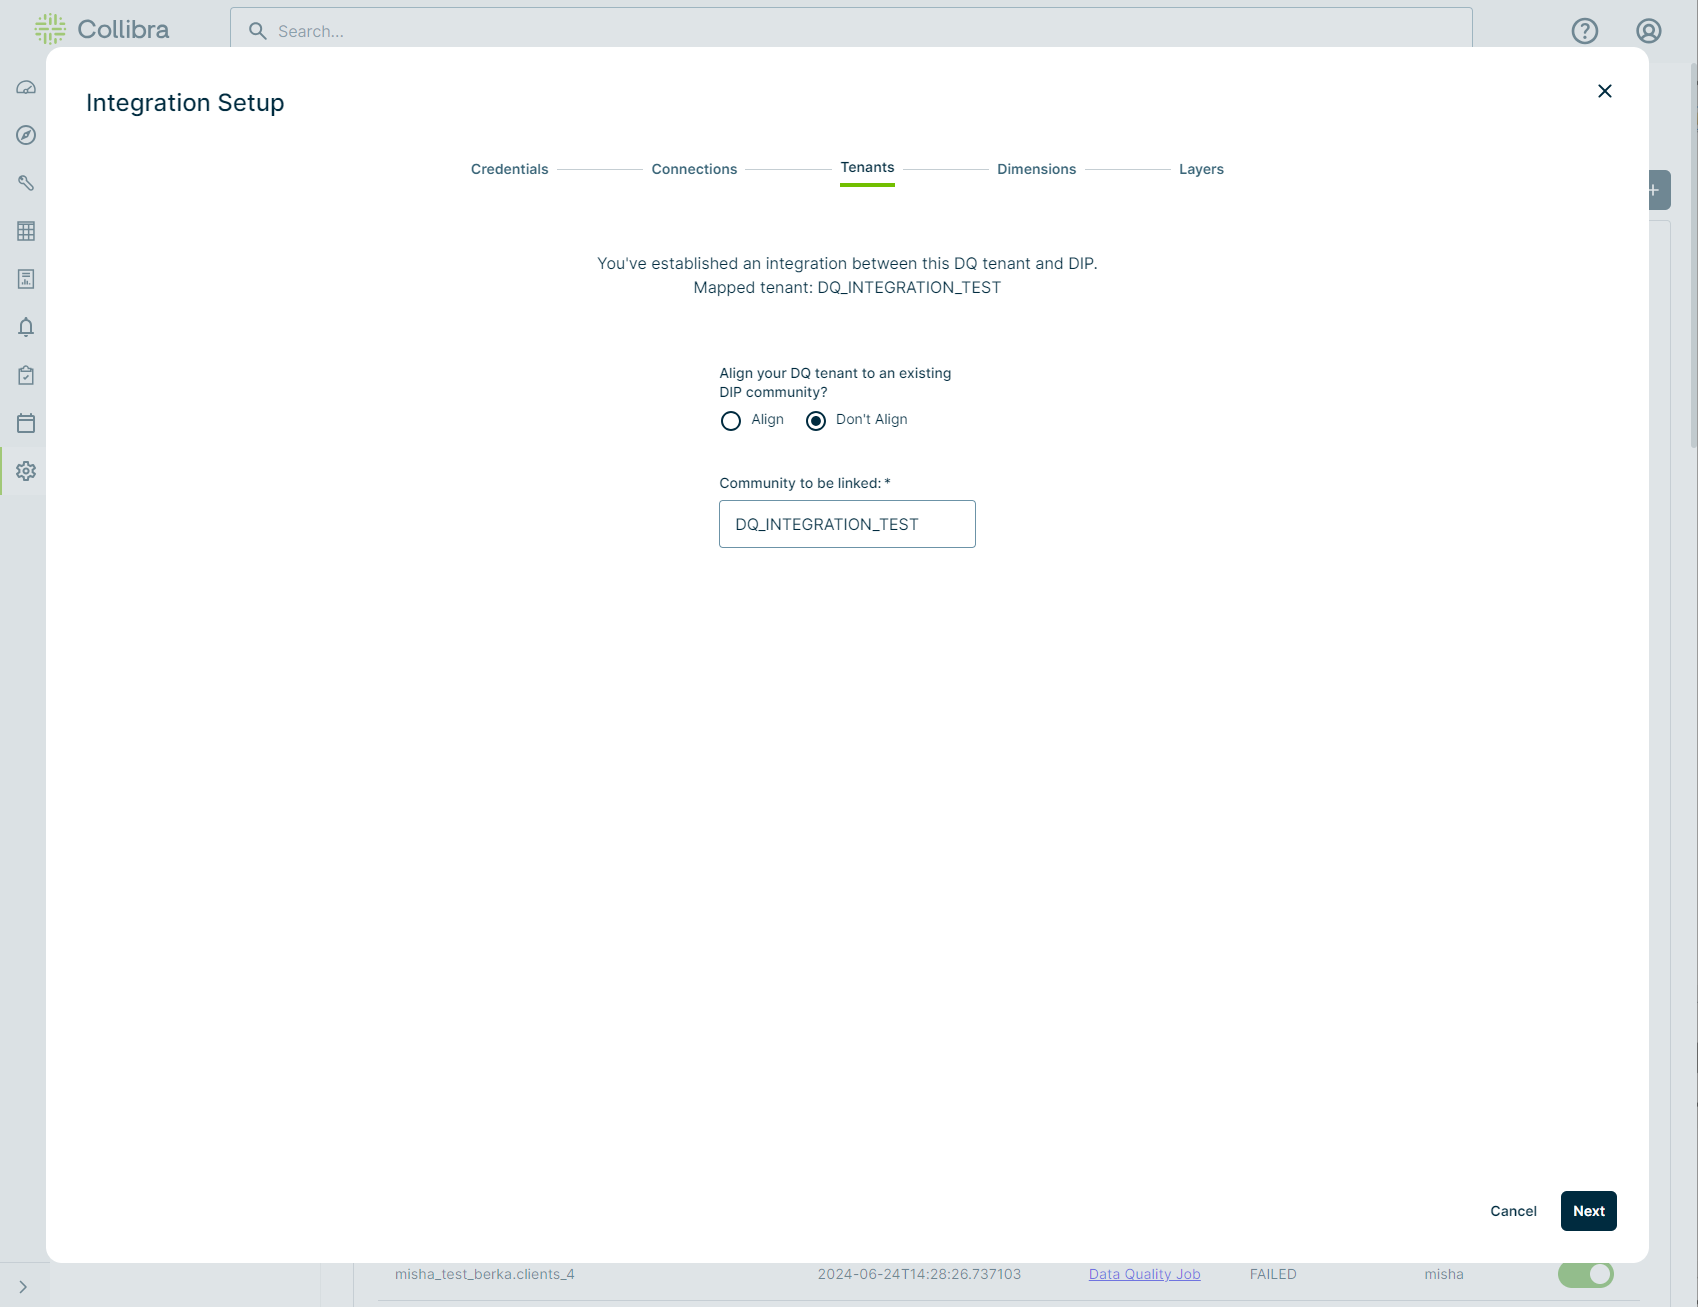
- Click Next. The Tenants step opens.
- On the Tenants step, enter the required information.
- Optionally, choose to align your Collibra DQ tenant with an existing Collibra Platform community.
- Align
- Select a Collibra Platform community from the drop-down list with which to align your tenant.
- Don't Align,
- Enter the name of a new community with which to align your tenant.
- Align
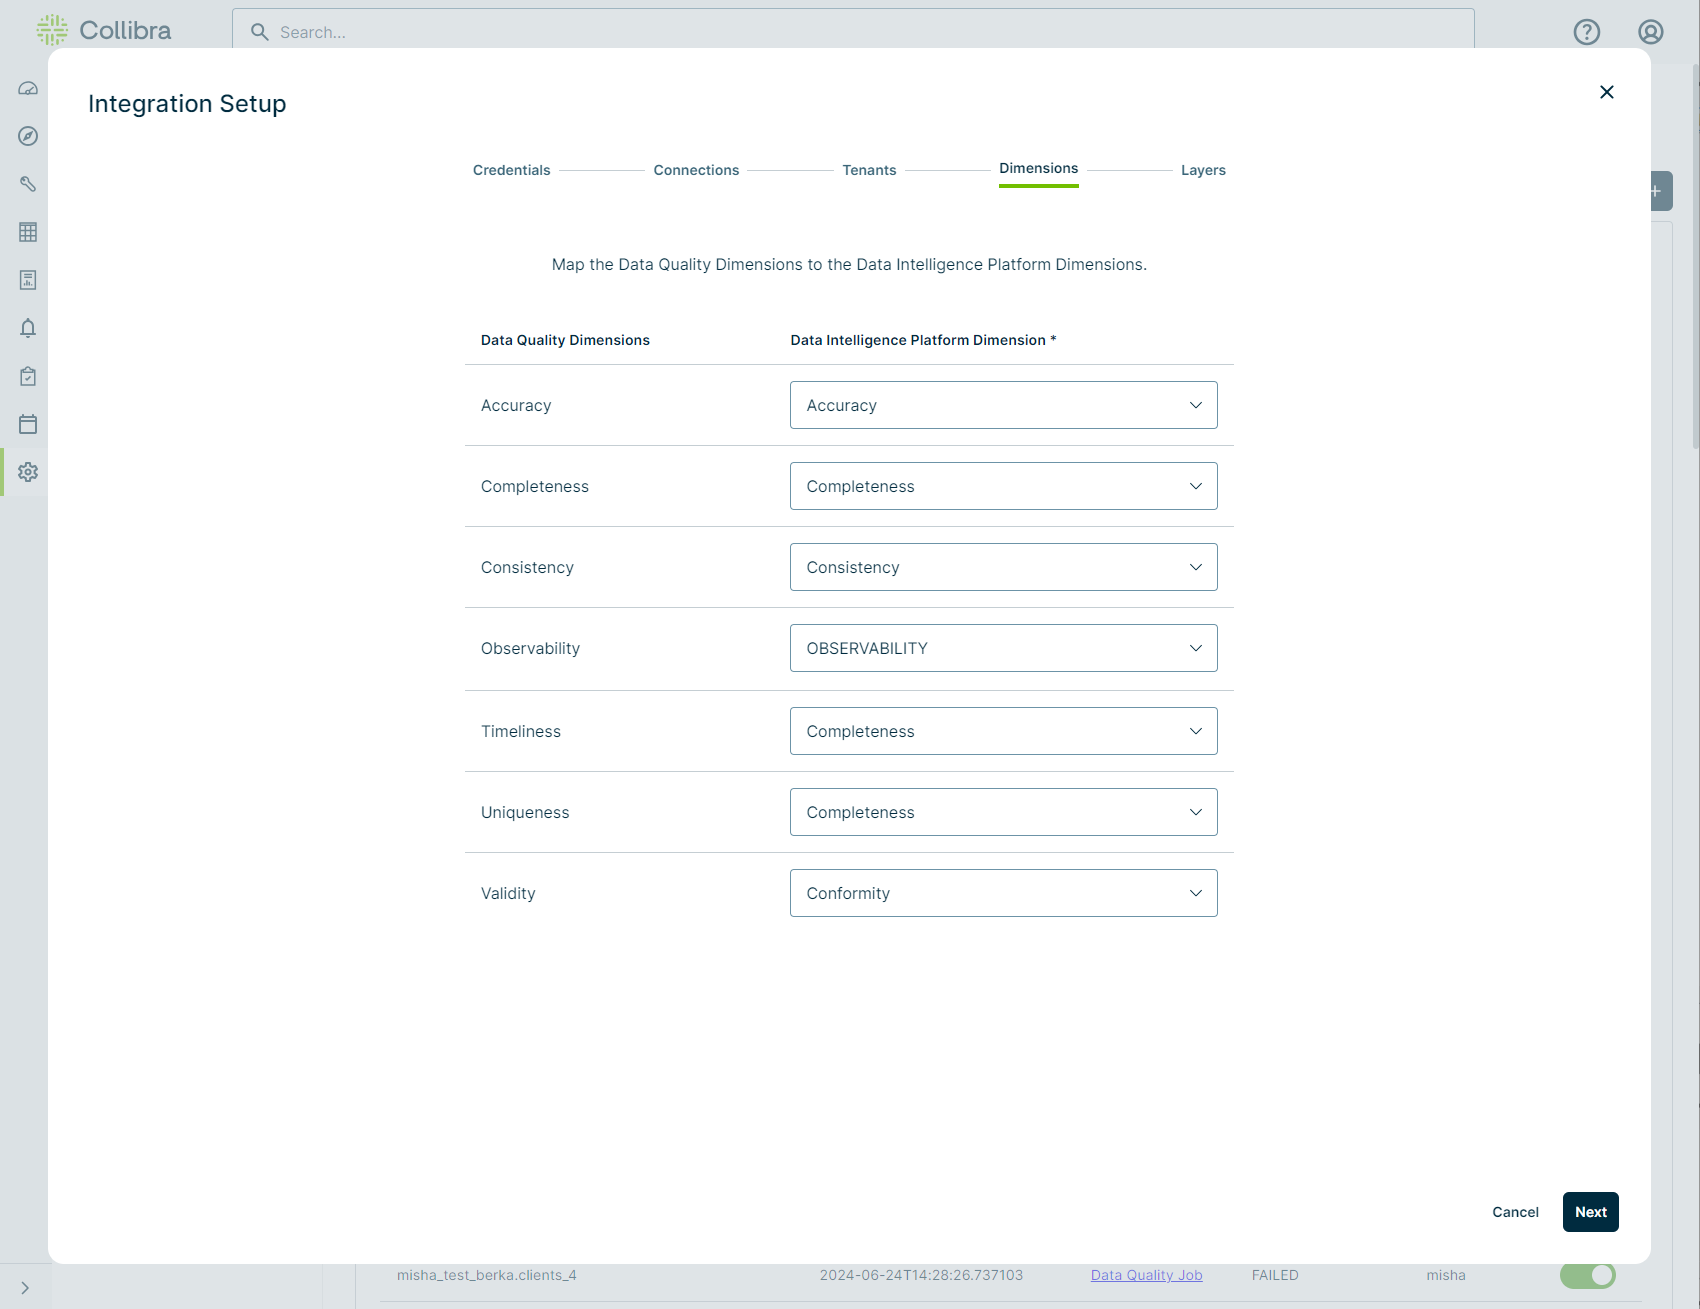
- Click Next. The Dimensions step opens.
- On the Dimensions step, enter the required information.
- Select a dimension from the drop-down list of the Data Intelligence Platform Dimension column that corresponds with the Data Quality Dimension you want to identify as a match.
- Click Next. The Layers step opens.
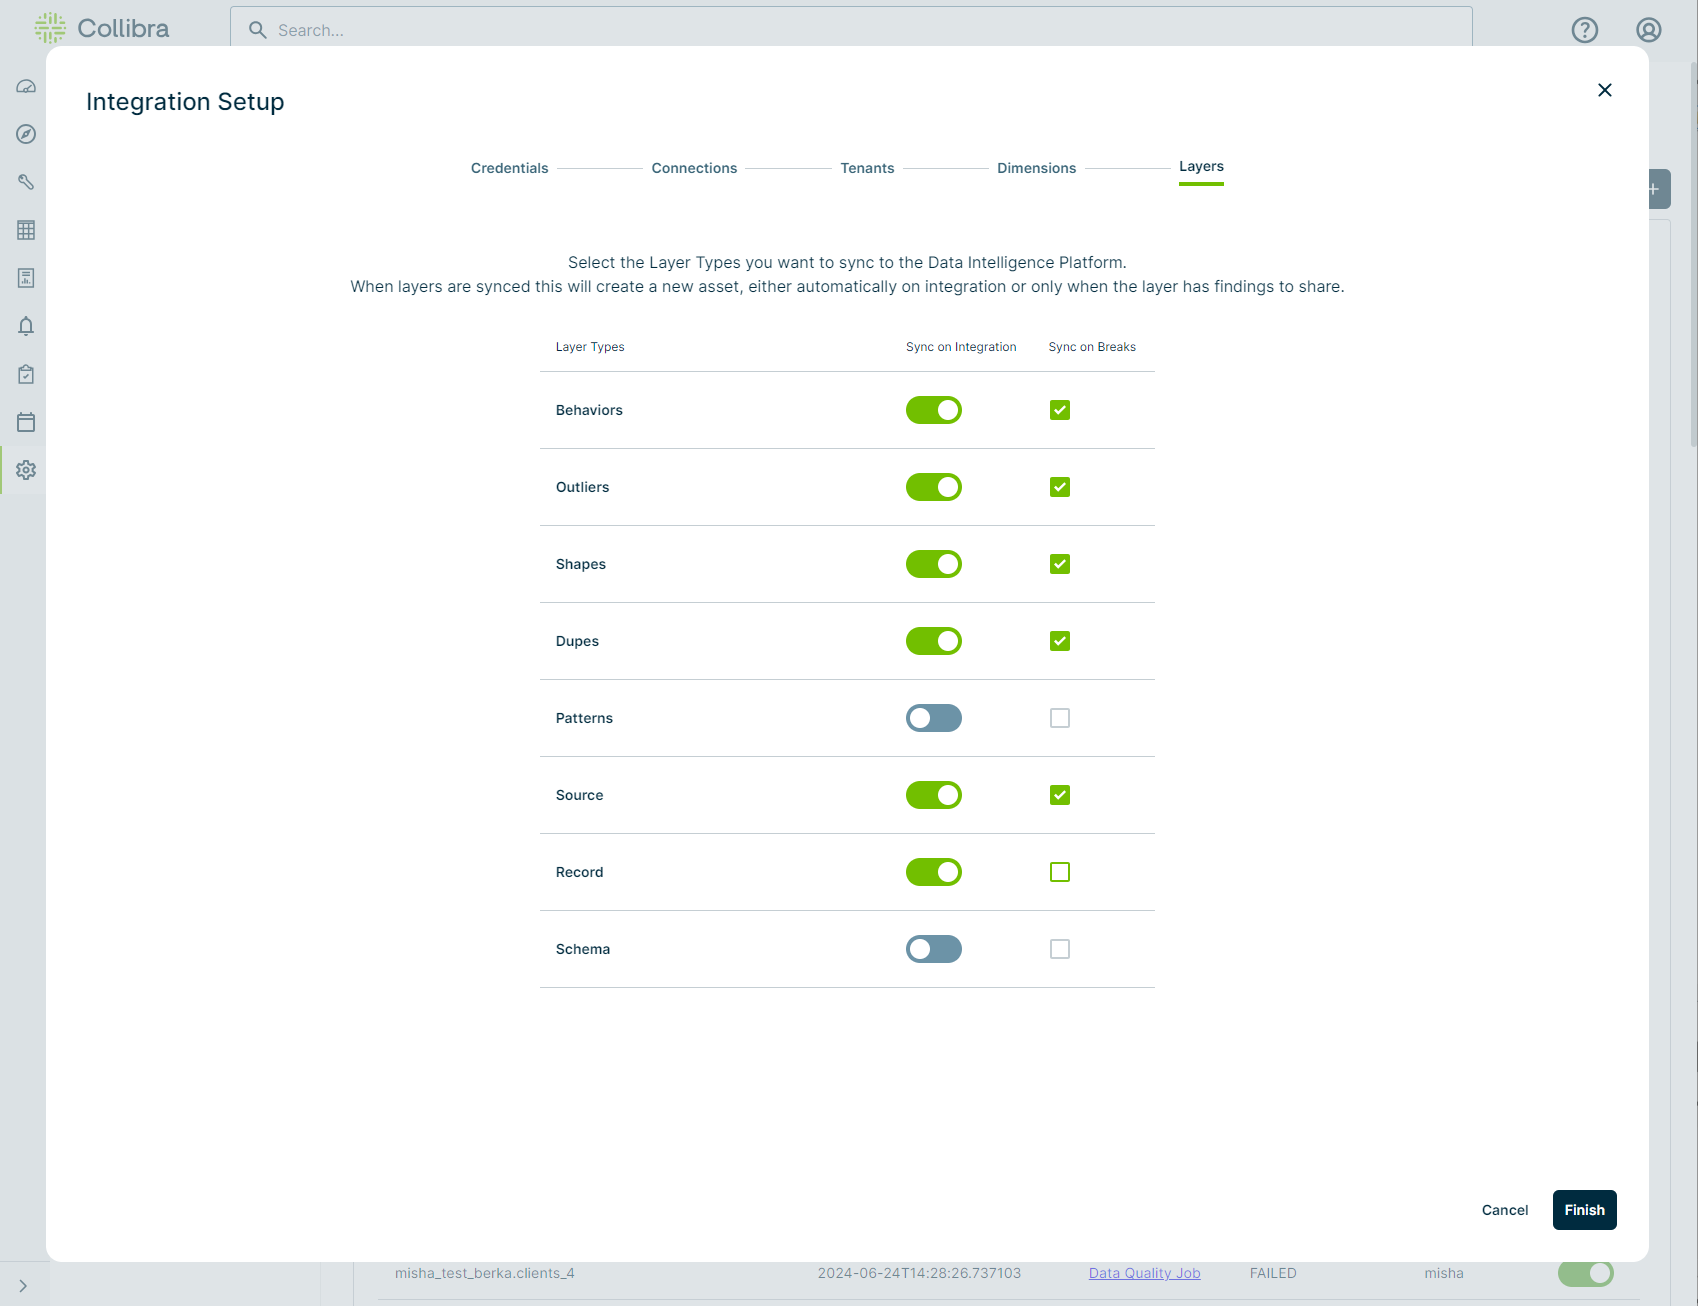
- On the Layers step, select which layers to synchronize to Collibra Platform.
- Select a layer in the Sync on Integration column to automatically create a new asset in Collibra Platform when the integration runs.
- Select the Sync on Breaks option to create a new asset in Collibra Platform only when the layer has a finding.
- Click Finish.
| Option | Description | Required |
|---|---|---|
| Service Type |
The application with which to integrate Data Quality & Observability Classic metadata. This value is always Data Intelligence Cloud. |
|
| Service URL |
The URL of the Collibra Platform environment to send Collibra DQ metadata. For example, "https://dg-example.collibra.com". |
|
| Authentication Mode |
The method of authenticating the API call to Collibra Platform. You can select either Basic or OAuth. Note To change the authentication mode, you should update the existing service URL credential. Only one integration credential can use a specific service URL. You can't have both Basic and OAuth for one service URL. |
|
| OAuth Token Endpoint |
The Collibra Platform URL where Data Quality & Observability Classic sends requests to obtain the OAuth access token. The OAuth Token Endpoint must be in this format:https://<yourdomain>.collibra.com/rest/oauth/v2/token To manage the scope of the DGC resources to which OAuth can grant access during the integration, a new OAuth parameter in the Web ConfigMap is now set to DQ_DGC_OAUTH_DEFAULT_REQUEST_SCOPE: "dgc.global-manage-all-resources,dgc.view-al" by default. To register your Collibra DQ instance, see the OAuth Applications settings page. |
Tip Required when using OAuth as the authentication mode. |
| Service Account | The username of your Collibra Platform environment. For example, "integration.user" or "Admin". |
Tip Required when using Basic as the authentication mode. |
| Password |
The password of your Collibra Platform environment. |
Tip Required when using Basic as the authentication mode. |
| Client ID | The public identifier provided by your OAuth service provider. |
Tip Required when using OAuth as the authentication mode. |
| Client Secret | The credential string from your OAuth service provider used to verify the identity of Data Quality & Observability Classic during the token request process. |
Tip Required when using OAuth as the authentication mode. |
Important
Only schemas ingested in Collibra Platform return when you click Run.

Mapping Status allows you to view mapping details, such as the number of available tables in a schema that are mapped and when a connection mapping fails.
| Column | Description |
|---|---|
| Connection Name | The name of the data source included in the mapping. |
| Schema Name | The name of the schema included in the mapping. |
| Status | The state of completion of the mapping. |
| Start Time | The time stamp, in yyyy-MM-dd hh:mm:ss format, of when the mapping began. |
| End Time | The time stamp, in yyyy-MM-dd hh:mm:ss format, of when the mapping stopped. |
| Tables Mapped |
The number of tables that mapped out of the total tables available in the schema. The 3 numbers shown in x/y/z format represent: Note There may be instances when x+y does not equal z. This occurs when tables from Collibra Platform aren't available because their metadata hasn't been ingested. When those tables are found through the Data Quality & Observability Classic connection, there is no attempt to map the tables or columns. The table is included in the total table count (z), but not in the partial or all column table counts (x or y). |
| Exception |
When an error during the mapping occurs, a message describes the issue. If the error message is truncated, you can hover your cursor over it to view the full message in a tooltip. When an exception did not occur, the value in this column is N/A. |
| Actions | When a mapping job is in progress, a |
Note Beneath each tenant-level community, a sub-community is created for each Business Unit that has datasets assigned to it in Collibra Platform. If a dataset is not assigned to a Business Unit, it is added to a community called Unassigned DQ Job by default.
Note All Data Quality Dimensions from your Collibra Platform environment are available to map to Data Quality Dimensions in Collibra DQ, including custom dimensions. However, Data Quality Dimensions from Collibra DQ are not customizable at this time.
Note Out of the box, not all adaptive rules are automatically assigned dimensions. Dimensions can be assigned to adaptive rules by changing a Metastore table. Contact Support or Professional Services for additional information.
| Dimension | Description | Out-of-the-box dimension assigned? | ||||||||
|---|---|---|---|---|---|---|---|---|---|---|
| Accuracy |
The degree to which data correctly reflects its intended values. Monitors associated with the accuracy dimension:
|
No | ||||||||
| Completeness |
The percentage of cells in a column that contain values identified as actual values, null, or empty. Completeness refers to the percentage of columns that have neither EMPTY nor NULL values. Monitors associated with the completeness dimension:
|
Yes | ||||||||
| Consistency |
The degree to which data contains differing, contradicting, or conflicting entries. Monitor associated with the consistency dimension:
|
Yes | ||||||||
| Validity |
The degree to which data conforms to its defining constraints or conditions, which can include data type, range, or format. Monitor associated with the validity dimension:
|
No | ||||||||
| Duplication |
The degree to which data contains only one record of how an entity is identified. Refers to the cardinality of columns in your dataset. Monitors associated with the duplication dimension:
|
No |
Enable a dataset for integration and start ingesting metadata from Collibra DQ into Collibra Platform.