Configuring Azure AD B2C user authentication
This topic describes how to configure Microsoft Azure Active Directory B2C (Azure AD B2C) as the primary OAuth2 authentication provider for Data Quality & Observability Classic. Once configured, users can log in to Collibra DQ using their Azure AD B2C credentials.
Configure the Azure AD B2C portal
The following procedures are performed in the Azure AD B2C portal, in which you will create the application registration that represents your Collibra DQ application. You must have an active Azure subscription with permissions to manage Azure AD B2C tenants, applications, and user flows. For more detailed information, refer to the Microsoft documentation on registering applications.
If you have not yet created an Azure AD B2C tenant, do so now. For more information, see Microsoft's tutorial on creating an Azure AD B2C tenant.
Register the DQ application in Azure AD B2C
Begin by creating the application registration in Azure AD B2C that represents your Collibra DQ application.
- Navigate to Azure AD B2C in your Azure portal.
- Under Manage, click App registrations.
- Click New registration.
- Provide a meaningful name for your application (for example, "DQ Application").
- Under Supported account types, select the appropriate option for your B2C tenant.
- Do not specify a Redirect URI at this stage. The DQ application will provide this value later.
- Click Register.
- Keep this application's overview page open in a separate tab or window. You will need its Application (client) ID.
Create a client secret for the DQ Application
The client secret is a confidential key used by your Collibra DQ application to authenticate with Azure AD B2C.
- From the registered application's overview page in the Azure portal, go to Certificates & secrets in the left-hand navigation.
- Click New client secret.
- Provide a description (for example, "DQ App Secret") and set an expiration (for example, 24 months).
- Click Add.
- The client secret value displays. Copy this value immediately and store it securely. You will need it for the Collibra DQ application configuration. This value will not be visible again once you leave this page.
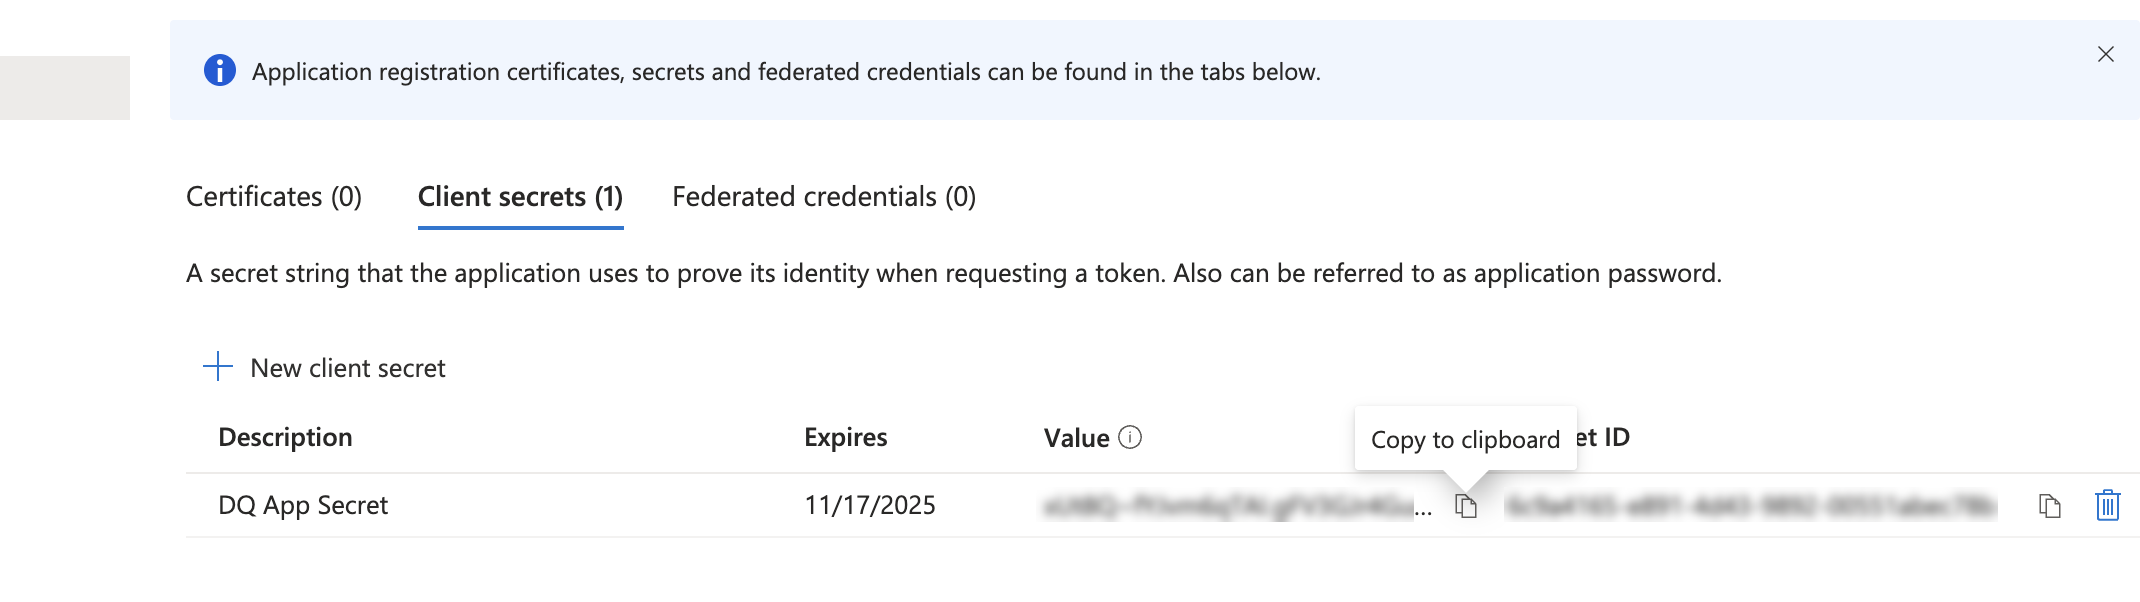
The client secret value is displayed only once. Copy this value immediately and store it securely.
Create a sign-up and sign-in user flow
This user flow defines the user experience for sign-up and sign-in in your Azure AD B2C tenant.
- From the main Azure AD B2C screen in the Azure portal, under Policies, click User flows.
- Click New user flow.
- Select Sign up and sign in and choose the recommended version.
- Click Create.
- Give your user flow a name (for example, "B2C_1_YourOrganizationSignin").
- Select the Identity providers you want to use (for example, "Email signup").
- Under User attributes and token claims, you can keep the defaults for now. You will add a custom attribute for roles in the next section.
- Click Create. Note the name of this user flow, as you will need it for the Collibra DQ application configuration.
Create a custom attribute for roles
To enable role mapping from Azure AD B2C to Collibra DQ, you need to create a custom user attribute. This attribute stores a comma-separated list of roles for each user in Azure AD B2C. For more information, refer to the Microsoft documentation on user flow custom attributes.
- From the main Azure AD B2C screen in the Azure portal, under Manage, click User attributes.
- Click Add.
- For Name, enter a descriptive name (for example, "dqroles").
- For Data Type, select String.
- Enter a Description (for example, "Comma-separated list of DQ roles").
- Click Create.
extension_ to its name. So, if you named it dqroles, it will appear as extension_dqroles in the token. You will use this version of the name in the DQ configuration.Configure the DQ Application
Next, configure your Collibra DQ application to integrate with the Azure AD B2C setup.
Enable the OAuth2 login feature
The OAuth2 login feature must be enabled in the Collibra DQ application in order for the OAuth2 Provider Configuration section to be active and editable.
Add the following value to the owl-env.sh file:
export OAUTH2_LOGIN_ENABLED=true
Add the following value to the Web ConfigMap:
OAUTH2_LOGIN_ENABLED: true
Configure the Azure AD B2C OAuth2 Provider in DQ
This section details how to add your Azure AD B2C tenant as an authentication provider within the Collibra DQ application's administrative interface.
- Sign in to Collibra DQ as an administrator and click
 in the left navigation pane.
 - Click Admin Console.
- Click User Management, then click OAuth2 Provider Configuration.
- Fill in the following fields:
- Click Save. After saving, your newly configured provider will appear in a list. Note the Redirect URI displayed for your provider. This URI will typically be in the format
<https://yourdqinstall.yourdomain.com/login/oauth2/code/{registrationId}>. - Copy the Redirect URI.
A setup page displays with fields to add a new OAuth2 Provider.
|
Field Name |
Description |
Details & Where to Find |
Example Value |
|---|---|---|---|
|
Identity Provider |
Specifies the type of OAuth2 provider. |
Select Azure B2C. |
Azure B2C |
|
Registration ID |
A unique, arbitrary name for this provider within your Collibra DQ environment. It is used internally by DQ to identify this specific configuration. |
Choose a name that is meaningful to you (for example, my-azureb2c, company-b2c). |
my-azureb2c |
|
Enabled |
Controls whether the Azure AD B2C login button displays on the Collibra DQ login screen. |
Set to False initially. You can toggle this to True after completing all configurations. |
False |
|
Client ID |
The unique identifier for your Collibra DQ application in Azure AD B2C. |
Found in Azure AD B2C on the Overview page of your registered DQ application. |
c3250bf3-bcb3-81c5-9acd-d31998da7b29 |
|
Client Secret |
The confidential key generated for your Collibra DQ application in Azure AD B2C. |
Found in Azure AD B2C, copy this value from Certificates & secrets in your registered DQ application. This value is only shown once in Azure AD B2C. |
someSuperSecretValue... |
|
OAuth2 Claim Field Name |
The name of the custom attribute in your Azure AD B2C token that contains the user's roles. |
This must be the name of your custom user attribute (for example, dqroles) prefixed with |
extension_dqroles |
|
Azure B2C Tenant ID |
Your Azure AD B2C tenant name. |
Often found in the Application ID URI of your Azure AD B2C app registration (for example, |
yourorganization |
|
Azure B2C Signup/Signin Policy |
The name of the Sign-up and Sign-in user flow you created in Azure AD B2C that defines the user authentication experience. |
The Name of the user flow you created in Azure AD B2C. |
B2C_1_YourOrganizationSignin |
|
Azure B2C Profile Edit Policy |
Reserved for future use. |
Leave blank or default. |
|
|
Azure B2C Password Reset Policy |
Reserved for future use. |
Leave blank or default. |
Update the Azure AD B2C Application Redirect URI
This is a critical step for successful authentication redirection. The Redirect URI tells Azure AD B2C where to send the user after they've successfully logged in.
- Go back to your Azure portal and navigate to the App registration for your Collibra DQ application.
- Under Manage, click Authentication in the left-hand navigation.
- Under Platform configurations, click Add a platform and select Web.
- In the Redirect URIs field, paste the Redirect URI you copied from the Collibra DQ application.
- Click Configure.
Restart the DQ Application
You must restart the Collibra DQ application when a new OAuth2 provider is added to ensure it is properly registered. If you are only modifying an existing provider (e.g., enabling/disabling), a restart is generally not necessary.
Test basic login functionality
- Open the Data Quality & Observability Classic login page.
- Click the Azure B2C Login button.
- If the configuration is correct, you will be redirected to the Microsoft Azure AD B2C sign-in window.
- If nothing happens or you encounter an immediate error, check your Collibra DQ application logs and browser developer console network logs. The most common issue at this stage is an incorrect or unpropagated Redirect URI in Azure AD B2C.
- From the Microsoft login window, sign in with an existing Azure AD B2C user account or create a new one through the configured user flow.
- Upon successful authentication in Azure AD B2C, you should be redirected to the Collibra DQ application. If you cannot successfully authenticate into Azure B2C, you may need to grant this user permission in your Azure AD B2C application.
- Even after logging in through Microsoft, you will likely see a message from Collibra DQ indicating "Access Denied" or similar. This is expected behavior at this point. It confirms that authentication through Azure AD B2C was successful, but the user does not yet have any roles assigned or mapped that grant them access to the Collibra DQ application's features.
- To grant users access, you must populate user roles in Azure AD B2C and complete the role mapping in Collibra DQ.
You should now see a new button, typically labeled Azure B2C Login or similar, below the standard login fields. If the button is not present, ensure that the OAUTH2_LOGIN_ENABLED property is set to true.

Basic role mapping in DQ
Without role mapping, even successfully authenticated users will be denied any access to the Collibra DQ application. This basic setup allows you to map one or two roles to quickly test user access. For advanced role management, refer to Configuring Azure AD B2C for user authentication via graph API.
- Sign in to Collibra DQ as an administrator (using a non-B2C login, if still available, or an account with existing roles).
- Click in the left navigation pane.
- Click Admin Console.
- Click User Management, then click OAuth2 Provider Configuration.
- For your Azure B2C provider, click to edit the role mappings.
- Map the B2C roles to the Collibra DQ application roles:
- For each role you want to map, find it in the Not Included section. If it’s not there, you must add your expected B2C roles:
- In the text box with the placeholder Enter a name or names (comma delimited), type the exact name(s) of the roles you expect to assign to users in Azure AD B2C (for example, dq-user, dq-admin).
- Click the
 next to the textbox. These will appear in the Not Included section.
- Click the
 next to the Application Role (Destination) field for that specific row.
 - From the list of available DQ Application Roles, select the desired internal DQ role (for example, ROLE_ADMIN, ROLE_CONNECTION_MANAGER).
- Click Submit to save the mapping for that specific role.
- Repeat this process for all Azure AD B2C roles you intend to use.
The Edit Mapping for [Provider Name] page displays.
Configuring Azure AD B2C for user authentication via graph API