Import complex relations
You can import
Tip For easier bulk changes, you can perform the so-called export/import roundtrip. First create a view that contains all the characteristics, then export that view, edit the exported file, and import it back into the same view. Collibra will automatically map the characteristics during the import.
Tip For importing complex relations using an Excel file, see the knowledge base on the Collibra Support Portal.
Note Exporting and importing assets and complex relations is restricted by the file upload settings, which determine the maximum file size, allowed file extensions and maximum amount of uploads and downloads per day.
Prerequisites
You have prepared an Excel file for upload:
- Only the essential sheets, columns and rows remain.
- Numbers that have to be interpreted as text are preceded by a single quotation mark.
- Dates are formatted as yyyy-mm-dd.
- The related assets to connect for a single complex relation must be specified in a single cell.
- Your import file has the correct structure to import complex relations.
Steps
- Open a view.
- Above the table, to the right, click
 →
→
The Import dialog box appears. - Click Select File and choose the appropriate Excel file for upload.
- Click Next.
- Select the complex relation type that you want to import.
- Click Next.
- Manage the mapping of the columns of the import file and the view's fields.
- The Import mapping dialog box appears and Collibra tries to map the fields of the view automatically to the columns in the import file, based on the names of the fields and columns.Learn more about the mapping dialog box.
Visual
Number
Field Description 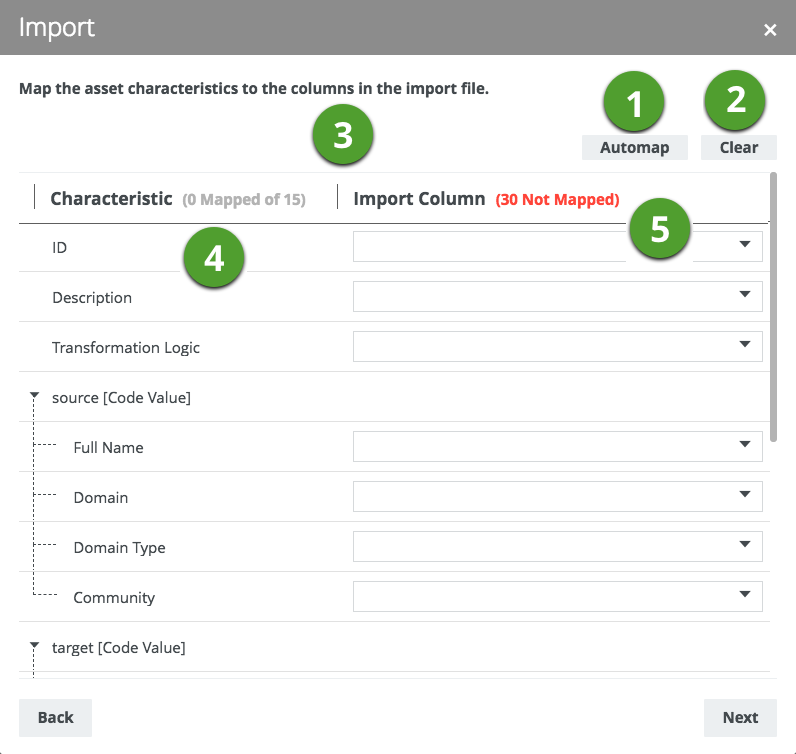
1
Automap
Button to let Collibra automatically map all fields of the view to the columns in the import file, based on the names of the characteristics and columns.
2
Clear
Button to clear all mapped characteristics in the Import Column.
3
Mapping table
This table enables you to map characteristics of the view to columns of the import file.
Each row has a background color to indicate whether a characteristics is mapped or not.
- Dark green: The characteristic is mapped to a column in the import file.
- Light green: The relation is mapped partially. This means not all underlying fields are mapped.
- White: The characteristic is not mapped.
4
CharacteristicThis column contains the available characteristics. Depending on the selection in the view selector, it contains either the characteristics of the selected view, or all characteristics. For relations, a hierarchy is displayed. 5
Import ColumnThis column should contain fields in which you can choose columns of the import file to map to a characteristic of the view.
- If required, choose another view in the view selector. Tip Choose All characteristics to show all characteristics. In most cases, this makes it easier to map all characteristics.
- Click Automap to let Collibra map all visible columns automatically.
- If required, manually map columns to another characteristic.
- The Import mapping dialog box appears and Collibra tries to map the fields of the view automatically to the columns in the import file, based on the names of the fields and columns.
- Click Next.
The Import options appear. - Enter the required information.
Setting Result Test Import Collibra first simulates an import without affecting the data to give you an overview of how the actual import would affect the data. After the overview, you can proceed with the import, go back to change the options or cancel the import. - Click the Test Import button.
The test results appear. - If everything looks okay, click Import.
If it doesn't, close the dialog box to cancel the import or click Back to change the mapping or import options.
The import results appear. - Click Close.