|

|
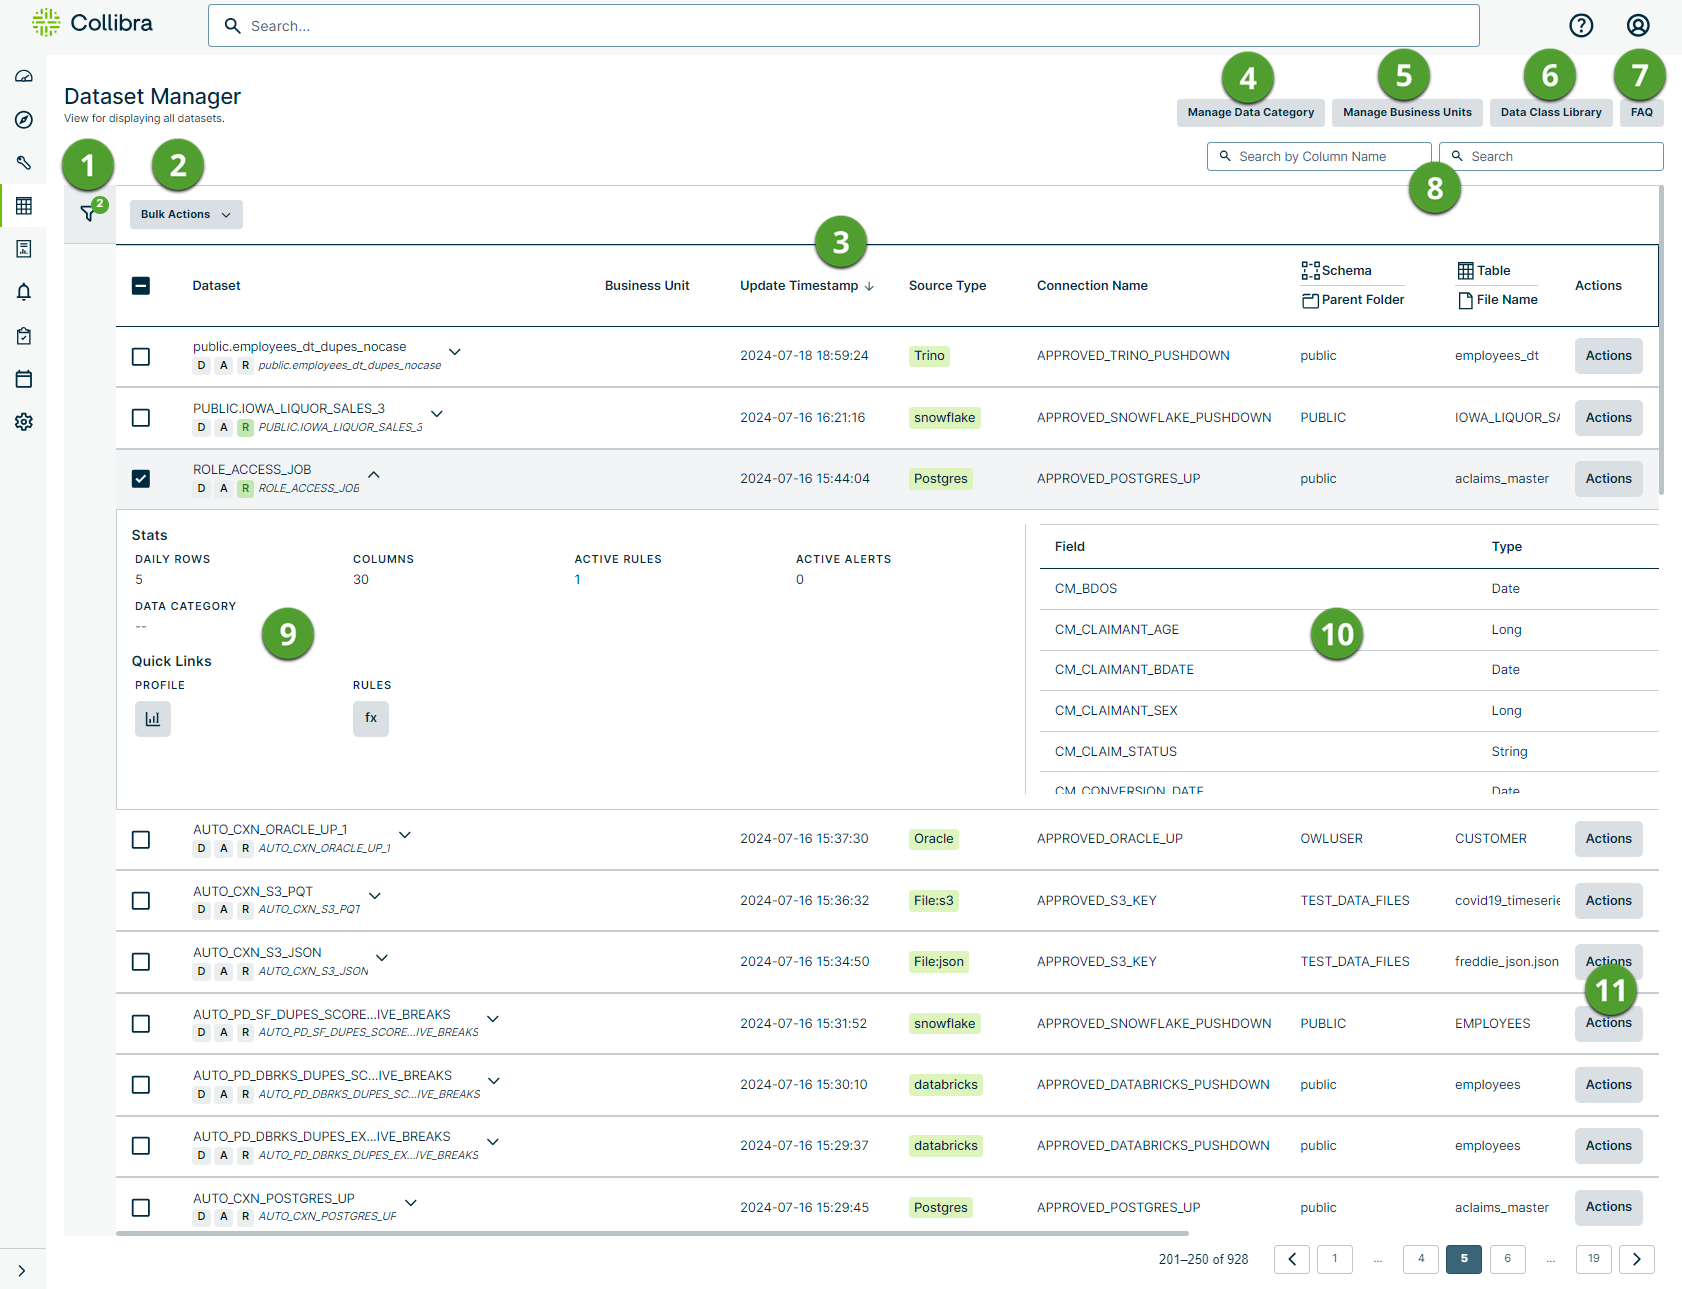
Filter |
Apply one or many filters to refine the list of datasets based on:
- Sensitivity
- Filter by sensitivity labels associated with datasets in your Data Quality & Observability Classic environment.
- Run Mode
- Filter datasets based on whether they are in published or draft status.
- Connection Type
- Filter datasets by Pushdown or Pullup processing mode.
- Attributes
- Filter datasets that only contain rules without alerts or alerts without rules.
- Source Type
- Filter datasets by data source.
- Data Class Type
- Filter datasets by data class.
- Business Units
- Filter datasets by business unit.
- Data Categories
- Filter datasets by data category.
- Row Count
- Filter datasets by the number of rows they contain.
- Column Count
- Filter datasets by the number of columns they contain
- Integrations
- Filter datasets based on whether they are integrated into Collibra Platform.
- # of DQ Scans
- Filter datasets by the number of times they have been run as DQ Jobs.
|
|

|
Bulk Actions |
Select the checkbox options in the column to the left of the Dataset column, then click Bulk Actions and select an option from the drop-down menu. The available Bulk Actions options include:
Bulk Manage Host
Allows admin users to update the host URL of multiple datasets at once. Select the checkbox options next to the datasets you want to manage, then click Bulk Manage Host from the Bulk Actions drop-down menu. From the Bulk Manage Host dialog, enter the new host URL and click Save.
Bulk Manage Agent
Allows admin users to update the agent of multiple Pullup datasets at once. Select the checkbox options next to the datasets you want to manage, then click Bulk Manage Agent from the Bulk Actions drop-down menu. From the Bulk Manage Agent dialog, select the new agent from the drop-down menu and click Save.
Important Updating the host of multiple datasets at once applies changes to both scheduled and unscheduled DQ Jobs. The connection of any dataset included in the bulk update is mapped to agent you select.
Bulk Manage Spark Settings
Allows admin users to update the Spark settings of multiple Pullup datasets at once. Select the checkbox options next to the datasets you want to manage, then click Bulk Manage Spark Settings from the Bulk Actions drop-down menu. From the Bulk Manage Spark Settings dialog, fill out the required fields and click Save.
The command line is updated at runtime, so you must re-run the job after updating the Spark settings.
Show fields
| Number of Executors |
The default number of executors allocated per DQ Job.
The default is 1.
|
| Driver Memory |
The default driver RAM allocated per DQ Job.
The default is 1 gigabyte.
|
| Executor Memory |
The default RAM per executors allocated per DQ Job.
The default is 1 gigabyte.
|
| Executor Cores |
The default number of cores per executors allocated per DQ Job.
The default is 1.
|
| Conf |
Additional spark-submit parameters appended to the DQ Job run command. |
| Master |
The Spark Master URL copied from the Spark cluster verification screen. For example, spark://... |
| Deploy Mode |
The Spark deployment mode can be either Client or Cluster. While we recommend Cluster, there are best practices to follow:
- If you only have one Spark Worker node, it is best practice to select Client.
- If you have more than one Spark Worker node, it is best practice to select Cluster.
|
- Bulk Manage Business Units
- Allows you to apply a business unit to multiple datasets at once. Select the checkbox options next to the datasets you want to manage, then select Bulk Manage Business Units from the Bulk Actions drop-down menu. From the drop-down menu, select your preferred business unit and click Save.
- To assign a business unit to a dataset, you need to have dataset access or ROLE_DATASET_ACTIONS.
- Bulk Manage Data Categories
- Allows you to apply a data category to multiple datasets at once. Select the checkbox options next to the datasets you want to manage, then select Bulk Manage Data Categories from the Bulk Actions drop-down menu. From the drop-down menu, select your preferred data category and click Save.
- To assign a data category to a dataset, you need to have dataset access, ROLE_DATASET_TRAIN, or ROLE_DATASET_ACTIONS.
- Bulk Enable Integrations
- Allows you to enable the integration for only the selected datasets. This option adds the dataset under the corresponding integration endpoint and sets the integration toggle to "true." It doesn't submit the integration job, run the Collibra job, or update business units/assets information.
- Select the checkbox options next to the datasets you want to manage, click Bulk Enable Integrations from the Bulk Actions drop-down menu, then click Enable integrations.
- To enable a dataset integration, you need to have ROLE_ADMIN, ROLE_DATASET_MANAGER, ROLE_DATASET_ACTIONS.
- Bulk Submit integration jobs
- Allows you to trigger the integration job for the selected datasets. This option submits the datasets for processing under the integration jobs pipeline, executes the Collibra job responsible for populating business unit and assets information, and ensures the Metadata bar displays updated information once processed.
- Select the checkbox options next to the datasets you want to manage, click Bulk Submit integration jobs from the Bulk Actions drop-down menu, then click Submit integrations.
- To submit a dataset integration, you need to have ROLE_ADMIN, ROLE_DATASET_MANAGER, ROLE_DATASET_ACTIONS.
- Bulk Delete
- Allows you to delete multiple datasets at once. Select the checkbox options next to the datasets you want to delete, then select Bulk Delete from the Bulk Actions drop-down menu.
- To delete a dataset, you need to be its owner or have ROLE_ADMIN or ROLE_DATASET_MANAGER.
|
|

|
Dataset table |
This table lists all datasets in your Collibra DQ environment and provides the high-level data points described in the following table.

|
Click these options to select one or more datasets to allow you to apply bulk actions. You can also select in the column header to select all datasets. |
| Dataset |
The name of your dataset. You can also see the following in this column:
- When a dataset is in draft status, a gray D displays beneath the dataset name.
- When a dataset is in published status, a green P displays beneath the dataset name.
- When a dataset does not have alerts configured, a gray A displays beneath the dataset name.
- When a dataset has alerts configured, a red A displays beneath the dataset name.
- When a dataset does not have rules configured, a gray R displays beneath the dataset name.
- When a dataset has rules configured, a green R displays beneath the dataset name.
- Click
 to the right of the dataset name to drill down into the dataset. to the right of the dataset name to drill down into the dataset.
|
| Business Unit |
The business unit with which the dataset is associated. |
| Update Timestamp |
The timestamp of the last run of the dataset in YYYY-MM-DD hh-mm-ss format. |
| Source Type |
The data source of the dataset. For example, SQL Server or BigQuery. |
| Connection Name |
The unique name of the data source. For example, EXAMPLE_SQLSERVER_CXN. |
| Schema/Parent Folder |
The schema or parent folder from which the dataset originates.
Note When you use complex queries (such as CTEs), the schema and table cannot be parsed and displayed correctly in the Dataset Manager. To resolve this, manually update the schema and table to the correct values by going to Actions > Edit.
|
| Table/File Name |
The table or file name from which the dataset was created.
Note When you use complex queries (such as CTEs), the schema and table cannot be parsed and displayed correctly in the Dataset Manager. To resolve this, manually update the schema and table to the correct values by going to Actions > Edit.
|
| Meta Tags |
The meta tags with which the dataset is associated. Optionally click Actions   Edit, then enter meta tags in the Meta Tags input fields. Edit, then enter meta tags in the Meta Tags input fields.
ENABLE_STRICT_TAGGING setting determines how meta tags are managed. When strict tagging is enabled, you can only select meta tags from an Admin-controlled list. When strict tagging is disabled, you can enter meta tags as free-form text or select existing tags. In free-form text mode, you can create new tags, but only one tag is allowed per field.
If a meta tag value contains empty spaces, the spaces are replaced with hyphens because white spaces are not supported in tags.
Note Meta tags have a 100 character limit.
|
| Server/File Path |
The server or file path associated with the origin of your dataset. |
| Actions |
Click  to take a variety of actions on your dataset. Available actions include: to take a variety of actions on your dataset. Available actions include:
- Edit your dataset.
- Edit Job to edit your dataset.
- Clone Dataset to create a new replica of your dataset.
- Rename your dataset.
- Publish your dataset or revert it To Draft.
- Assign a Data Category to your dataset.
- Assign a Business Unit to your dataset.
- Enable or Disable Integrations of your dataset into Collibra Platform.
- Delete your dataset. If necessary, in the confirmation dialog box, check the Also delete integration for this dataset option to also delete integration artifacts.
Note You can also create a clone of the dataset from the Findings page by using the Clone Dataset option on the Job tab.
|
|
|

|
Manage Data Category |
Opens the Data Categories page in the Admin Console where you can create and manage data categories.
ROLE_ADMIN or ROLE_DATA_GOVERNANCE_MANAGER is required to access the Admin Console.
|
|

|
Manage Business Units |
Opens the Business Units page in the Admin Console where you can create and manage business units.
ROLE_ADMIN or ROLE_DATA_GOVERNANCE_MANAGER is required to access the Admin Console.
|
|

|
Data Class Library |
Opens the Data Class Library modal where you can view and search the data classes in your Collibra DQ environment. |
|

|
FAQ |
Opens the Top Questions and Answers modal where a sample of common dataset management questions appear. |
|

|
Search |
There are two search options. The first search field on the left lets you search for datasets containing columns that match your search criteria. The second search field on the right lets you search for items that match your criteria based on dataset name, source type, schema/parent folder, or table/file name. |
|

|
Dataset drill down |
Click to the right of the dataset name to drill down into the dataset and reveal the following high-level data points.
| Stats
|
| Daily Rows |
The number of rows scanned in the last run. |
| Columns |
The number of columns in the dataset. |
| Active Rules |
The number of active rules included in the last run. |
| Active Alerts |
The number of alerts configured to notify specified users when their conditions were met in the last run. |
| Data Category |
The data category assigned to your dataset on the Rule Workbench or Metadata Bar. |
| Quick Links
|
| Profile |
Click the  to open the Profile page of your dataset. to open the Profile page of your dataset. |
| Rules |
Click the  to open the Dataset Rules page of your dataset. to open the Dataset Rules page of your dataset. |
| Description |
The description of your dataset given to it on the Explorer Review page. |
|
|

|
Column overview |
This section of the dataset drill down shows the following column-level details of all columns in your dataset.
| Field |
The name of the column. |
| Type |
The data type of the column. |
| Data Class |
The data class labels of a column, when applied. |
| Sensitive Label |
The sensitive label to obscure sensitive information, when applied. |
|
|

|
Actions |
Click to take a variety of actions on your dataset. Available actions include:
Edit
Edit your dataset details.
To edit the alias, schema, table or file name, server or file path, or meta tags of a dataset, you need to have the proper role.
Source Type is a read-only field.- Users with ROLE_ADMIN can edit the Alias, Schema/Parent Folder, Table/File Name, and Server/File Path.
- Users with ROLE_DATA_GOVERNANCE_MANAGER or ROLE_DATASET_ACTIONS can edit Meta Tags.
Important When you edit a dataset from the Dataset Manager, the dataset definition is updated in the and shown in all relevant locations in the application, such as on the Job tab. In addition, when you edit a dataset, it is not locked. This means that another user can edit the same dataset simultaneously.
Note The Schema Table Mapping field on the Edit dialog box provides a JSON data structure that describes the schemas and tables for the dataset. When working with scope queries that reference multiple tables, the JSON data structure may not accurately represent the column relations by default. You can modify the JSON data structure as needed. Be sure to validate the JSON in your preferred editor.
Edit Job
Edit your dataset.
Clone Dataset
Create a new replica of your dataset.
To clone a dataset, you need to be its owner or have ROLE_OWL_CHECK and be assigned to the dataset.
Rename
Rename your dataset.
To rename a dataset, you need to be its owner or have ROLE_ADMIN or ROLE_DATASET_MANAGER.
Special characters are not allowed.
Publish
Publish your dataset or revert it To Draft.
To publish a dataset, you need to have dataset access, ROLE_DATASET_TRAIN, or ROLE_DATASET_ACTIONS.
Data Category
Assign a Data Category to your dataset.
To assign a data category to a dataset, you need to have dataset access, ROLE_DATASET_TRAIN, or ROLE_DATASET_ACTIONS.
Business Unit
Assign a Business Unit to your dataset.
To assign a business unit to a dataset, you need to have dataset access or ROLE_DATASET_ACTIONS.
Enable/Disable Integration
Enable or disable the integration of your dataset into Collibra Platform.
To toggle a dataset integration, you need to have ROLE_ADMIN, ROLE_DATASET_MANAGER, ROLE_DATASET_ACTIONS.
Delete
Delete your dataset.
To delete a dataset, you need to be its owner or have ROLE_ADMIN or ROLE_DATASET_MANAGER.
Delete Integration
Delete all Data Quality & Observability Classic and Collibra Platform integration objects for a dataset. This includes all Data Quality & Observability Classic Metastore references for a dataset and all Collibra Platform assets for the dataset. Once deleted, the dataset is disabled for integration and the integration history is removed.
To delete a dataset integration, you need to be its owner or have ROLE_ADMIN or ROLE_DATASET_MANAGER.
|