Collibra relies on AWS Glue and AWS Identity and Access Management (IAM) to ingest and synchronize data from Amazon S3.
AWS Glue
AWS Glue performs extract-transform-load (ETL) processes on the data stored in data sources such as Amazon S3. Collibra only uses AWS Glue to ingest data from Amazon S3. All other features such as crawling other data sources or ETL processes are not integrated.
For more information about AWS Glue, go to the AWS Glue documentation.
AWS Glue has the following components:
- Glue crawlers: Glue crawlers analyze and describe a wide range of data sources such as Amazon S3 or MySQL. Data Catalog only uses them for the Amazon S3 file system integration.
- Glue database: Glue crawlers store their results in a database in the form of tables and columns. These contain metadata that describes the content of Amazon S3. Data Catalog reads these databases for metadata ingestion. The name of the created Glue database is
- ETL processes: The ETL processes can extract data from a data source, process that data, categorize and clean it, and produce output. Data Catalog currently does not use this component.
Although you need an AWS account, you don't have to work in AWS Glue directly because Collibra does everything for you.
AWS Identity and Access Management
Collibra uses the AWS Identity and Access Management (IAM) service to manage access to Amazon S3 and AWS Glue. Similar to AWS Glue, you need an AWS account to use the IAM service. Once you have set up the required user and role, you don't have to work directly with IAM.
For more information about IAM, go to the AWS IAM documentation.
You need two things in IAM:
- An AWS programmatic user to access Amazon S3 and AWS Glue, if you use IAM authentication.
- An IAM role for the Glue crawlers.
Supported authentication types
Before you integrate an S3 file system via Edge, you need to prepare Amazon S3 by creating the required roles and permissions.
Two types of authentication are supported for Amazon S3: IAM or EC2. The preparations in S3 depend on the authentication type you want to use.
- IAM is the most common authentication type for Edge.
- EC2 is used to connect to an AWS EC2 instance that is configured with role-based authentication.
Each authentication type has different requirements and steps.
Prerequisites
IAM
- You have access to the AWS IAM console.
- Programmatic user: Collibra needs programmatic access to Amazon S3 and AWS Glue. For more information about creating a user with programmatic access, go to the IAM documentation. The user must have the following permissions:
- AWS managed policy: AWSGlueServiceRole.
Note If you don't want to use this out-of-the-box AWS managed policy, go to the Support portal to learn about the required permissions.
- Inline policy: pass_role with the following specific JSON content. Show JSON content for the inline policyCopy
{
    "Version": "2012-10-17",
    "Statement":
    [
        {
            "Sid": "VisualEditor0",
            "Effect": "Allow",
            "Action": "iam:PassRole",
            "Resource": "*"
        }
    ]
}
If your Glue database is KMS encrypted, also grant the permission
kms:Decrypt.Show JSON content for the extra permissionCopy{
"Version": "2012-10-17",
"Statement": {
"Effect": "Allow",
"Action": [
"kms:Decrypt"
],
"Resource": "Resource ID"
}
}- Resource ID is the identifier of the encryption key used to encrypt the Glue database.
For example, "Resource": "arn:aws:kms:us-east-1:123456789012:key/abc1234567890def1234567890efg123"
- Resource ID is the identifier of the encryption key used to encrypt the Glue database.
- AWS managed policy: AWSGlueServiceRole.
- IAM role: When you create the capability for the AWS connection in Collibra, you need to add an IAM role. The AWS Glue crawlers need this role to run their operation. The pass_role permission policy of the programmatic user is used to assign this role to the crawler. The IAM role needs the following parameters:
- Trusted entities: glue.amazonaws.com
- AWS managed policies:
- AWSGlueServiceRole
Note If you don't want to use this out-of-the-box AWS managed policy, go to the Support portal to learn about the required permissions.
- AmazonS3ReadOnlyAccess, required only when you want to access a private S3 bucket.
- AWSGlueServiceRole
If your Glue database is KMS encrypted, also grant the permission
kms:Decrypt.Show JSON content for the extra permissionCopy{
"Version": "2012-10-17",
"Statement": {
"Effect": "Allow",
"Action": [
"kms:Decrypt"
],
"Resource": "Resource ID"
}
}- Resource ID is the identifier of the encryption key used to encrypt the Glue database.
For example, "Resource": "arn:aws:kms:us-east-1:123456789012:key/abc1234567890def1234567890efg123"
- Resource ID is the identifier of the encryption key used to encrypt the Glue database.
- You can provide more restrictive permissions to the IAM role, if dictated by your security requirements. Your AWS subject matter expert can create the appropriate permission set using the steps in the IAM documentation. We recommend that you test a crawler with an IAM role that has these permissions in the AWS console to ensure that it is successful before you use the IAM role in Collibra.
- The S3 credentials are stored on the Edge site and not in the Collibra repository.
EC2
- You have access to the AWS IAM console.
- You have access to the Amazon EC2 console.
- You have an Amazon EC2 instance.
- IAM role: When you create the capability for the AWS connection in Collibra, you need to add an IAM role. The AWS Glue crawlers need this role to run their operation. The pass_role permission policy of the programmatic user is used to assign this role to the crawler. The IAM role needs the following parameters:
- Trusted entities: glue.amazonaws.com
- AWS managed policies:
- AWSGlueServiceRole
Note If you don't want to use this out-of-the-box AWS managed policy, go to the Support portal to learn about the required permissions.
- AmazonS3ReadOnlyAccess, required only when you want to access a private S3 bucket.
- Inline policy: pass_role
- AWSGlueServiceRole
If your Glue database is KMS encrypted, also grant the permission
kms:Decrypt.Show JSON content for the extra permissionCopy{
"Version": "2012-10-17",
"Statement": {
"Effect": "Allow",
"Action": [
"kms:Decrypt"
],
"Resource": "Resource ID"
}
}- Resource ID is the identifier of the encryption key used to encrypt the Glue database.
For example, "Resource": "arn:aws:kms:us-east-1:123456789012:key/abc1234567890def1234567890efg123"
- Resource ID is the identifier of the encryption key used to encrypt the Glue database.
Steps
To set up IAM or EC2 with role-based authentication, complete the following steps.
- Go to AWS Identity and Access Management.
- Create the programmatic user that you want to use to connect to AWS.
- During the user creation process, attach the permission policy: AWSGlueServiceRole.
- After user creation, open the user details and create an inline policy.
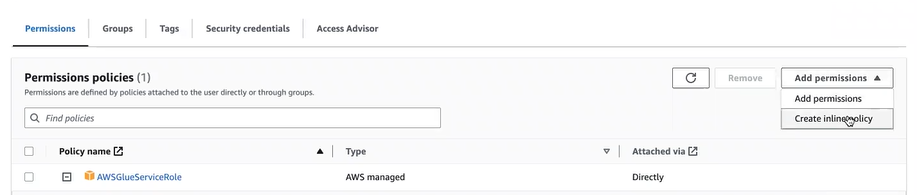
- Add the following JSON content for the inline policy:Copy
{
    "Version": "2012-10-17",
    "Statement":
    [
        {
            "Sid": "VisualEditor0",
            "Effect": "Allow",
            "Action": "iam:PassRole",
            "Resource": "*"
        }
    ]
} - Use the following name for the inline policy: pass_role.
When you create the AWS connection in Collibra, you need the programmatic user credentials and access keys. For information on access keys, go to the IAM documentation.
- During the user creation process, attach the permission policy: AWSGlueServiceRole.
- Create an IAM role. You will need to use this IAM role when you add a capability in Collibra.
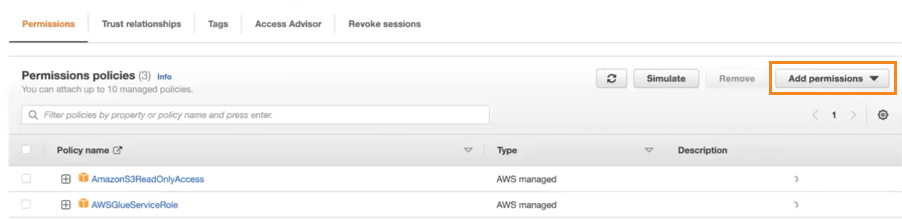
- During the role creation process, add permission policy: AWSGlueServiceRole.
- (Optional) If you also want to access a private S3 bucket, add an additional permission policy: AmazonS3ReadOnlyAccess.
- Open the newly created role, and in Trust relationships, check that
glue.amazonaws.comis added as a trust policy. This should have been added automatically based on the permission policy AWSGlueServiceRole.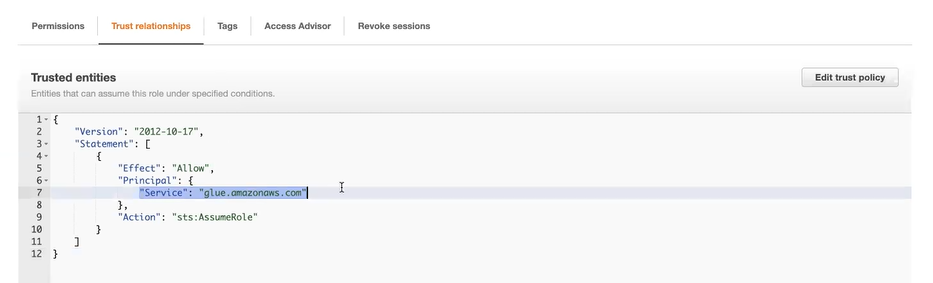
- During the role creation process, add permission policy: AWSGlueServiceRole.
- If you have enabled Data Lake Formation, complete additional steps.Show step-by-step instructions
- Register the Data Lake locations and create an IAM role for Lake Formation.
To add or update data, Lake Formation needs read/write access to the Amazon S3 path that you want to integrate.- Navigate to AWS Lake Formation → Administration → Data lake locations.
- Click Register location.
- Select the IAM role for Lake Formation "AWSServiceRoleForLakeFormationDataAccess" and add the S3 location that you want to integrate.
This IAM role needs the following permission policies:- AWS managed policy: LakeFormationDataAccessServiceRolePolicy
- inline policy: LakeFormationDAtaAccessPolicyForS3
- Click Register Location.
- Add the programmatic user as a Data Lake administrator.
To perform this step, go to AWS Lake Formation → Administration → Administrative roles and tasks and add the user as Data Lake administrator. - Give your IAM role permission to access specific storage locations.
- Go to AWS Lake Formation → Permissions → Data locations.
- Click Grant.
- Select the IAM role you created and add the S3 location that you want to integrate.

- Click Grant.
- Register the Data Lake locations and create an IAM role for Lake Formation.
Note EC2 has been validated only for bundled K3s installations of Edge.
If you use K3s-bundled Edge on an AWS EC2 instance that is configured with role-based authentication, you can connect to Amazon S3 without an access key ID and secret access key. Use the following steps to configure role-based Amazon S3 access control.
- Go to AWS Identity and Access Management.
- Create an IAM role. You will need to use this IAM role when you add a capability in Collibra.
- During the role creation process, add the permission policy: AWSGlueServiceRole.
- (Optional) If you also want to access a private S3 bucket, add an additional permission policy: AmazonS3ReadOnlyAccess.
- Open the newly created role, and in Trust relationships, check that
glue.amazonaws.comis added as a trust policy. This should have been added automatically based on the permission policy AWSGlueServiceRole. - After the creation, open the user details and click Add permissions to create an inline policy.
- Use the following JSON content for the inline policy:Copy
{
    "Version": "2012-10-17",
    "Statement":
    [
        {
            "Sid": "VisualEditor0",
            "Effect": "Allow",
            "Action": "iam:PassRole",
            "Resource": "*"
        }
    ]
} - Use the following name for the inline policy: pass_role.
- During the role creation process, add the permission policy: AWSGlueServiceRole.
- In the Amazon EC2 console, attach the IAM role you created to the Amazon EC2 instance.
- Only if the credentials in the Amazon EC2 instance cannot be used to authenticate, you can create a credentials file instead and save it in the user_home/.aws/ folder. The credentials file should look like this:
[default]
aws_access_key_id = <access key ID>
aws_secret_access_key = <secret access key>
For more information, see the AWS developer guide.
Warning Do not use a credentials file unless absolutely necessary.
- Only if the credentials in the Amazon EC2 instance cannot be used to authenticate, you can create a credentials file instead and save it in the user_home/.aws/ folder. The credentials file should look like this:
You can now go to Collibra to register your AWS regions and prepare your Edge site to continue with the Amazon S3 integration. See steps in Integrate an Amazon S3 file system.