The CLI lineage harvester is deprecated and reaches its End of Life on July 31, 2026. You need to migrate to technical lineage via Edge before this date.
This topic provides a workflow for migrating source IDs, configuring Edge capabilities, and resolving critical "useCollibraSystemName" configuration mismatches.
Required permissions
- You have a global role with the Product Rights > System administration global permission.
- You have a global role that has the Manage Edge sites global permission.
- You have a global role that has the Manage connections and capabilities global permission, for example, Edge integration engineer.
- A global role that has the following global permission:
- Catalog, for example Catalog Author
- View Edge connections and capabilities
- A resource role with Configure external system resource permission, for example Owner.
Migration steps
- Identify the source ID for the data source you want to migrate:
- Open your existing lineage harvester configuration file.
- Take note of the value of the
idproperty for the data source you want to migrate. For example,id: "marketing_snowflake_prod".
- Remove the entire section for that data source from the lineage harvester configuration file. For example:
{
	"dialect" : "oracle",
	"id" : "informatica_source",
	"type" : "ExternalDirectory",
	"dirType" : "powercenter",
	"path" : "/path/to/the/informatica/folder/",
	"mask" : "*",
	"recursive" : false,
	"deleteRawMetadataAfterProcessing": false
}
If you don't remove it, and you configure Edge with the same source ID, you risk a condition where both the CLI harvester and Edge attempt to update the same lineage batch. - Configure the Edge capability:
- Open a site.
-
On the main toolbar, click
 →
→
 Settings.
The Settings page opens. -
In the tab pane, click Edge.
The Sites tab opens and shows a table with an overview of your sites. - In the table, click the name of the site whose status is Healthy.
The site page opens.
-
On the main toolbar, click
- In the Capabilities section, click Add capability.
The Add capability page appears. - Select the relevant capability template for the data source you want to migrate, for example Technical Lineage for Oracle.
- Enter the necessary information in the capability. Pay particular attention to the following fields:
- Click Add.
The capability is added to the Edge site.
The fields become read-only.
Field Description Source ID Enter the source ID you noted in step 1. In our example:
marketing_snowflake_prod.Collibra System Name Enter the name of your System asset in Data Catalog. For successful stitching, the names must exactly match.
Important Be sure to read the following section The "useCollibraSystemName" trap.
Processing Level Select Analyze to test the connectivity, or Sync to immediately synchronize the lineage.
- Open a site.
- Synchronize the technical lineage.
Cleanup and deletion
If necessary, remove stale source IDs that cause "useCollibraSystemName" errors or persist as gray nodes in the lineage viewer. This is the most critical pain point for users.
The "useCollibraSystemName" trap
A common source of synchronization failure is "CPSH system name" setting mismatches. This happens if the value of the useCollibraSystemName property in your lineage harvester configuration file does not match with the Edge setting in Collibra Console.
Specifically:
-
In your lineage harvester configuration file: the
useCollibraSystemNameproperty must be set totrueorfalse. - In Collibra Console, the Collibra system name must match the value of the
useCollibraSystemNameproperties in your lineage harvester configuration file, either True or False.
For information on this Collibra Console setting, go to Enable technical lineage via Edge.
The useCollibraSystemName property in your lineage harvester configuration file and the Collibra system name setting in Collibra Console determine whether the System name is included in the full path - and therefore the full names - of assets. If the property and field values do not match, stitching cannot be achieved.
Important If you change the values either in your lineage harvester configuration file or in Collibra Console to avoid a mismatch, you must remove the old source ID (as described in the following options A, B, or C) to clear the cached configuration. Then synchronize as a fresh data source.
Option A: Remove a data source using the technical lineage admin options via Edge
For more information about the Technical Lineage Admin Edge connection and capability mentioned in this procedure, go to Technical lineage admin options.
-
Ensure that the Active checkbox in the relevant technical lineageEdge capability is cleared.
- Open an Edge site.
-
On the main toolbar, click
→
Settings.
The Settings page opens. -
In the tab pane, click Edge.
The Sites tab opens and shows a table with an overview of your sites. - In the Edge site overview, click the name of the Edge site to which you added the technical lineage capability for the data source.
The Edge site page appears.
-
On the main toolbar, click
- In the Capabilities section, locate and click the technical lineage capability for the data source you want to delete.
- Clear the Active checkbox.
- Click Save.
The capability is updated.
- Open an Edge site.
-
Create a Technical Lineage Admin connection.
For CollibraData Lineage to connect to and retrieve metadata from the Collibra Data Lineage service instance, you have to create an Technical Lineage Admin connection.
Prerequisites
- You have a global role with the Product Rights > System administration global permission.
- You have a global role that has the Manage Edge sites global permission.
- You have a global role that has the Manage connections and capabilities global permission.
Steps
- Open a site.
-
On the main toolbar, click
→
Settings.
The Settings page opens. -
In the tab pane, click Edge.
The Sites tab opens and shows a table with an overview of your sites. - In the site overview, click the name of a site.
The site page appears.
-
On the main toolbar, click
- In the Connections section, click Create Connection.
The Create Connection dialog box appears. - Select the Technical Lineage Admin connection.
-
Enter the connection information.
- Basic Authentication
If you choose this method, ignore the rest of the fields. - OAuth
If you choose this method, you must use the following fields to provide a client ID and client secret. This authentication method is recommended for enhanced security.Important OAuth authentication is not yet available for Collibra Platform for Government customers. - In Collibra Settings, click OAuth Applications.
- Click Register New Application.
The Register New Application dialog box appears. - Enter the following information:
- For the Application Type, select Platform.
- Provide a name for the application.
- In the Integration Type drop-down list, select Technical Lineage.
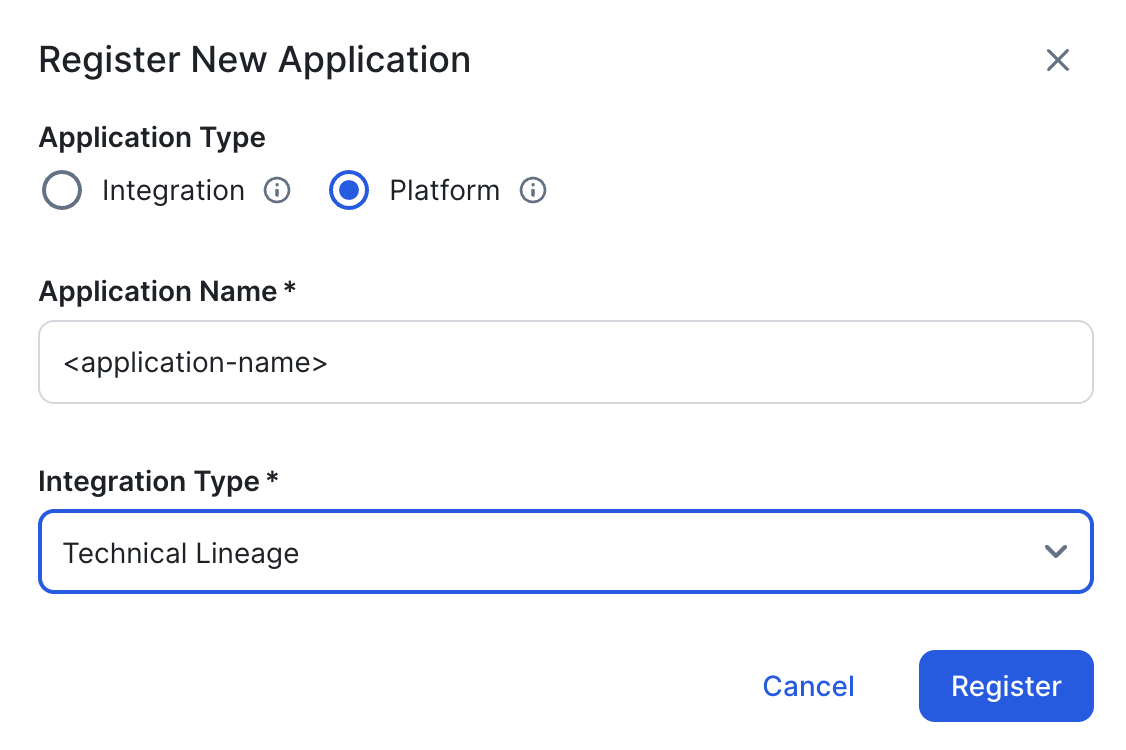
- Click Register.
-
Copy and safely store the Client ID and Client Secret.
Important This is the only time you are able to see the client secret.
- In Collibra Settings, click OAuth Applications.
- Click Register New Application.
The Register New Application dialog box appears. - Enter the following information:
- For the Application Type, select Platform.
- Provide a name for the application.
- In the Integration Type drop-down list, select Technical Lineage.
- Click Register.
-
Copy and safely store the Client ID and Client Secret.
Important This is the only time you are able to see the client secret.
- Click Create.
Field Description Required Name A name for the Edge connection.
 Yes
YesDescription A description of the connection.
 No
No
Authentication Type
The authentication method you use to connect to Collibra Data Lineage:
YesClient ID
Your client ID for OAuth authentication.
How to obtain a client ID and client secretFor complete information, go to OAuth Applications.
Yes
Client Secret
Your client secret for OAuth authentication.
How to obtain a client ID and client secretFor complete information, go to OAuth Applications.
Yes
.
-
Add a Technical Lineage Admin capability to your Edge site.
Complete the following steps to add the technical lineage capability to your Edge site.
Prerequisites
- You have a global role with the Product Rights > System administration global permission.
- You have a global role that has the Manage connections and capabilities global permission, for example, Edge integration engineer.
Steps
- Open a site.
-
On the main toolbar, click
→
Settings.
The Settings page opens. -
In the tab pane, click Edge.
The Sites tab opens and shows a table with an overview of your sites. - In the table, click the name of the site whose status is Healthy.
The site page opens.
-
On the main toolbar, click
- Select the relevant capability template:
Technical Lineage Admin. - Enter the required information.
Field Description Required? Name
The name of the capability.
Yes
Description
The description of the capability.
Yes
Admin connection
The name of the Edge connection you created in the previous step.
Yes
Property Use this section to define custom parameters for technical lineage. Click Add property to add a parameter.
Available properties:Type Value Type Name Descriptions Example value Text
Plaintext
httpTimeoutSets the HTTP timeout duration, in seconds. You can enter a value in the range of 1 to 3599. The default value is 15.
15Properties for Collibra Platform for Government customersType Value type Name Description Example value Text
Plaintext
techlinHostThis is the URL of the Collibra Data Lineage service instance to which you want to upload metadata.
techlin-europe-west1.collibra.comText
Secret
techlinKeyThis is the unique API key to connect to a Collibra Data Lineage service instance.
Specify a unique user key for each CPSH environment. If you're not sure what your user key is, contact your CPSH Collibra Account Team.
<your-techlin-key> Yes for US government customers.
Debug
An option to enable logging of a JDBC job. If you enable logging, you can download the output file of the JDBC job in the Edge Jobs dashboard (in preview). The output file contains the logs of the JDBC driver. For more information about downloading the output file, go to Download job output files.
Select one of the following values:
True- Enables logging of the JDBC job.
False- Disables logging of the JDBC job. This is the default value.
No
Log level
An option to determine the verbosity level of Catalog connector log files. By default, this option is set to No logging.
No
- Click Create.
The capability is added to the Edge site.
The fields become read-only.
-
Run the "Ignore source" option in Data Catalog.Important
To use the Ignore sources option:
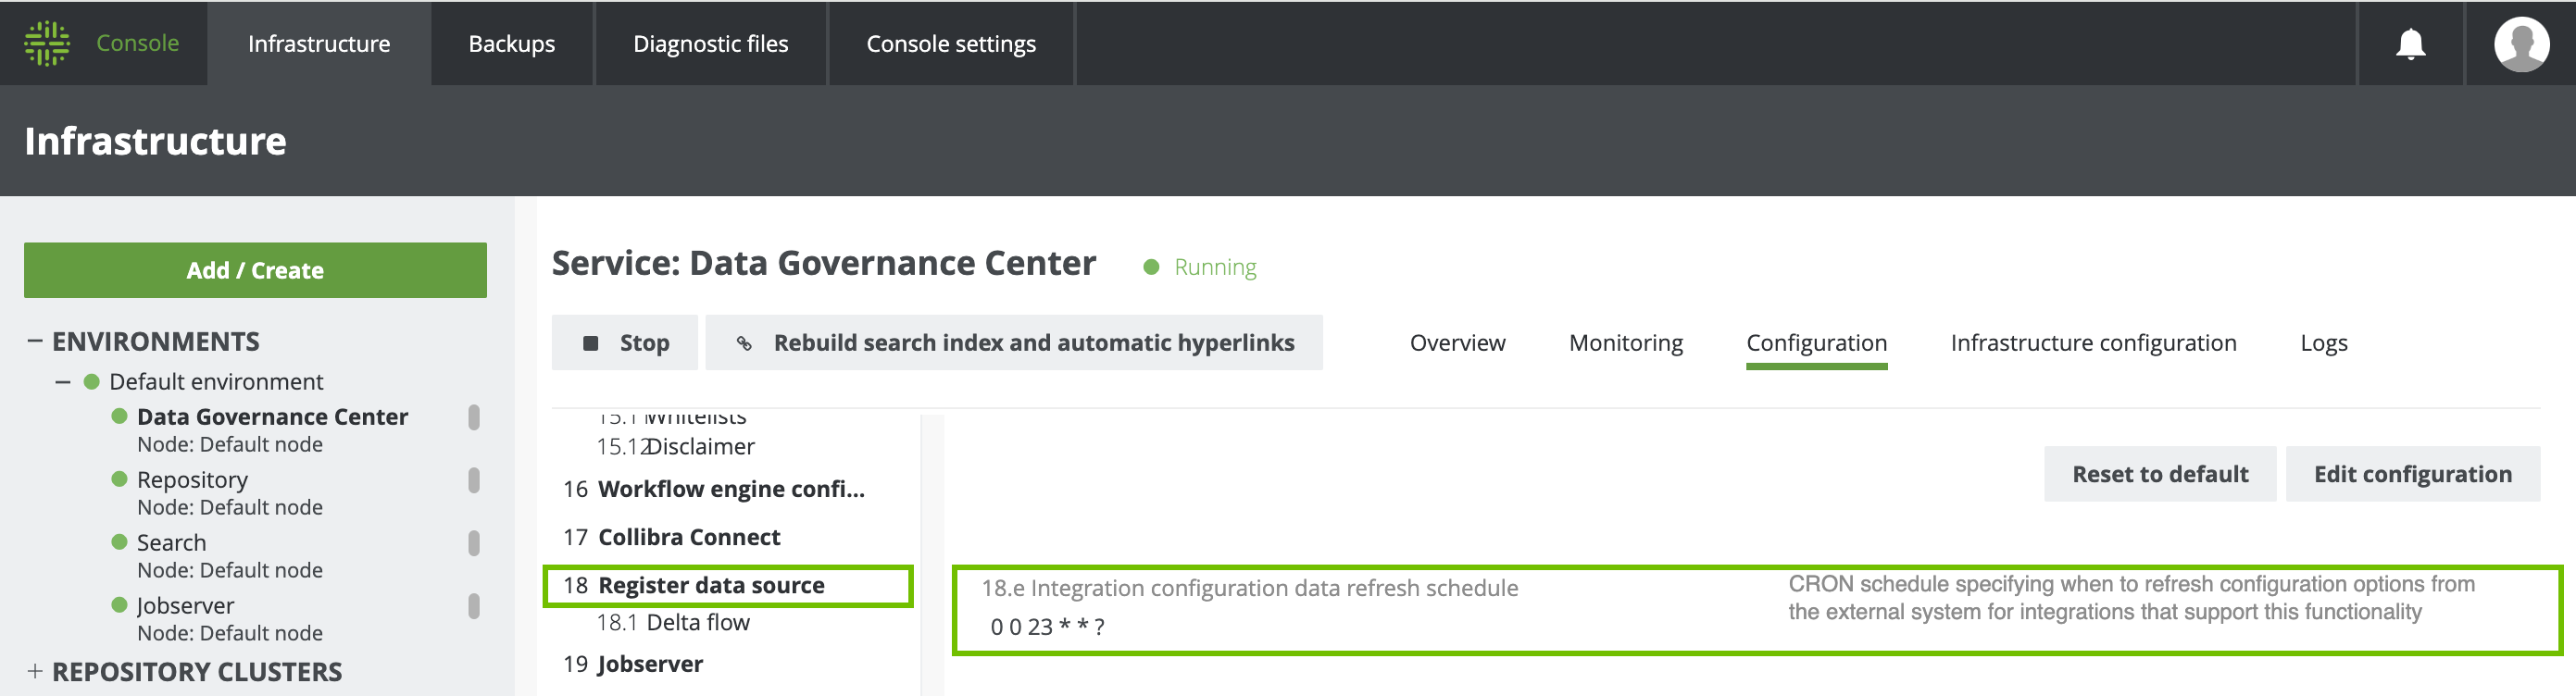
- Your metadata must be refreshed. You can either wait for the next scheduled synchronization to run, or you can edit the Integration configuration data refresh schedule setting in Collibra Console so that the refresh is done sooner.
- If you edit the Integration configuration data refresh schedule setting, you must restart Collibra.
If you don't refresh your metadata (and restart Collibra, if necessary), an error is shown on the Integration Configuration tab.
For each source that you want to ignore, ensure that the Active checkbox in the respective technical lineage Edge capability is cleared.
-
On the main toolbar, click
→
 Catalog.
The Catalog homepage opens. -
In the tab bar, click
Integrations.
The Integrations page opens. - Click the
Integration Configuration tab.
- Find the connection that you used when you added the technical lineage capability, and click the link in the Capabilities column. If multiple capabilities exist for the connection, expand them to find your capability.
The capability configuration page opens. - On the Synchronize Configuration section, click Edit Configuration.
- In the Admin command drop-down list, select Ignore sources.
- In the Sources drop-down list, select the source or sources you want excluded from the technical lineage.

- Click Save.
- In the Synchronize Configuration section, click Synchronize.
When synchronization is complete, the technical lineage of the data source is deleted.
-
View the synchronization results for the "Ignore sources' job.
- Open the Activities list.
-
In the row containing the job, click Result.
The Synchronization Results dialog box appears.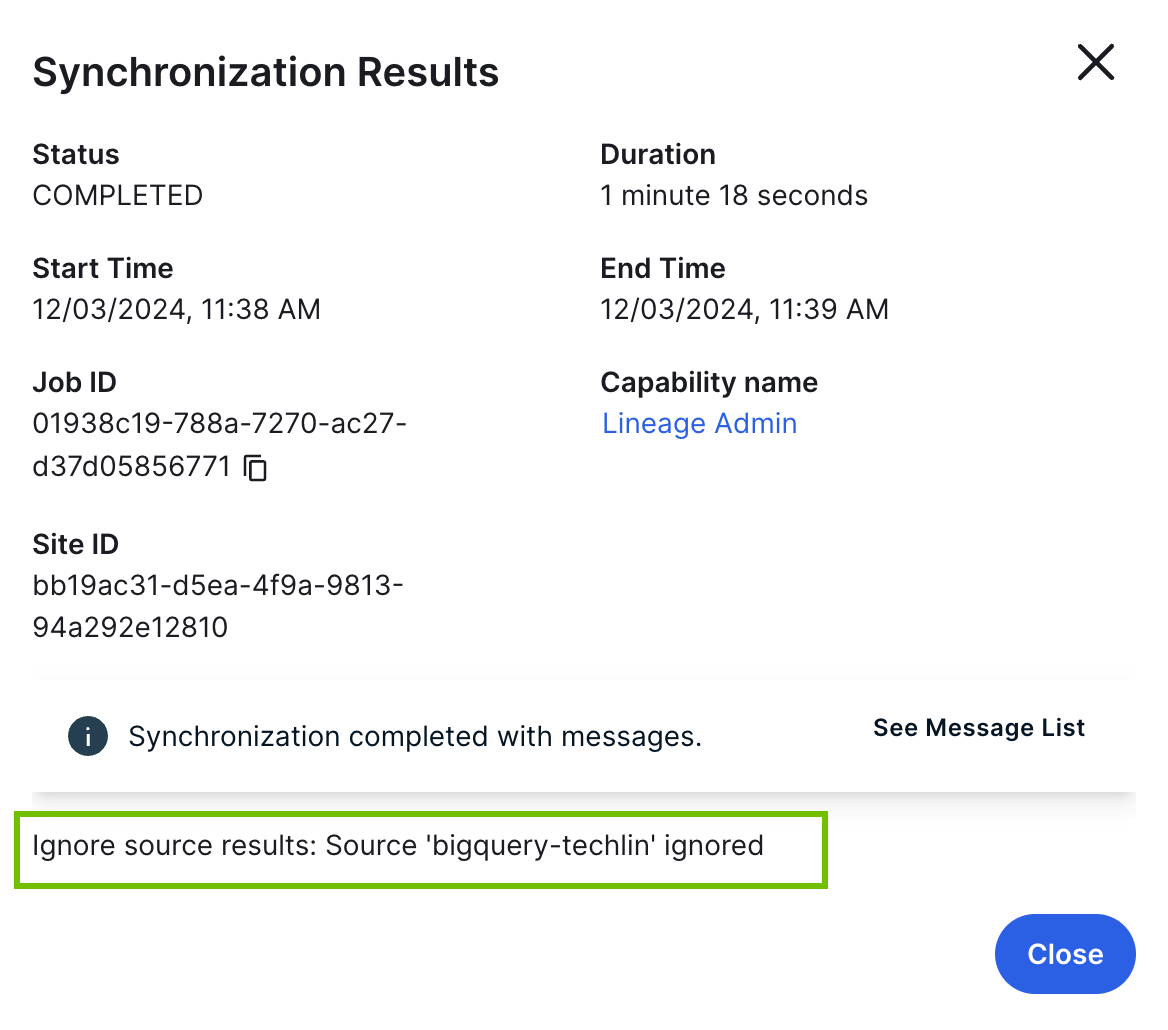
- Run the "Sync" option in Data Catalog, for any other data source.
Note This step ensures that the technical lineage is regenerated. You don't have to create a new Edge connection or add another capability. For the data source that you sync, ensure that:
- The Active option is selected in the Edge capability.
- The Processing Level setting is set to Sync.

Option B: Remove a data source via the CLI lineage harvester
Occasionally, the "list and ignore sources" option (described in Option A above) doesn't return sources that were originally created via the CLI lineage harvester. In this case, you can use the CLI harvester to perform the clean up.
- Run the following "list sources" command:
- For Windows:
.\bin\lineage-harvester.bat list-sources - For other operating systems:
./bin/lineage-harvester list-sources
- For Windows:
- Run the following "ignore sources" command:
- For Windows:
.\bin\lineage-harvester.bat ignore-source <source_ID> - For other operating systems:
./bin/lineage-harvester ignore-sources <source_ID>
- For Windows:
- Run the following synchronization command:
- For Windows:
.\bin\lineage-harvester.bat sync - For other operating systems:
.\bin\lineage-harvester sync
- For Windows:
View the technical lineage graph.
You can check the progress of the technical lineage creation in Activities in your Collibra Platform Self-Hosted environment. The Results field indicates how many relations were imported into Data Catalog. Go to the status page to see the log files of the SQL analysis.
If the lineage harvester log shows an error message or the harvesting process fails, you can use the technical lineage common errors and issues in Collibra Support Portal to fix the error.
For technical lineage via Edge, if the synchronization fails or completes with an error message, you can use the technical lineage via Edge common error messages in Support Portal to fix the error.