Snowflake Cortex connects to the Collibra MCP server through a custom MCP Connector. Once connected, Cortex Agents can use Collibra's governed metadata tools. The recommended approach is for an administrator to create the connection once and share it with selected user groups.
Note The Snowflake integration connects to a server in the Collibra Cloud environment, so it is not available for Collibra Platform for Government or Collibra Platform Self-Hosted (CPSH).
Before you begin
- You need admin privileges in Collibra to register an OAuth application.
- Each user signs in with their own Collibra credentials (OAuth 2.0, user to machine, per user).
- Have an administrator create the connection once and share it with the relevant user groups.
- Do not share a Client ID and Client Secret between individual users.
Step 1: Register an OAuth application in Collibra
This step requires admin privileges in Collibra.
- Go to Settings.
- Click OAuth applications.
- Click New Application.
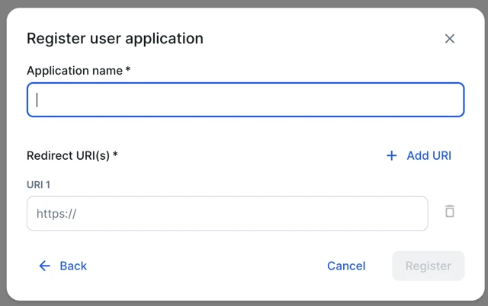
- Click Register user application.
- Enter an application name.
- Enter the redirect URI for Snowflake:
https://identity.snowflake.com/oauth2/callback - Click Register.
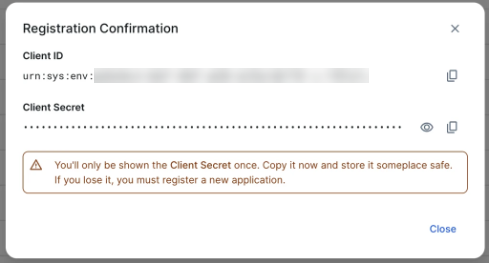
- Copy the Client ID and Client Secret as those values are needed later when configuring the connection in Snowflake.
Step 2: Configure the connection in Snowflake
In Snowflake, create a custom MCP Connector that points to the Collibra MCP server. The connector uses Standard OAuth for authentication, with Collibra acting as the authorization server using the credentials you obtained in the previous step.
- As an administrator in Snowflake, go to Settings > Account > MCP Connectors.
- Click Add Custom.
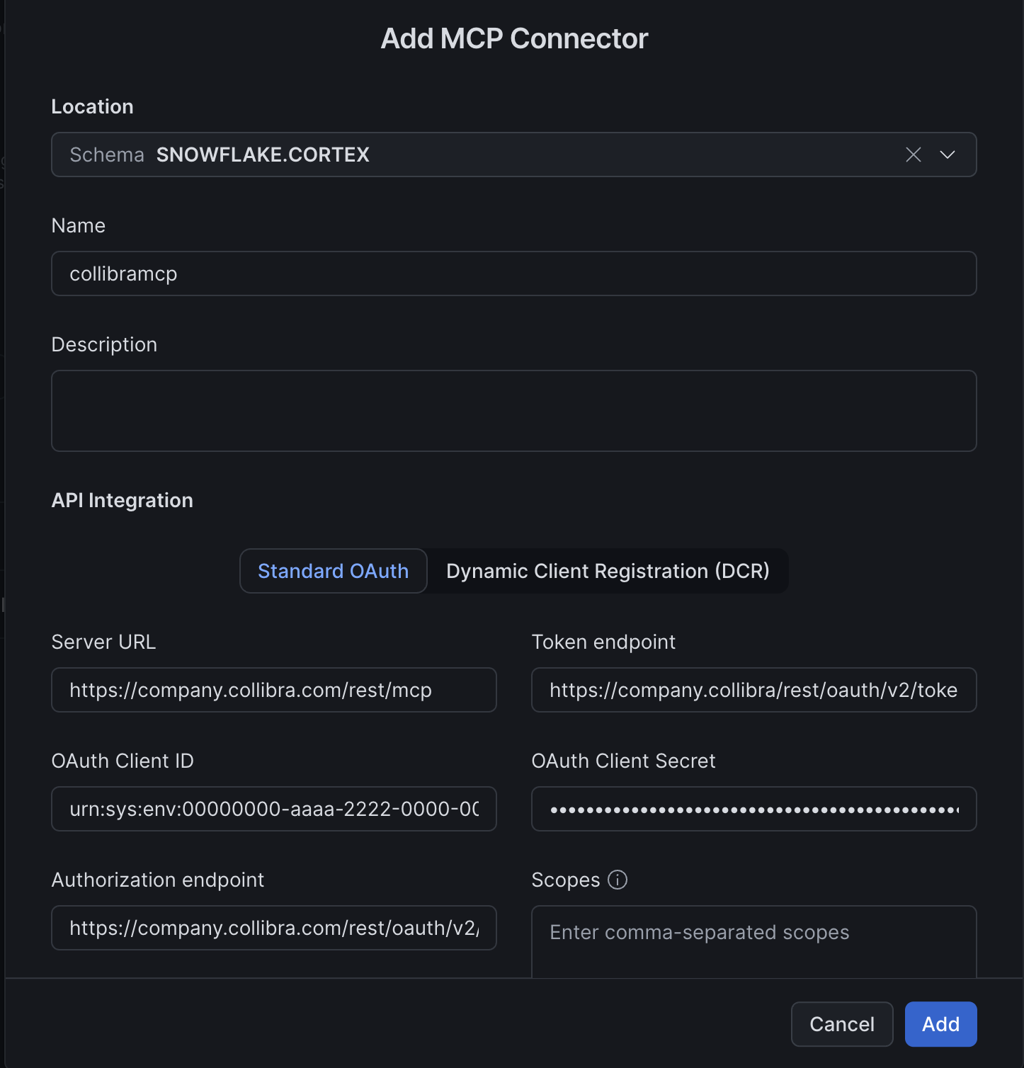
- Complete the form using the following values, replacing
<instance>with your Collibra instance name:Field Value Location Select the database and schema where the MCP Connector object will be stored. This does not restrict the connector to a single database or schema. Name Enter a name for the MCP Connector. Description Enter a description for the MCP Connector. API Integration Standard OAuth Server URL https://<instance>.collibra.com/rest/mcpToken Endpoint https://<instance>.collibra.com/rest/oauth/v2/tokenOAuth Client ID The Client ID from Step 1: Register an OAuth application in Collibra step. OAuth Client Secret The Client Secret from Step 1: Register an OAuth application in Collibra step. Authorization Endpoint https://<instance>.collibra.com/rest/oauth/v2/authorizeScopes Leave empty, or enter offline_access. The Collibra authorization server accepts an empty scope. - Click Add.
Use the connection
Each user authenticates with their own Collibra credentials. Once the connection shows as Connected, Cortex Agents can access all available Collibra tools.
- Open Snowflake's Cortex Copilot.
- In the MCP Connectors list, confirm the connector status is Connected.
- Sign in with your Collibra credentials when prompted.
After you connect
You can use the Collibra MCP tools to browse the data catalog, explore certified data products, and take actions such as adding or removing data classifications from assets. For a full list of available tools, see Collibra MCP tools.