ChatGPT connects to the Collibra MCP server through a custom plugin configured with OAuth 2.0. Once connected, ChatGPT can use Collibra's governed metadata tools directly in your conversations. The recommended approach is for an administrator to create the connection once and share it with selected user groups.
Note Connecting ChatGPT to the Collibra MCP requires an OpenAI account with a Pro, Team, Enterprise, or Edu plan. Developer Mode is not available on Free plans.
Prerequisites
In your Collibra environment
- You need admin access to Collibra Settings → OAuth Applications to create an OAuth application.
- Your Collibra MCP instance must have a publicly accessible HTTPS endpoint, for example,
https://<tenant>.collibra.com.
In your ChatGPT environment
- You need an OpenAI account with a Pro, Team, Enterprise, or Edu plan.
- An administrator can create the connection once and share it with the relevant user groups. Do not share a Client ID and Client Secret between individual users.
Step 1: Start the plugin setup in ChatGPT
Start creating the plugin in ChatGPT to generate the redirect URI you need for Collibra OAuth registration in Step 2.
Enable Developer Mode
- In ChatGPT, go to Settings → Security and login → Developer Mode.
- Switch Developer Mode on.
Create a custom plugin
- Go to the Plugins tab and click + to create a new plugin.
- Fill in the following fields:
Field Value Plugin name Collibra MCP (or a descriptive name) Description Describe what the connector does. For example: Connects ChatGPT to your Collibra Data Intelligence Platform, enabling you to search and retrieve assets, definitions, lineage, and governance metadata directly from your conversations. Connection https://<tenant>.collibra.com/rest/mcpAuthentication OAuth - Click Advanced OAuth Settings. ChatGPT generates a Redirect URI based on your MCP URL.
- Copy the Redirect URI. You need it in Step 2.
Step 2: Register an OAuth application in Collibra
This step requires admin privileges in Collibra.
- Go to Settings.
- Click OAuth applications.
- Click New Application.
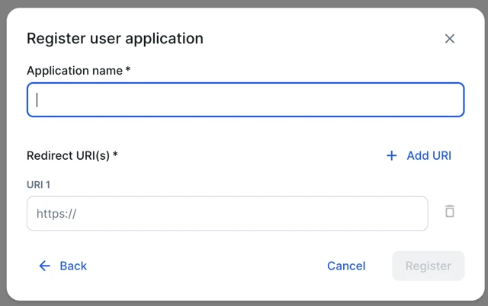
- Click Register user application.
- Enter an application name, for example,
openai-chatgpt-integration. - Enter the Redirect URI copied from Step 1.
- Complete the registration and copy the Client ID and Client Secret. You need them in Step 3. The secret is shown only once.
Step 3: Complete the plugin setup in ChatGPT
Return to the plugin form in ChatGPT to enter the credentials from Step 2.
- Enter the OAuth Client ID and OAuth Client Secret from Step 2.
- Set Token endpoint auth method to
client_secret_basic. - Verify the remaining fields. These should be auto-filled from Advanced OAuth Settings:
Field Value Scopes > Default scopes offline_accessAuth URL https://<tenant>.collibra.com/rest/oauth/v2/authorizeToken URL https://<tenant>.collibra.com/rest/oauth/v2/tokenAuthorization server base https://<tenant>.collibra.com/rest/mcpResource https://<tenant>.collibra.com/rest/mcp - Check the trust confirmation checkbox and click Create.
- Complete the OAuth authorization flow to authorize the connection.
Note After updating your Collibra MCP server, go to Settings → Plugins, click into the plugin, and choose Refresh to pull in updated tool metadata.
Step 4: Publish the plugin to your organization
Complete this step to make the plugin available to all members of your OpenAI workspace. By default, the plugin is visible only to the creator's account.
- Go to Settings → Plugins → Collibra MCP Server Plugin and click Publish. You are routed to a publishing form in the admin portal.
- Review the potential risks, check the required boxes, and click Publish.
The plugin is now available to all members of your organization's workspace.
Use the connection
- Start a new chat and enable the Collibra plugin.
- Send a prompt that invokes a Collibra tool, for example, "Search for assets related to customer data".
- Verify ChatGPT surfaces a tool call with the correct tool name and parameters.
- Confirm the response contains real data from your Collibra instance.
Note In Developer Mode, the plugin must be enabled per chat session.
After you connect
- ChatGPT dynamically discovers all Collibra tools, including search, lineage, and glossary.
- Use Settings → Plugins → Refresh after any Collibra MCP server update to pick up new or changed tools.