Configure custom JDBC data source drivers
This section shows you how to set up persistent external volumes on existing cloud native deployments of Collibra DQ to support the use of custom JDBC data source drivers.
Steps
- Create a Persistent Volume (PV) and a Persistent Volume Claim (PVC) in the same Kubernetes cluster namespace where your cloud native deployment of Collibra DQ is running with
ReadWriteManyaccess mode, as shown in the following example:CopyapiVersion: v1
kind: PersistentVolume
metadata:
name: nfs-pv
spec:
capacity:
storage: 10Gi
accessModes:
- ReadWriteMany
nfs:
server: nfs-server.nfs.svc.cluster.local
path: "/"
---
kind: PersistentVolumeClaim
apiVersion: v1
metadata:
name: nfs-pvc
spec:
accessModes:
- ReadWriteMany
storageClassName: ""
resources:
requests:
storage: 10GiTip You can choose any storage class that supports ReadWriteMany access mode only.
- Patch the existing DQ Web and Agent StatefulSets with an additional Volume Mount, as shown in the following example:Copy
    spec:
      volumes:
        - name: owldq-ext-jdbc-jars
          persistentVolumeClaim:
            claimName: nfs-pvc
    ...
    ...
      containers:
        - volumeMounts:
            - name: owldq-ext-jdbc-jars
mountPath: /opt/owl/drivers/ext - From the Connections page, click Add on the Generic JDBC Connection tile.
The New JDBC Conection modal appears. - Enter the required information.
- Click the folder icon in the Driver Location option.
The Add Driver modal appears. - Click Choose File and select the JAR file to upload.
- Enter a one-word directory name to store the driver, for example, ext.
- Select
/opt/owl/drivers/extunder Driver Directories to upload your driver to that location, as shown in the image below.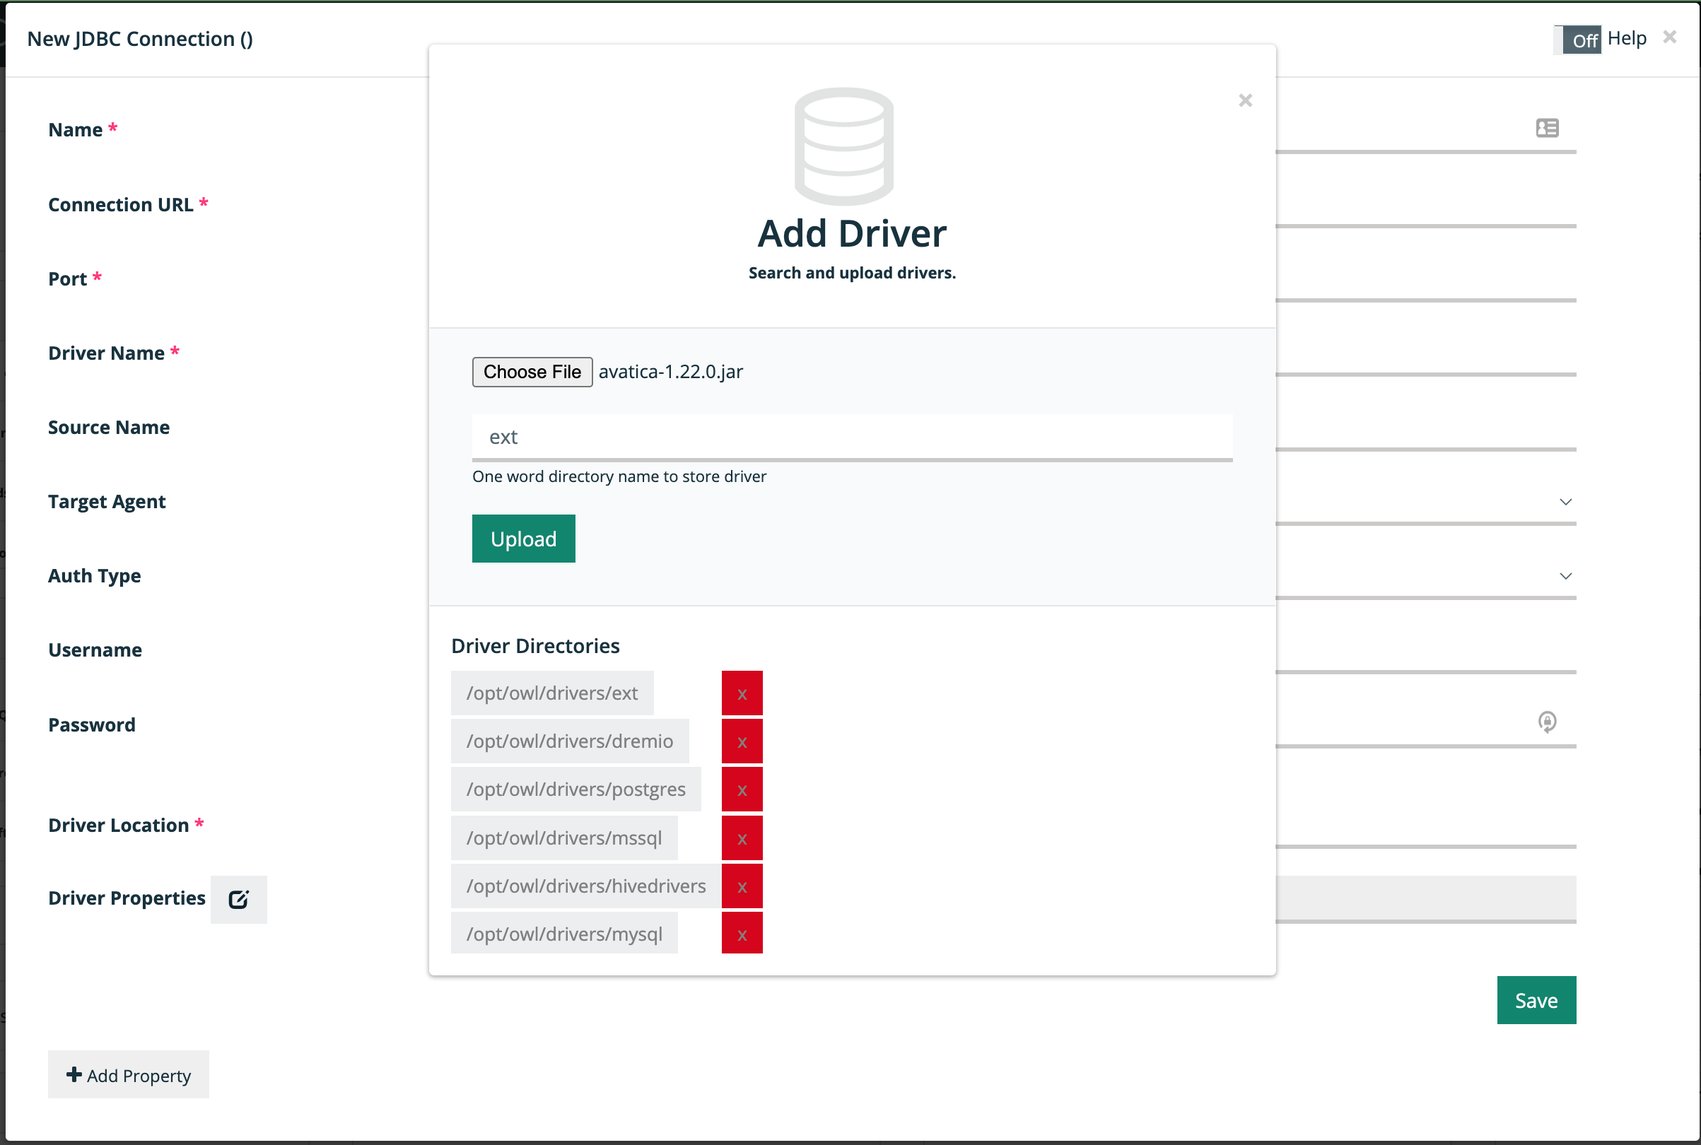
- Click Upload.
A success message appears when your driver is successfully added.Note
Uploads from DQ Web only work if the PVC's storageclass supports the fsGroup security context of Kubernetes. If the fsGroup security context is not supported, create a temporary dummy pod running as a root user with the PVC mounted, and copy the required JDBC jars to the mount location with 544 permissions. - Go to the Remote Agent section of the Admin Console and click the pencil icon to edit your agent.
The Edit Agent modal appears. - Add the following properties to the Free Form (Appended) option, as shown in the following example:Copy
-conf spark.kubernetes.driver.podTemplateFile=local:///opt/owl/config/k8s-driver-template.yml,spark.kubernetes.executor.podTemplateFile=local:///opt/owl/config/k8s-executor-template.yml,spark.kubernetes.executor.volumes.persistentVolumeClaim.nfs-pv.options.claimName=nfs-pvc,spark.kubernetes.executor.volumes.persistentVolumeClaim.nfs-pv.options.sizeLimit=10Gi,spark.kubernetes.executor.volumes.persistentVolumeClaim.nfs-pv.mount.path=/opt/owl/drivers/ext,spark.kubernetes.executor.volumes.persistentVolumeClaim.nfs-pv.mount.readOnly=false,spark.kubernetes.driver.volumes.persistentVolumeClaim.nfs-pv.options.claimName=nfs-pvc,spark.kubernetes.driver.volumes.persistentVolumeClaim.nfs-pv.options.sizeLimit=10Gi,spark.kubernetes.driver.volumes.persistentVolumeClaim.nfs-pv.mount.path=/opt/owl/drivers/ext,spark.kubernetes.driver.volumes.persistentVolumeClaim.nfs-pv.mount.readOnly=falseNote
The pod templates induce security context to the Spark driver and executor pods, which allows you to mount the PVC dynamically. You can also download the template file and host it in your own public space. - Click Save.
- Go to the Connections page to start using your new custom JDBC data source driver.
Steps
- Install the EFS Container Storage Interface (CSI) Driver on your cluster.
- Create a Persistent Volume (PV) and a Persistent Volume Claim (PVC) in the same Kubernetes cluster namespace where your cloud native deployment of Collibra DQ is running with
ReadWriteManyaccess mode, as shown in the following example:CopyapiVersion: storage.k8s.io/v1
kind: StorageClass
metadata:
name: efs-sc
provisioner: efs.csi.aws.com
reclaimPolicy: Delete
volumeBindingMode: Immediate
---
apiVersion: v1
kind: PersistentVolume
metadata:
name: efs-pv
spec:
capacity:
storage: 5Gi
volumeMode: Filesystem
accessModes:
- ReadWriteMany
storageClassName: efs-sc
persistentVolumeReclaimPolicy: Retain
csi:
driver: efs.csi.aws.com
volumeHandle: fs-e8a95a42
---
apiVersion: v1
kind: PersistentVolumeClaim
metadata:
name: efs-claim
spec:
accessModes:
- ReadWriteMany
storageClassName: efs-sc
resources:
requests:
storage: 5Gi
Tip You can choose any storage class that supports ReadWriteMany access mode only.
- Patch the existing DQ Web and Agent StatefulSets with an additional Volume Mount, as shown in the following example:Copy
    spec:
      volumes:
        - name: owldq-ext-jdbc-jars
          persistentVolumeClaim:
            claimName: efs-claim
    ...
    ...
      containers:
        - volumeMounts:
            - name: owldq-ext-jdbc-jars
mountPath: /opt/owl/drivers/ext - From the Connections page, click Add on the Generic JDBC Connection tile.
The New JDBC Conection modal appears. - Enter the required information.
- Click the folder icon in the Driver Location option.
The Add Driver modal appears. - Click Choose File and select the JAR file to upload.
- Enter a one-word directory name to store the driver, for example, ext.
- Select
/opt/owl/drivers/extunder Driver Directories to upload your driver to that location, as shown in the image below. - Click Upload.
A success message appears when your driver is successfully added.Note
Uploads from DQ Web only work if the PVC's storageclass supports the fsGroup security context of Kubernetes. If the fsGroup security context is not supported, create a temporary dummy pod running as a root user with the PVC mounted, and copy the required JDBC jars to the mount location with 544 permissions. - Go to the Remote Agent section of the Admin Console and click the pencil icon to edit your agent.
The Edit Agent modal appears. - Add the following properties to the Free Form (Appended) option, as shown in the following example:Copy
-conf spark.kubernetes.driver.podTemplateFile=local:///opt/owl/config/k8s-driver-template.yml,spark.kubernetes.executor.podTemplateFile=local:///opt/owl/config/k8s-executor-template.yml,spark.kubernetes.executor.volumes.persistentVolumeClaim.efs-pv.options.claimName=efs-claim,spark.kubernetes.executor.volumes.persistentVolumeClaim.efs-pv.options.sizeLimit=10Gi,spark.kubernetes.executor.volumes.persistentVolumeClaim.efs-pv.mount.path=/opt/owl/drivers/ext,spark.kubernetes.executor.volumes.persistentVolumeClaim.efs-pv.mount.readOnly=false,spark.kubernetes.driver.volumes.persistentVolumeClaim.efs-pv.options.claimName=efs-claim,spark.kubernetes.driver.volumes.persistentVolumeClaim.efs-pv.options.sizeLimit=10Gi,spark.kubernetes.driver.volumes.persistentVolumeClaim.efs-pv.mount.path=/opt/owl/drivers/ext,spark.kubernetes.driver.volumes.persistentVolumeClaim.efs-pv.mount.readOnly=falseNote
The pod templates induce security context to the Spark driver and executor pods, which allows you to mount the PVC dynamically. You can also download the template file and host it in your own public space. - Click Save.
- Go to the Connections page to start using your new custom JDBC data source driver.