Issue Management workflow tasks
This topic contains information about the various tasks in the Issue Management workflow. The workflow may have a different name if your Collibra Platform administrator renamed it.
Accept or reject a data issue
When the Issue Management workflow begins, tasks are assigned to the users that are defined in the workflow. By default, these are the issue stewards. The workflow task needs to be completed before a predefined deadline. Otherwise, the issue is escalated to the issue manager who will set a reviewer manually.
The stewards can accept or reject an issue. When one of the stewards accepts the issue, the status becomes Under Review. Only when all stewards reject an issue, the issue is marked as Invalid and the requester is notified.
Click the task row to select it. You can accept or reject the task from the sidebar.

If you click the name of the task or the related resource, the issue page opens.
If you accept the issue, the workflow automatically advances to the next step. You can also access the issues via Data Helpdesk → Issues and apply a filter to find the issues that require an action from you.
Analyze and propose a solution
When the status of a task is Under Review, you can perform the following actions.
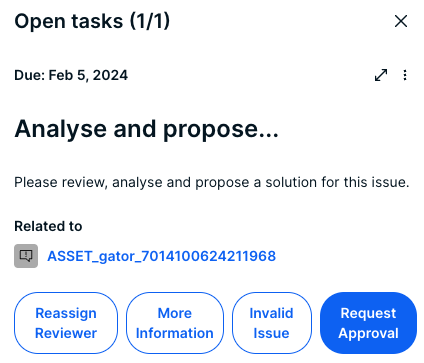
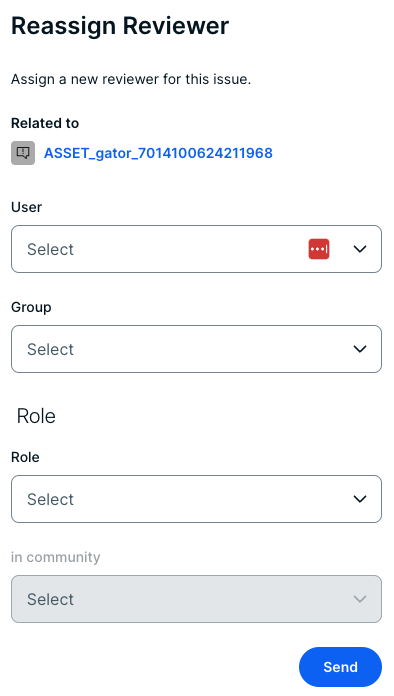
- Reassign Reviewer: Choose this action if you find that another user is more suited to analyze the issue. The status of the task becomes Reassign Reviewer. Click Submit to assign a new user, role, or group as the new reviewer for the issue.
- More Information: Choose this action if you need more information from the issue requester. The status of the issue becomes Pending. This action creates a task for the requester to provide more information about the issue. When the requester has completed this task, the workflow returns to you with a task with the same four options.
- Invalid Issue: Choose this action to mark the issue as Invalid. The requester is notified and the Issue Management workflow ends. Note that this is an irreversible action.
- Request Approval: Choose this action to request an approval for your analysis and solution proposal. You can click this action only when you have provided a detailed analysis of the issue in the issue's Analysis attribute. In the Resolution attribute, you can propose a solution to the issue. When you request an approval, the contents of the Analysis and Resolution attributes can be evaluated and approved. The issue is marked as Submitted for approval.
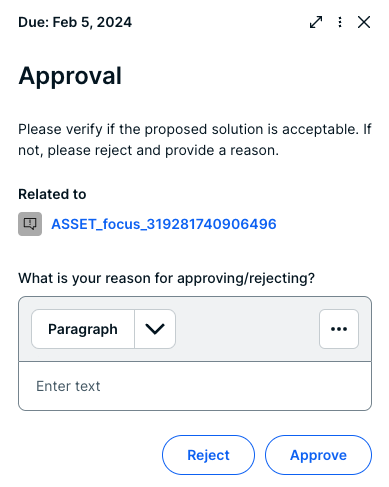
Approve or reject a solution
Each stakeholder assigned to the issue is requested to accept or reject the analysis and solution proposed by the reviewer. All the stakeholders need to accept. Otherwise, the solution isn't approved. If any one of the stakeholders rejects the solution, the workflow creates a new task for the reviewer to update the analysis and solution, considering the comments given by the stakeholder who rejected the proposed solution. If approved, the issue is marked as Accepted.
- In the sidebar, enter a reason for your action.
- Click Reject or Approve.
If all of the stakeholders approve the solution, the status of the issue becomes Approved. If the last stakeholder is a reviewer, the user can immediately appoint an assignee to solve the issue, or close the issue if no further action is required.
Appoint an assignee or resolve the issue
When all the stakeholders have accepted the proposed solution, it doesn't necessarily mean that the issue is resolved. It is possible that the solution still needs to be implemented.
When the solution is approved, the reviewer can decide to appoint an assignee who can implement the actual solution to resolve the issue, or mark the issue as resolved if there is no need for a specific implementation.
After appointing an assignee, the issue is marked as In Progress. You can appoint an assignee in the following ways:
- In the User field, enter a list of users.
- In the Group field, add groups.
- In the Role field, specify a role that the selected user needs to have on the current issue. If you also enter the in community field, all the users with the specified role for the given community become the assignee of the issue.
Depending on the configuration of the Issue Management workflow, a user might be proposed in the User field.

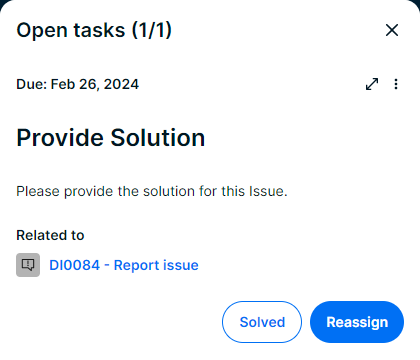
Provide a solution
The assignee resolves an issue and provides an implementation.
- The assignee can reassign the task to someone else if that user is more suited to perform the task. When reassigning the task, a similar form is presented as described in the earlier step where the new assignee can be appointed.
- The assignee can also mark the issue as Solved. This ends the task and the workflow asks the reviewer to check if the solution matches the expectations. In this case, the issue is marked as Resolution Pending.
This task needs to be completed within a predefined period. Otherwise, the workflow returns to the previous step and presents a new task to the reviewer to appoint a new assignee to perform the task.
Instead of resolving the issue by implementing the proposed solution, it is possible that the issue can be resolved by linking it to a governance asset, for example, by forcing all assets to comply with a business rule so that the problem described in the issue can't happen again.
To resolve an issue with a related asset, you need right permissions in the community as an assignee. You can link the issue with a governance asset as follows:
- On the issue page, click Characteristic.
- On the Relations tab, select the Resolved by relation.
- In the dialog box, enter the resolving governance assets.
- Optionally, set a start date and an end date.
- Click Save.
The relation appears in the resolved by Governance Asset table on the issue page. - To mark the issue as resolved, click Solved.
Review the solution
The reviewer reviews the provided solution.
- Click Accept to accept the solution and mark the issue as Resolved. This notifies the requester and ends the Issue Management workflow. If there are multiple reviewers, only one of them needs to accept the solution.
- Click Reject to reject the solution and mark the issue as Under review. The workflow returns to the Analyze and propose a solution step.
- Click View relevant changes to view the history of the issue. You can open the task in
 full screen to have a better view of the relevant changes.
- Click
 More → Reassign to assign the review step to another user.