The lineage harvester (deprecated) uses Azure APIs to get the information necessary to build technical lineage from Azure Data Factory. This topic guides you through the required tasks for registering Azure Data Factory in the Azure Portal and assigning the necessary permissions and access.
Warning Because the tasks covered in this topic are performed outside of Collibra, it is possible that the content changes without us knowing. We strongly recommend that you carefully read the source documentation.
Topics in this section
- Required values for your Azure Data Factory configuration file
- Register your Azure Data Factory instance in the Azure Portal
- Assign the API permissions
- Create an authentication secret
- Create an Azure Active Directory group and add your Azure Data Factory instance
- Add your Azure Data Factory instance to a resource group
- Retrieve the subscription ID of the resource group
- Assign read-only permissions to the resource group
Required values for your Azure Data Factory configuration file
The tasks in this topic help you to identify the values you will need when you are preparing the lineage harvester (deprecated) configuration file for Azure Data Factory. You need the correct values for the properties shown in the following table.
Important If you want to create a technical lineage for more than one Azure Data Factory instance, you need this information for each instance.
| Properties | Description |
|---|---|
| tenantDomain |
The directory ID of your Azure Data Factory instance. To get the directory ID, go to Register your Azure Data Factory instance in the Azure Portal. |
| applicationId |
The application ID of your Azure Data Factory instance. Specifically, this is the associated service principal for Azure Data Factory, not the enterprise application ID. To get the application ID, go to Register your Azure Data Factory instance in the Azure Portal. |
| resourceGroupName |
The name of a resource group with the Reader role for the Azure Data Factory instance. To get the resource group name, go to Add your Azure Data Factory instance to a resource group. |
| subscriptionId |
The subscription ID of the resource group. To get the subscription ID, go to Retrieve the subscription ID of the resource group. |
| password |
The secret value for the application ID. To get the service principal secret, go to Create an authentication secret. |
Register your Azure Data Factory instance in the Azure Portal
Follow the Microsoft Azure instructions on how to register an application and refer to the following table for help with the various settings:
| Setting | Description |
|---|---|
| Name | The name of your Azure Data Factory instance. |
| Supported account types |
The type of tenant. This indicates who can access the Azure Data Factory instance. Select Single tenant. |
| Redirect URI |
The location to which a user's client is redirected and where security tokens are sent after successful authorization. In this case, the redirect URI must be of the type Web. Leave this field empty. You don't have to specify a web location. |
The Azure Portal creates:
- The Application ID. Use this ID as the value for the
applicationIdproperty in the lineage harvester (deprecated) configuration file. - The Directory ID. Use this ID as the value for the
tenantDomainproperty in the lineage harvester (deprecated) configuration file.
Assign the API permissions
-
In the Azure Portal, click the Authentication pane, and then:
- Click the Advanced settings section.
- For the Allow public client flows option, click Yes.
- Click the API permissions pane, and then:
- For the permission type, click Delegated permissions.
- Assign the Azure Data Factory instance in Microsoft Azure the Microsoft Graph User.Read permission.
The user now has the following permissions:
- Microsoft Graph
- User.Read
Create an authentication secret
- In the sidebar navigation, in the Manage section, click Certificates and secrets.
-
Ciick New client secret. Note that certificates are not supported.
- Enter a description.
- Use the date picker to specify an expiration date for the authentication secret.
- Click Add.
An authentication secret is shown. The authentication secret is the value you will use when prompted for the password to connect to Azure Data Factory.Important Make note of the authentication secret. For security purposes, It will not be available later. If you lose the authentication secret, you will need to create a new one.
Create an Azure Active Directory group and add your Azure Data Factory instance
- Go to the Group Management page for your Azure Data Factory instance.
-
Follow the Microsoft Azure instructions on how to Create and manage an Azure Active Directory (AD) Group, and refer to the following table for help with the various settings:
Setting Description Group Name The name of the new Azure AD group that you are creating.
Group Type The type of the Azure AD group.
Select Security.
Service Principal The identity an application uses to access Azure resources and APIs.
Enter the Application ID that was generated when you registered Azure Data Factory in the Azure Portal.
Add your Azure Data Factory instance to a resource group
Your Azure Data Factory instance should already be part of a resource group. If it is, you can skip this step. If it's not, you need to create a resource group and add your Azure Data Factory instance to it.
The group name is the value you will use for the resourceGroupName property in your Azure Data Factory configuration file.
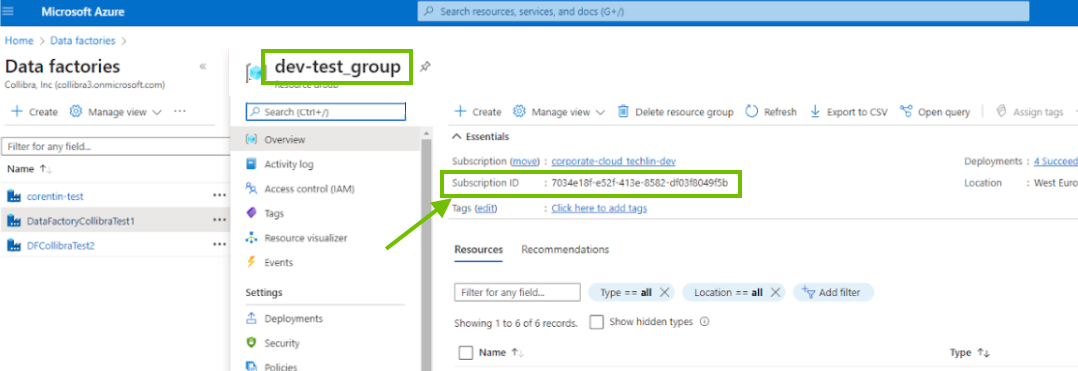
Tip The Data factories page shows all of your Azure Data Factory instances, including their subscriptions and resource groups. Check here to know if your instance is part of a resource group.
Retrieve the subscription ID of the resource group
On the Data factories page, click the resource group for the Azure Data Factory instance for which you want to create a technical lineage, and make note of the subscription ID.
The subscription ID is the value you will use for the subscriptionId property, in your Azure Data Factory configuration file.

Assign read-only permissions to the resource group
To gather the information needed for technical lineage, the resource group needs permission to read the APIs.
-
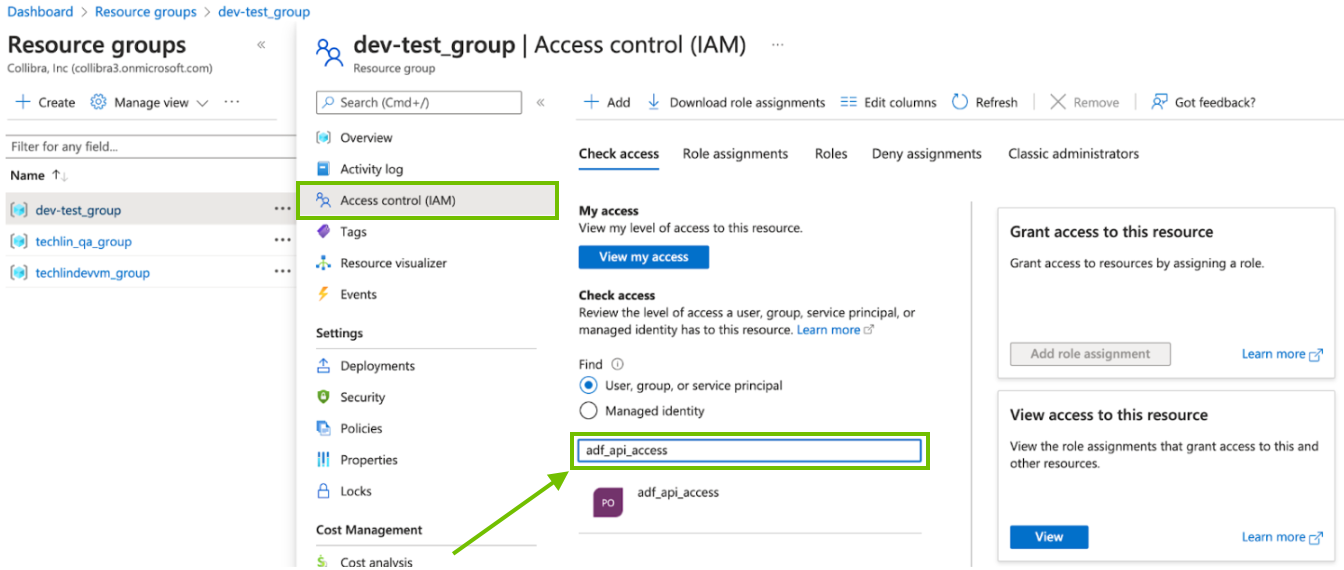
Check to see which permissions the resource group has.
- On the Resource groups page, click Access control (IAM).
-
In the Check access search box, type the name of the AD group.

- In the search results, click on the AD group to see the access assignments.

- If your resource group does not have the Reader role, click X in the upper-right corner, to close the Access assignments page.
The Access control (IAM) page again appears. - Click the Role assignments tab.

- Click Add > Add role assignment and follow the Microsoft Azure instructions on how to add a role assignment. Refer to the following table for help with the various settings:
Setting Description Roles The role assignment for the resource group.
Select Reader.
The lineage harvester (deprecated) only needs read access.
Members Ensure that the User, group, or service principal radio button is selected.
Search for and select the AD group.
Conditions No conditions are necessary. Click Next. Review + assign Click Review +assign, to assign the Reader role to the resource group. After a few moments, the read-only permission is assigned to the resource group.
If your resource group already has the Reader role, as shown in the previous image, this task is complete.